Blog Archives

Reserve Form Actions

WP Inventory Reserve Form Actions

WP Inventory reserve form actions can really help you to build your brand and customize your presentation.  Another possibility is to add messages to the checkout page.  Options are seemingly endless.  Below and in the right hand side navigation; are links to various different action hooks with example code.

wpim_reserve_sent – This hook allows you to get information about an item that was reserved after the email is sent to the admin.  If Reserve Cart is installed and active, it runs for each item in the cart. This is run after error checking.  Only run if decrease quantity setting on reserve is set to true.

wpim_save_reserve – This hook runs after each item on reserve when it is being saved.  This is run after error checking.

reserve_confirmation – This hook runs at the time the email is being sent to the reserver.  Must have send email confirmation to customer set to on.

wpim_reserve_confirmation_sent – This hook fires after the reserve_confirmation hook.


wpim_reserve_sent

This action allows you to get four pieces of data in order to do something different with it after the reserve email has been sent.  This does not modify the info sent to the user, it is just available if you want to add it to another table in your database, send it to another person (like an admin of your site), etc.


function my_custom_function($inventory_id, $data, $subject, $message) {
$inventory_id; // Id of the inventory item that was just reserved
$data; // The array of information from the reserve form (not the cart data)
$subject; // Subject of the email
$message; // Message of the email

// Get the item information

$item_info = new WPIMItem(); // Get new instance of the item class
$item_info = $item_info->get( $inventory_id ); // use the get method with the inventory id to get item information

$name = $item_info->inventory_name;  // Example to fetch the item name

// Do whatever you want from here!

}

add_action('wpim_reserve_sent', 'my_custom_function', 10, 4); 

Front End Item Entry: Advanced Inventory Manager

Adding Items via Front End with Advanced Inventory Manager

This documentation requires the following plugins:

  1. Gravity Forms – Single handedly the best form plugin for WordPress.
  2. Gravity Forms WPDB Connect – This plugin adds a “feed” to your gravity forms.  You can map your form fields to the database and the columns within the database at the time of the form submission.  This is what is going to put all of the inventory item information into the various WP Inventory Manager tables.
  3. Gravity Form Perks – This is an add on comprised of many add ons that enhances Gravity Forms.  It is necessary to run the following plugin “Unique ID”.
  4. Gravity Forms Unique ID – This “perk” (add on) is a field that you can use in any form to make a unique number.

Note: It is highly recommended that you read the documentation for adding an item without AIM first.  It will be assumed that you understand the fundamentals of that in order to setup the feed using Advanced Inventory Manager.  We will be building onto that documentation in the steps below.

You should have already had the Gravity Forms and Gravity Forms WPDB Connect plugins installed from the basic setup.  Now, to be able to enter items with AIM installed, we have to incorporate the other two:  Perks and Unique ID.

1.  Step One

Now that you have installed the Perks and Unique ID add ons you will see a new field in the “Advanced Fields” section within your form called “Unique ID”
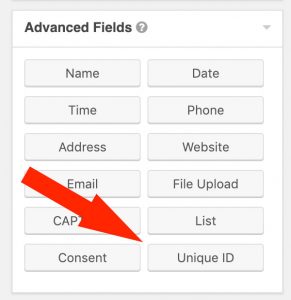
This field is the field we are going to use to make our inventory_id field.  In the regular setup, you will recall this graphic of all of the regular item columns in the database:
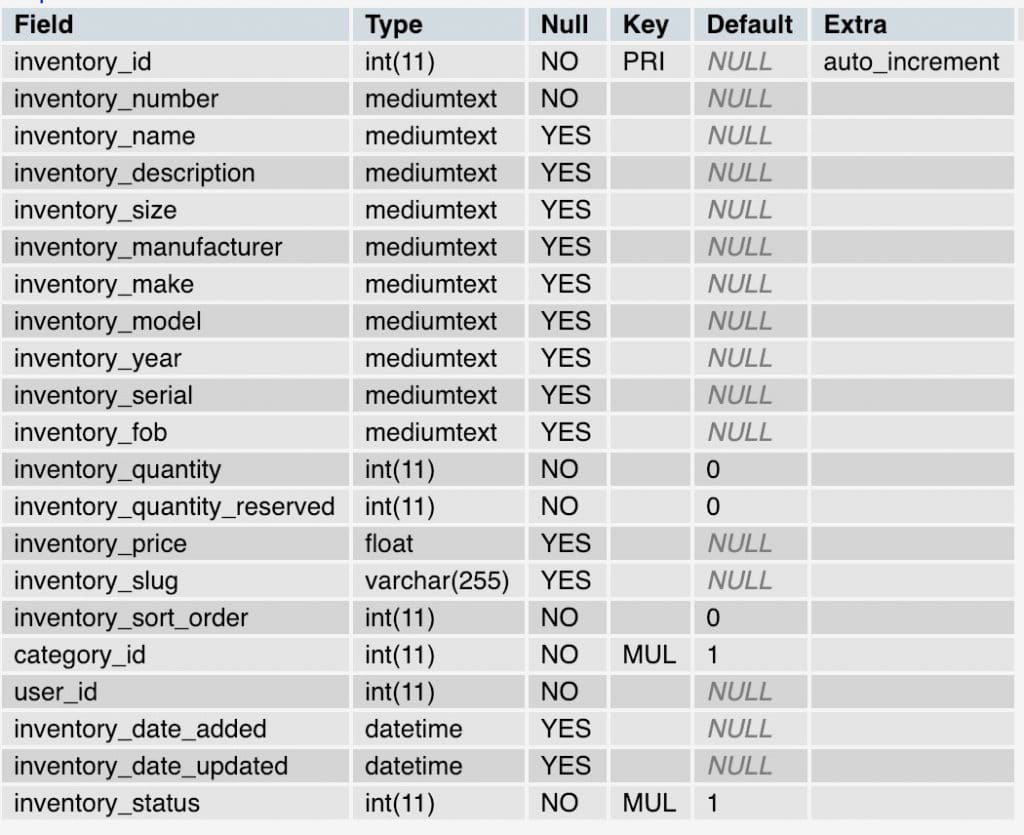
Before, we did not need to set the inventory_id field because the database would auto increment it for us.  However, with AIM installed, we must set it because we also have to write the record with the inventory_id to the wpinventory_aim_inventory_to_type table as well as the wpinventory_aim_inventory_field_value table.  We have to make sure they match identically otherwise the database will not associate the record and it won’t work.  So, we click on the “Unique ID” field from our Advanced Fields list in our form and put it in our form.
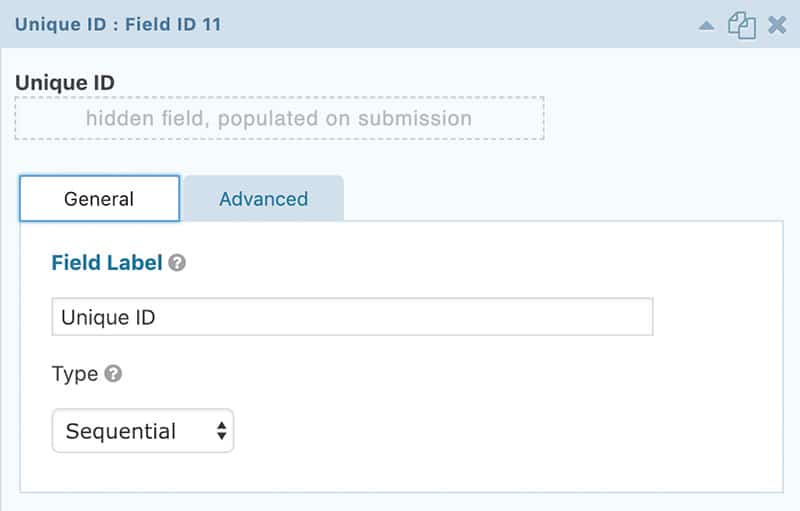
You want to select the “Sequential” option as the type.  Then, hit the “Advanced” tab:
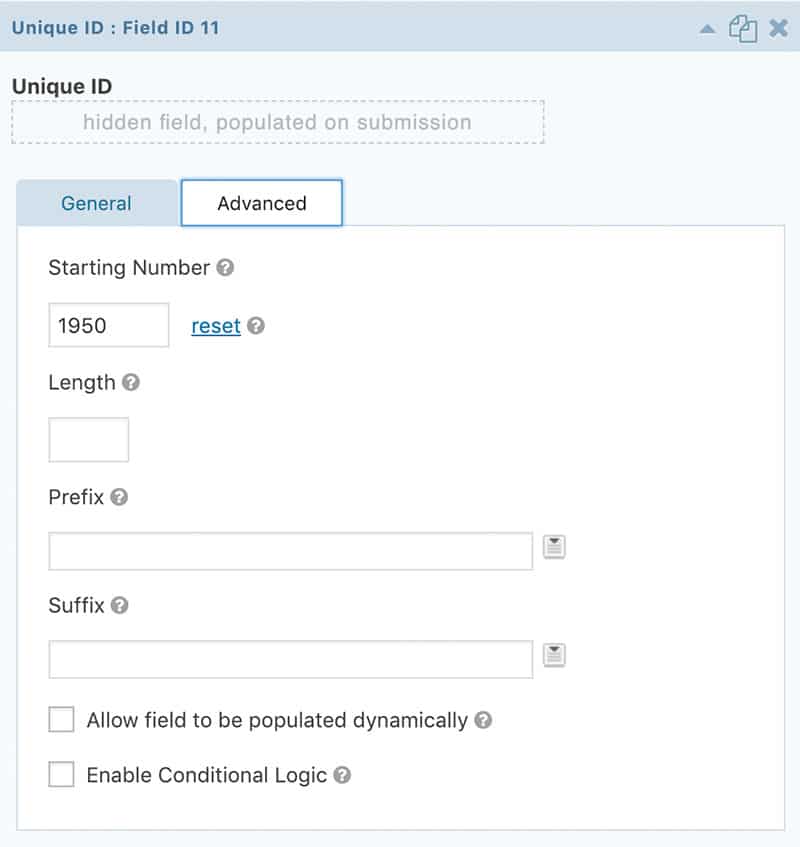
Here is an important setting, “Starting Number”.  You want to set that higher than the amount of products you have in your inventory database right now.  So, if you have 10,000 items in your database, you want to set it higher than that.  I recommend some cushion, so 10,100 would be just fine.  You see here in the screen shot that we set ours to 1950.  That is because we had 1900 items about in the system.  What this is going to do is start the inventory at this new, higher number.  We have to define it so the system is not going to interfere with any existing records.  If no records exist, then set it to something like 10.

2.  Step Two

At this point it is assumed that you have setup your Unique ID with proper starting number and you have built out your Gravity Form with all of the fields you want to collect.  It is time to get all of our information together so we can begin mapping the fields and setting up our feeds.  But first lets take a look at the two other database tables we will need to understand:

wpinventory_aim_inventory_to_type
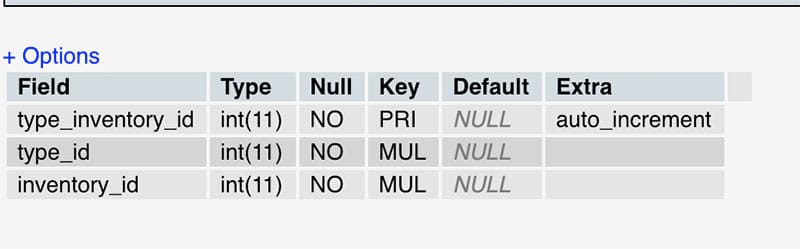
This is just a relational database table we need to feed values to so it can correctly associate the records.

wpinventory_aim_inventory_field_value
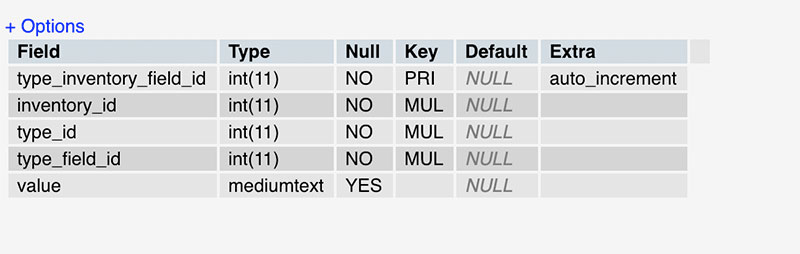
This table holds the values of your custom AIM fields.  So if you make a text field, a dropdown select field, or a textarea; this is where it is going to go.

3.  Step Three

Now we can start to setup all of our feeds from our form.  Our form must contain the following:

  • Inventory Id – This field is hidden and is the “Unique ID” field mentioned above.  It will be mapped to the inventory_id columns in the database tables. (hidden field)
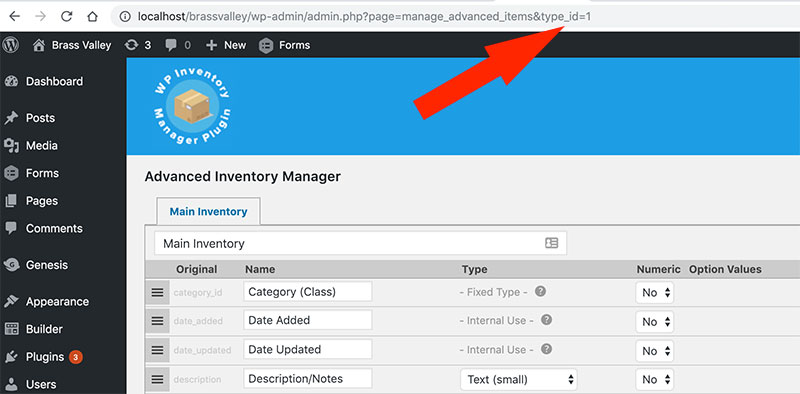
  • Type ID – This hidden field is the AIM type ID.  You find this ID by clicking a type tab to manage in the dashboard and the ‘type_id’ will be a parameter in the URL (see below steps with screen shot).  This field is mapped to the ‘type_id’ columns in the database tables. (hidden field)
  • Type Field ID – The ID of any particular field in an inventory type. (hidden field)
  • Value – This will be the value of the saved custom type field.  You will need to have a hidden field pair between this field and the hidden “Type Field ID”.  The type field id will be the id of the type field we get below so we can store it in the table.  The visible field you make for the user to fill in is the field you map to the ‘value’ column in the wpinventory_aim_inventory_field_value table.

So let’s get started!

A.  How to get the Inventory ID

Getting the inventory ID is the “Unique ID” field that we have because we loaded the necessary plugins at the beginning of this exercise.  We set it to a number greater than the current inventory rows in the DB.  This is setup in the Gravity Form itself.

B.  How to get the Type ID

This is a bit tricker, but not very difficult.  To get this, you simply visit the “Advanced Management” tab in your WP Inventory menu of your dashboard.  There, you will have a tabbed display of all of your inventory types.  Click one of the tabs.  After you click a tab, you will see the ‘type_id’ parameter in the URL like so:
C.  How do I get the Type Field ID

This is the trickiest of all and requires you to open your developer console in your browser.  We are going to look at a custom field we made called “Part Number”:
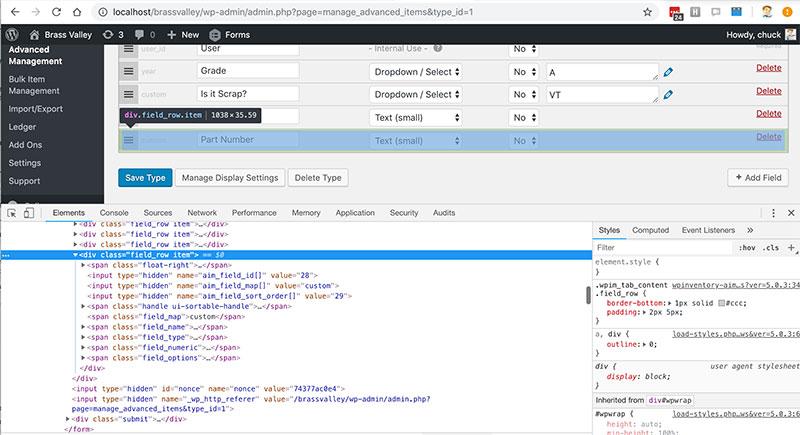
Zoomed in on the input:
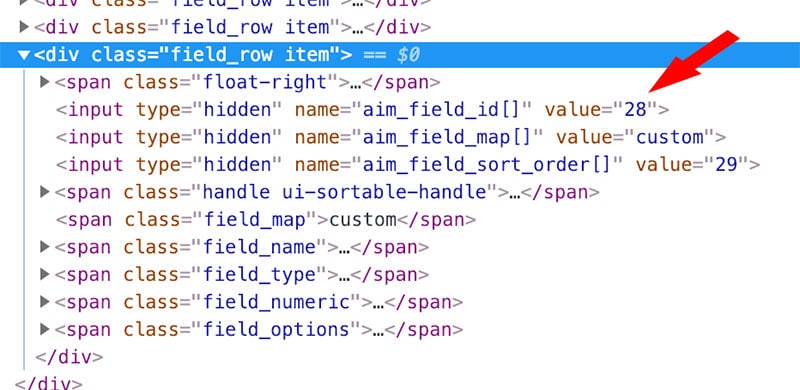
Here we can see that this particular field (Part Number) has a custom field ID of 28.  You can find all of your field IDs in this fashion.

D.  How do I get the value

This one is easy.  It is any field you want to map from your form.  So, you just make a visible field for “Part Number”.  Then, we will map that to the ‘value’ field in the following step.

4.  Step Four

Now we setup our feeds.  There will be at least three (3) for sure, but could be more (depending on how many custom fields).  The first feed we setup is to make the item in the regular wpinventory_item table.

Table Feed:  wpinventory_item

It will be exactly the same as we did in the documentation for the regular core feed:
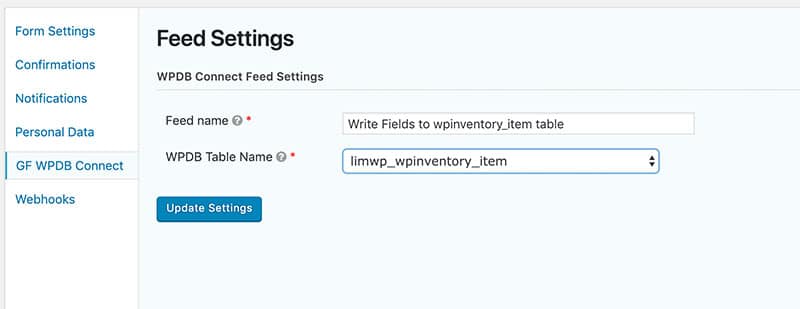
Note: Remember that ‘limwp_’ is just a table prefix.  Yours will be different.  But the table name is ‘wpinventory_item’

Now this time when we map our fields, at the bottom of the page, we are going to select the “Primary Key” as our “Unique ID” field we made (in the regular setup without AIM we did not have to set this):
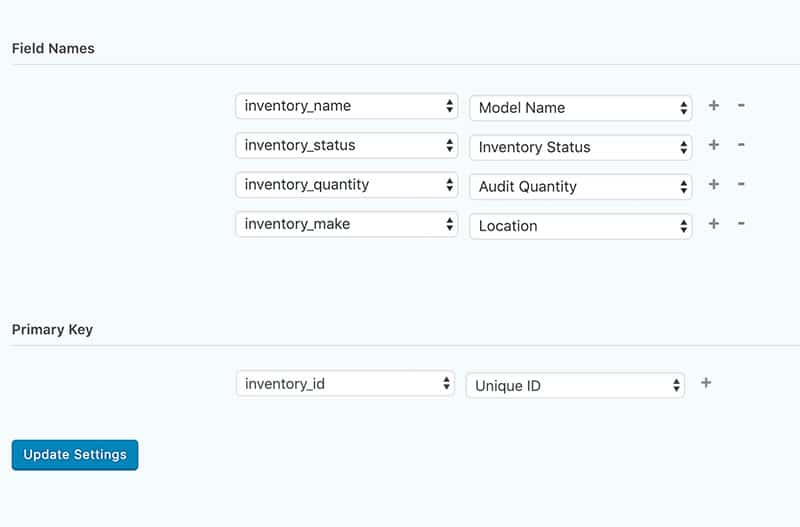
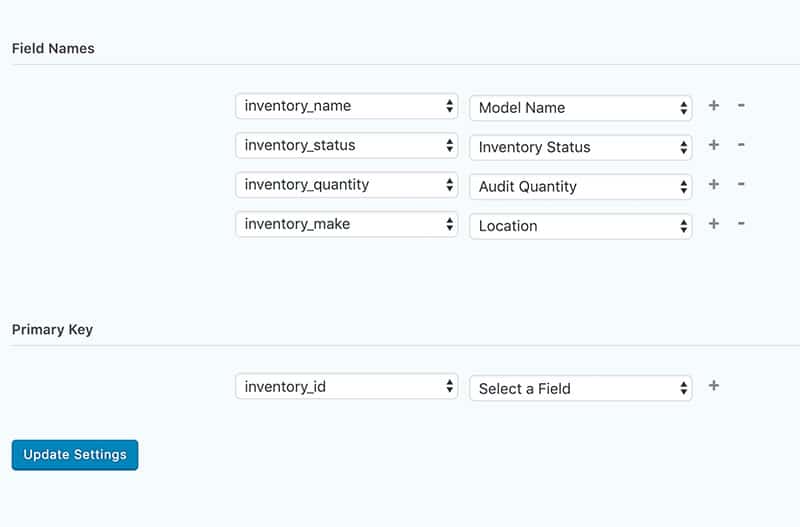
Note: We re-purposed the ‘inventory_make’ field and made it a “Location” field.  The left hand side is the fields in the datbase table, and the right hand side is the fields we are mapping from our Gravity Form.

Table Feed:  wpinventory_aim_inventory_to_type

For this table, we will need to know the type_id and the inventory_id which we showed above how to obtain.  Remember, the inventory_id is always the “Unique ID” field we setup.  So we already have that.  In our Gravity Form select a “Number” field from your fields list.  Make this field hidden and give it the value of your type ID.  This was the ‘type_id’ parameter in the URL from the step above.  In the screen shot that type_id was qual to 1.  So, we will set the value to equal 1:
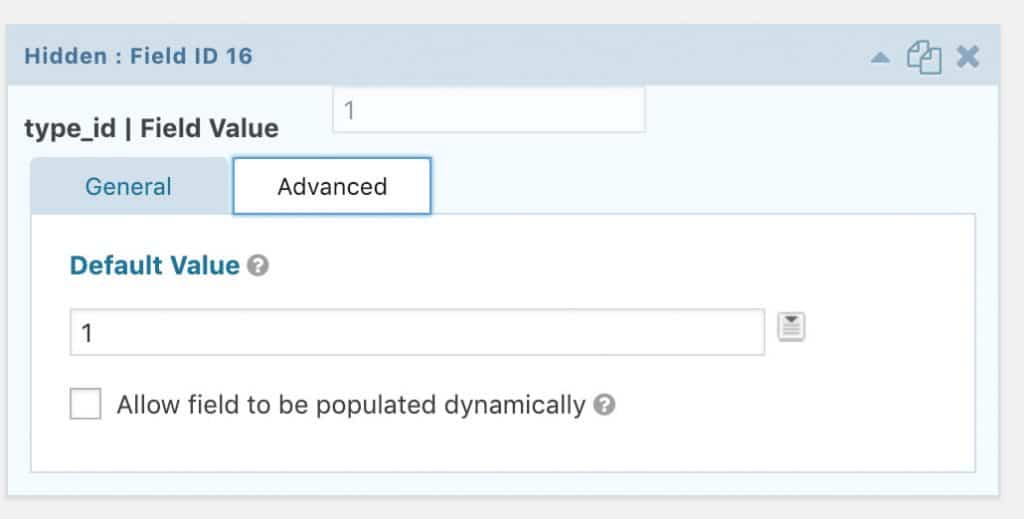
As you see, we set a value of 1 for this hidden field.  The value of the type_id.  So with these two pieces of information, we are now ready to setup our feed to the wpinventory_aim_inventory_to_type table:
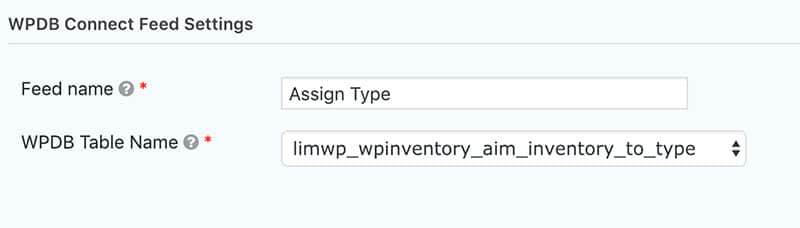
And we map the fields to the table like so:
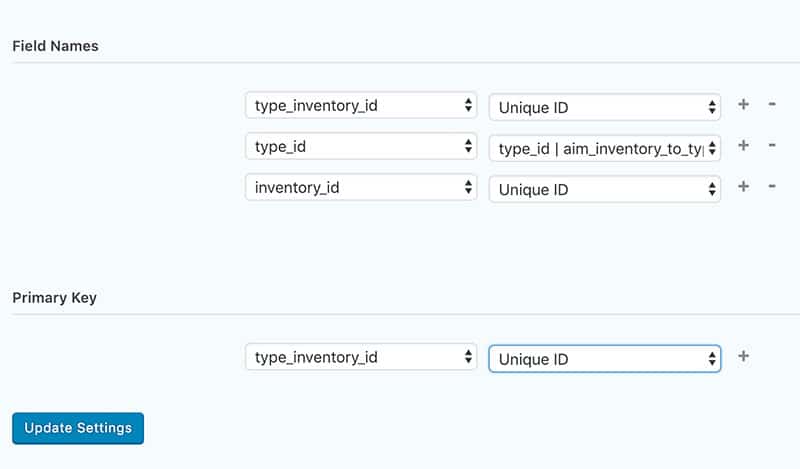
Notice that we use the “Unique ID” in three different spots.  The first column we map to is the type_inventory_id.  The second column we map to is our type_id column and we map that to the hidden field we created above setting that specific type_id.  Which was equal to 1.  The third column is the inventory_id and again, this is our “Unique ID” field.  Lastly, at the bottom, is the “Primary Key” settings.  We want to set that to our “Unique ID” field as well.

Table Feed:  wpinventory_aim_inventory_field_value

Note: If you don’t have any custom fields to map, and are only mapping the core fields to the wpinventory_item table; then you can stop here.  You are done.  However, if you do have custom fields you created and want to save their values, please continue

This table will store the values of our custom fields.  For each custom field we need a pair of fields.  One hidden with the value of the ID of the custom field in AIM.  And one visible that is filled out on the form by the user that we map to the ‘value’ column.  We begin by adding these two fields.

In your form, select a “Number” field and make it hidden.  Set it’s default value equal to the custom field ID.  We showed how to get this above and it was equal to 28 for the field “Part Number” that we created.
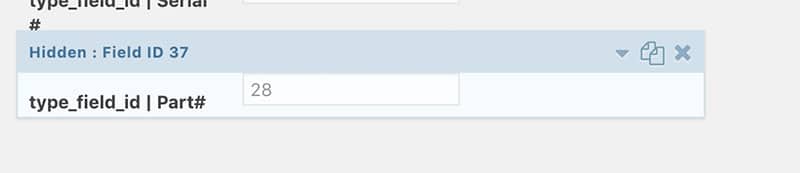
It is created the exact same way you did the type_id field in the previous feed above.  Just this time we make the field value 28, the ID of the custom field we created in AIM.  You also see that it is labeled so we can tell what it is for.  This says “type_field_id | Part #”.  So when we are in the form, we know what this hidden field represents – the field ID for part number.

Then you simply make the field for “Part Number” like so:
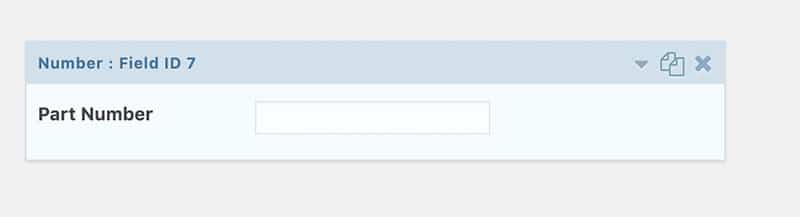
We will map this field to the ‘value’ column.  Let’s setup the feed!

Just like the other feeds above, we begin by creating a new feed and naming it and selecting which table we are going to write to.  This table is the wpinventory_aim_inventory_field_value
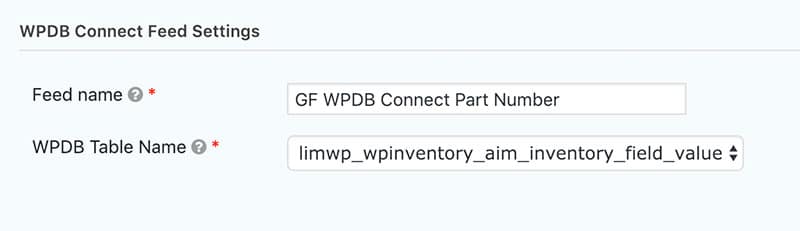
And we map the fields as follows:
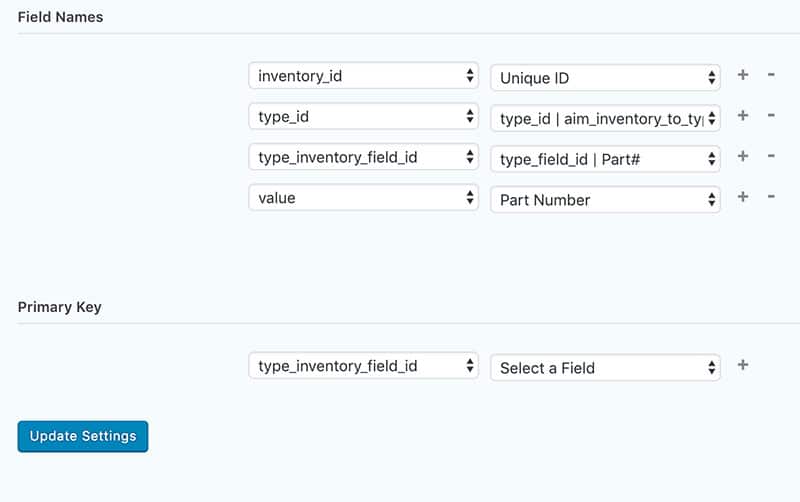
Once again, the inventory_id is always set to our “Unique ID” field we created.  So map it to that.  The ‘type_id’ is already in the form as a hidden field because we set that field up in the form already.  So, simply map it.  Now we map the inventory field ID which was the hidden field we just created with the value 28 (the ID of the custom field made in AIM).  That hidden field is mapped to the ‘type_inventory_field_id’ in the database table.  Then, lastly, is the ‘value’ column.  That is any field you want, but we made the “Part Number” field above.  So we map that field to the value in the table.

We do not need to map the “Primary Key” setting as the primary key in that table is the ‘type_inventory_field_id’ and it will auto-increment on it’s own.  No need to set it as it has no relational value in the database.

Note: If you have multiple different custom fields, you just repeat the process for adding feeds to the wpinventory_aim_inventory_field_value table.  You have to have two:  a hidden and visible.  You set the hidden to the field ID in AIM and visible one to whatever you want the user to fill out.  You repeat this process setting up an individual feed for each custom field you may have.


IMPORTANT:  As a last note, this entire process needs to be done per inventory type.  We covered one inventory type where type_id was equal to 1.  If you have multiple types of inventory, you just repeat this process using a different Gravity Form for each.  Then, in the steps above where you set your hidden field ‘type_id’ equal to 1, you would set that equal to the next type ID you were doing.  Then, setup all your feeds for that form using the process above.

Bottom line:  Every type of inventory setup in AIM would need it’s own form with type_id and it’s own feeds.

Front End Item Entry

Front end item entry using Gravity Forms

Our position at WP Inventory over the years has been to resist allowing front end inventory management because of security concerns.  It is our top priority to keep your data as safe as possible and to do that, we do everything behind the curtain of the /wp-admin/.  Now, that being said, we have a brilliant solution for those of you that are willing to accept the risk or have implemented a password protected page on your site, etc. to allow for item entry to the system.  This documentation covers the steps to achieve that using a few plugins.  So let’s get started!

To get started we will need to download the following plugins and then activate them in our website’s WordPress dashboard.

  1. Gravity Forms – Single-handedly the best form plugin for WordPress.
  2. Gravity Forms WPDB Connect – This plugin adds a “feed” to your gravity forms.  You can map your form fields to the database and the columns within the database at the time of the form submission.  This is what is going to put all of the inventory item information into the various WP Inventory Manager tables.
  3. Optionally use Restrict Content Pro – This will allow you to restrict the page(s) with the editing form to certain people depending on your needs (signed-in users, specific users, etc.).

All of the above plugins are necessary to proceed.  Once you have them, please keep reading.

Note: This will NOT work if you have Advanced Inventory Manager (AIM) installed.  If you have AIM installed, please follow the steps through this document. At the end, there will be a link for you to continue on for additional setup steps.

Core Only: Advanced Inventory Manager NOT installed.

1. Step One

Using only the standard WP Inventory Manager the process is very simple.  You just need to understand the database table a bit and then you are off to the races.


The above image shows the columns inside of the wpinventory_item table.  You will map your form fields to these columns.

2.  Step Two

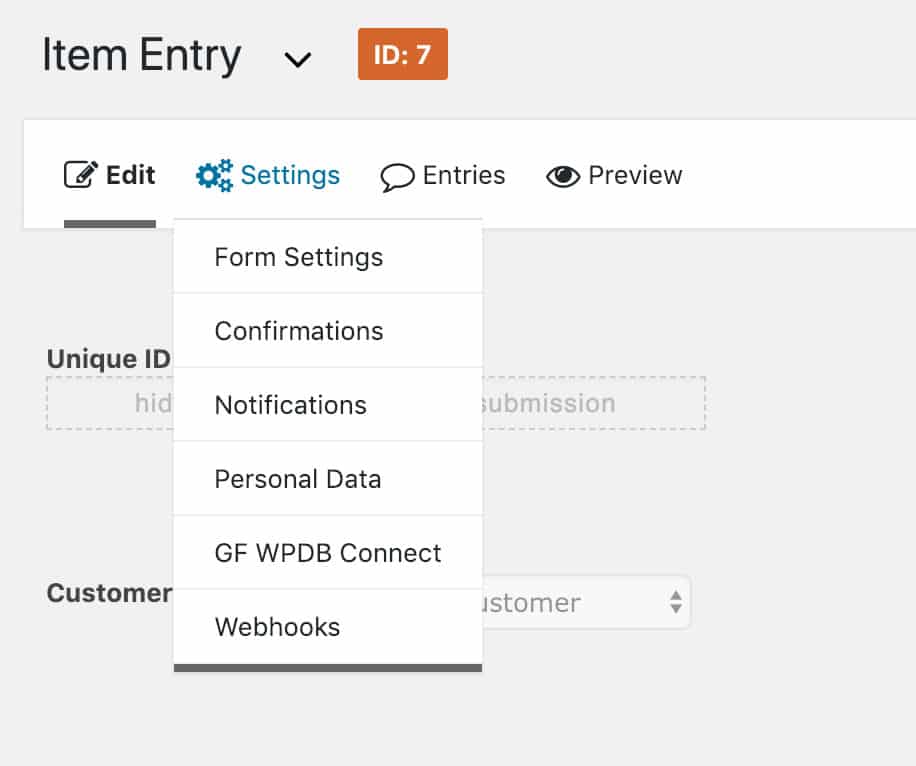
When you are inside of a form in the dashboard, at the top of the page, you will drop down the “Settings” tab:

You want to select the “GF WPDB Connect” option.  Once you have done so you end up on a page to setup your first feed.  At the top of the page, hit the “Add New” button.  You then have to provide two pieces of information:  name of the feed and what table it is modifying.

As you see above, we have given it a useful name to describe what the feed is doing.  The second field, the dropdown, is where we selected our wpinventory_item table.

Note: ‘limwp_’ is our table prefix.  Your’s will/can be different.  By default, the wordpress database prefix is ‘wp_’.

Hit update settings, and you wind up on the page to make your feed.

3.  Step Three

We are assuming at this point that you have made your fields in your form.  Everyone will have their own set of needs and therefore the fields will vary.  But usually you have an item name, make or model, and quantity.  The screenshot above that shows the database columns.  Those are the columns your form fields will map to.  We are going to target:  inventory_name, inventory_make, inventory_status, and inventory_quantity.  Again, you can do all or just a few, it is up to you.

Below you see that we have mapped our name, make, quantity, and status fields.

Note: The status field is default to 1 which is inactive.  If you want the item to be active right away, you must set it’s value to 2.  1 is inactive, 2 is active.  So, we have a number field that is a hidden field in our Gravity Form.  That field is “Inventory Status” and the value is set to 2.  Tip: If you want people to add items, but don’t want them to be automatically available on the front end; then keep the inventory_status at the default 1.  This will allow people to submit the item, and an administrator to review before marking it active.

The fields on the left are the database fields and the fields on the right are our fields in our Gravity Form.  You will see at the bottom is the “Primary Key” option.  You can leave this blank because it will write it automatically for you.  Hit the “Update Settings” button once you have mapped all of your fields.

That is it.  You can now visit your form on the front end of your website, fill it out, and hit submit.  You should now see another item in your WP Inventory Manager in the dashboard.

Note: If you have AIM installed, you need to continue now to the Add Inventory Items via Front End with Advanced Inventory Manager.

Filter Image Sizes

Filtering the images field sizes

If you would like to set the images size differently for the listing or display using some easy to use filters, here is how.  Copy and paste the below code into your function.php file:


add_filter( 'wpim_images_size', 'my_function', 10, 2 );

/**
* Return a custom size for images (vs image)
* @param string $size - original size from settings
* @param string $context - detail or listing
*
* @return string - should be thumbnail, medium, large, full
**/
function my_function( $size, $context ) {
if ( 'detail' == $context ) {
// this value is used for detail / single
return 'full';
}

// this value is used for listing
return 'large';
}

Filter Reserve Messages

Filtering WP Inventory Reserve Message

You can set custom success messages in your code for when a user makes a reservation.  There are  a couple:

 Just the core only (no reserve cart):

This will allow you to change the message that is displayed in the page.


add_filter( 'wpim_reserve_email_message', 'my_reserved_message_function');
function my_reserved_message_function( $message ) { 
$message = 'My new "Items Reserved" custom message.';
 
return $message; 
}

With Reserve Cart Add On

This will allow you to change the message displayed in the page.


add_filter('wpim_reserve_reserved_message', 'my_reserved_message_function');

function my_reserved_message_function( $message ) {
$message = 'My new "Items Reserved" custom message.';

return $message;
}

For the Widget

This will change the success message in the widget if you are using the widget in a sidebar on the page


add_filter('wpim_reserve_checkout_message', 'my_checkout_message_function');

function my_checkout_message_function( $message ) {
$message = 'Custom success message for the widget.';

return $message;
}


Hide Add to Cart for Certain User Roles

You can suppress the add to cart on both the listing and detail page in this fashion:

Listing Page:

In your theme’s functions.php file add the following code.  Where you see ‘customer’, ‘administrator’; you can add more like ‘, ‘subscriber’, ‘editor’, … etc.  That will suppress the button from any logged in user NOT assigned one of those roles.


add_filter('wpim_cart_hide_button_in_listing','wpim_button_by_role');
function wpim_button_by_role( $hide ) {
$current_user = new WP_User( get_current_user_id() );
$user_role = ( ! empty( $current_user->roles ) ) ? array_shift( $current_user->roles ) : NULL;

if ( ! $user_role || ! in_array( $user_role, array( 'customer', 'administrator' ) ) ) {
$hide = TRUE;
}

return $hide;
}


Detail Page:

The detail page can suppress the add to cart in one of the following two ways:

1.  Template Override: –  copy the reserve_cart/views/add-to-cart.php template to the theme’s wpinventory/views/add-to-cart.php folder, then at the top add:


$current_user = new WP_User( get_current_user_id() );
$user_role    = ( ! empty( $current_user->roles ) ) ? array_shift( $current_user->roles ) : NULL;

if ( ! $user_role || ! in_array( $user_role, array( 'customer', 'administrator' ) ) ) {
return;
}

2.  Filter:   Hook into this filter and add this function which leverages the already-existing function used to hide the button on the listing page under the “Listing Page” heading above  (this is the “recommended” way, but either will work).


add_filter( 'wpim_get_template_part_path_<wbr />reserve-form.php', 'wpim_hide_button_in_detail', 99999, 1 );

function wpim_hide_button_in_detail( $template ) {
if ( wpim_button_by_role( FALSE ) {
// return nothing, which will cause the system to NOT render the template.
return '';
}

return $template;
}

Extending Reserve Form

Extending the Reserve Form

1.  In order to accomplish this job you are going to first have to setup your own reserve-form.php file via the template override system.  This is important because if you ever do an update with us, your form will not get wiped out.  So, you will want to copy that from the plugins directory and then setup the override system as explained here:

Template Override System

2.  So, now that you have copied over the file to a location that looks like:

/wp-content/themes/your-theme-name/wpinventory/views/reserve-form.php

We can start to modify it.

3.  For this tutorial, we will setup a check for the logged in user’s ID.  You want to paste this block of code inside the reserve-form.php file above the submit button some place.  You can put it wherever you want, just make sure you insert it between areas of PHP:

<?php if ($display_user) {

// Use WordPress Built in functionality to find the logged in user

if (!is_user_logged_in()) {
$user = 'Unknown User';
} else {
$user = get_current_user_id();
}

$required = ($display_user == 2) ? ' required' : '';  ?>
<div class="user"<?php echo $required; ?> style="display: none;">
<label><?php echo $user_label; ?><?php if ($required) { echo '<span class="req">*</span>'; } ?></label>
<input type="hidden" name="wpinventory_reserve_user" value="<?php echo $user; ?>"<?php echo $required; ?> />
</div>
<?php } ?>

Please notice the inline style that is “display: none;”.  You can do this to hide this block from the form.  It is an input we are going to take automatically without the user filling out anything at all.  And, to that point, the input is also type=”hidden”.  If the user is not logged in, it assigns the value “Unknown User”.  You can get creative and do your own checks for different conditions, etc., but for this tutorial we have done a basic one for a default value.

4.  Now, you need to go to your functions.php file located in your theme directory.  Then copy the following into it:
add_action('wpim_reserve_config', 'my_reserve_form_customizations');
function my_reserve_form_customizations($args)
{
$args = wpinventory_reserve_add_field($args, 'user', 'optional', 'User ID', 'wpinventory_reserve_name');

return $args;
}

What this is doing is passing the information along to the processor once the form field you just added in step three above has been added.  You need the add_action and you need the function.  What this function does is accepts five arguments:

4.1 –

$args

– you always have to have this and never need to change it.  It is always

$args

4.2 –  The next one is the name of the input.  Ours is ‘user’

4.3 –  The next one is if it is optional or required.  I have elected to make it optional.

4.4  –  The next one is the label.  The text that will sit next to the input on the form.  It is also the text that will be passed in the confirmation email.

4.5 –  The last one is the position in the form.  When you want to put the field in a certain position you need to know the name value of the field before it.  Passing this to the fifth parameter of this function will tell it to put the new field directly above the one you gave it the name for.

5.  To setup another field, you would just repeat the process by adding a new line like this:

$args = wpinventory_reserve_add_field($args, 'user', 'optional', 'User ID', 'wpinventory_reserve_name');
$args = wpinventory_reserve_add_field($args, 'project', 'required', 'Project', 'wpinventory_reserve_user');

So in this example, we added another field right under the ‘user’ called ‘project’ and gave it a label of “Project” and we want it to be required.  We then have to go back over to the reserve form, and again add that field:

<?php if ($display_project) {
$required = ($display_project == 2) ? ' required' : '';  ?>
<div class="state"<?php echo $required; ?>>
<label><?php echo $project_label; ?><?php if ($required) { echo '<span class="req">*</span>'; } ?></label>
<input type="text" name="wpinventory_reserve_project" value="<?php echo $project; ?>"<?php echo $required; ?> />
</div>
<?php } ?>

6.  You can now navigate to your form and fill it out and submit it.  You will receive an email that will have these details in it for you as well as whatever normal settings you have set through the dashboard.

Using the logic of this tutorial, you can put any field types you want in the reserve form.  Such as checkboxes, radio buttons, textarea, etc.

Filter the Sort Options

Customizing The WP Inventory Manager Filter Options

The WP Inventory Manager filter can be extended to meet your exact needs

This filter is used to display the items that are available to “sort by” in the filter drop down of the inventory pages:

wpim_filter_sort_by_options()

However, you may find that simply turning off labels that you do not want to use in the dashboard does not get rid of all of them.  An example being the “date added”.  For these fields, you need to unset them using a bit of code in your functions.php.

So for example:

add_filter('wpim_filter_sort_by_options', 'custom_sort_options');

function custom_sort_options( $fields ) {
    // list the fields in the order desired.  Be sure the field name is accurate!

    $my_fields = array(
        // name of field     => Displayed Label
        'inventory_name'   => 'Product',
        'inventory_make'   => 'Output Voltage(s)',
        'inventory_serial'   => 'Wattage',
        'inventory_size'   => 'Dimension',
        'inventory_manufacturer' => 'Industry'
        // ... etc
    );

    // Change to FALSE or remove it completely if you ONLY want to include the fields listed above
    $include_all_fields = FALSE;

    if ( ! empty($include_all_fields)) {
        foreach ( $my_fields AS $key => $field ) {
            unset( $fields[ $key ] );
        }

        $my_fields = array_merge( $my_fields, $fields );
    }

    return $my_fields;
}

Would only render the filter options:

  • inventory_name
  • inventory_make
  • inventory_serial
  • inventory_size
  • inventory_manufacturer

Here is a complete list of all the sort order, available keys:

inventory_date_added
inventory_date_updated
inventory_description
category_id
inventory_fob
inventory_image
inventory_images
inventory_manufacturer
inventory_media
inventory_name
inventory_number
inventory_price
inventory_quantity
inventory_quantity_reserved
inventory_serial
inventory_size
inventory_slug
inventory_sort_order
inventory_status
user_id
inventory_year
inventory_make
inventory_model

Understanding the Different Templates

Available Files Used in the Template Override Systems

Inside of the WP Inventory Manager plugin views folder, you will see a wide variety of files. Below are the general descriptions of each file, so you know which file to override to meet your needs. Please also note that each file is documented – when you open the file, view the comments at the top of the file for more information.

Also be aware that there are several sample files provided, that reveal even more information. Any file with the “-sample” ending is a sample file, and gives a full example of the final HTML of the related view file. We recommend referring to those files to see many of the functions that WP Inventory makes available for displaying information.

loop-all.php

This file is loaded to display the main inventory listing when your display settings “Display List as Table” is set to No, called with the [wpinventory] shortcode. This file will allow you to change the position of the filter form, as well as provide any additional markup or classes to the container inside of which the inventory items will be listed.

Relevant Setting: Display Settings=>Display Listing as Table=>No

loop-all-table.php

This file is loaded to display the main listing when your display settings “Display List as Table” is set to Yes, called with the [wpinventory] shortcode. This file will allow you to change the position of the filter form, as well as provide any additional markup or classes to the table and its rows, inside of which the inventory items will be listed.

Relevant Setting: Display Settings=>Display Listing as Table=>Yes

loop-category.php

This file is similar to the loop-all.php file, however, this file is called only when the display shortcode is set to view a specific category, such as [wpinventory category_id="1"].

Note: at this time, WP Inventory does not support different templates per category

loop-category-table.php

This file is similar to the loop-all-table.php file, however, this file is loaded when the display shortcode is set to view a specific category, such as such as [wpinventory category_id="1"].

Note: at this time, WP Inventory does not support different templates per category

single-loop-all.php and single-loop-category.php

This file displays the details of an individual item within the listing loop of the above files. Note that if you override this template, you will see that it is highly automated in order to respect all of the settings configured in the Display Settings. For an example of how to use this file in a less-automated way, please refer to the single-loop-all-sample.php file, which reveals many of the functions available for displaying content. The single-loop-category.php file is called when the display shortcode is set to view a specific category.

Relevant Setting: Display Settings=>Display Listing as Table=>No

single-loop-all-table.php and single-loop-category-table.php

Similar to single-loop-all.php above, except this is the template that is loaded when the Display Listing as Table setting is set to Yes. The single-loop-category-table.php file is called when the display shortcode is set to view a specific category.

Relevant Setting: Display Settings=>Display Listing as Table=>Yes

loop-search.php

The file displays the inventory listing resulting from a user’s search, or else displays a message if the search results do not match any items.

Relevant Setting: Settings=>General=>Search Settings=>Display Filter at Top of Item Listing=>Yes

single-loop-search.php

Like the other -single files above, this file displays the details of an individual item within the listing loop of loop-search.php. Note that if you override this template, you will see that it is highly automated in order to respect all of the settings configured in the Display Settings.

single-item.php

This file handles the display of the item detail page, which displays upon clicking on any item in the inventory listing. Note that this file also has a sample file for reference on its functionality depending on the Display Settings. This file also calls the reservation form, handled by the file below.

reserve-form.php

This file handles the reservation form, which displays by default below the item information on the item detail page. This is the perfect place to change or add to how the reservation form functions.

Relevant Setting: Settings=>Reserve=>General=>Allow Visitors to Reserve Items=>Yes

widget-latest-items-loop.php

This file handles the inventory item listing loop for the items that will display in the “WP Inventory Latest Items” widget available to place in any of your site’s sidebars.

widget-latest-items-single.php

Like the other -single files above, this file displays the details of an individual item within the listing loop of widget-latest-items-loop.php. Note that if you override this template, you will see that it is highly automated in order to respect all of the settings configured in the Display Settings.

Reviews on WordPress.org

Trusted by thousands of businesses

★★★★★

"Created an online museum for my club. Really impressive plugin. Support was responsive and helpful."

@hackrepair

★★★★★

"Excellent, clean, simple inventory management. Well structured code — use it right away or customize it to your liking."

@techlocally

★★★★★

"We purchased the entire suite. Installation was easy, small issues were fixed immediately, and the guidance during setup was invaluable."

@design4dotcom

★★★★★

"Plugin support was helpful and rapid. Highest mark."

@drgar

★★★★★

"Great support. Very thorough when looking for a solution, and upfront with exactly how to fix it or institute a workaround."

@shoidahl

★★★★★

"I used this plugin and eventually hired the developers for all my WordPress work. Responsive, competent, and clean code. Would recommend to anyone."

@justenhong