Front end item entry using Gravity Forms
Our position at WP Inventory over the years has been to resist allowing front end inventory management because of security concerns. It is our top priority to keep your data as safe as possible and to do that, we do everything behind the curtain of the /wp-admin/. Now, that being said, we have a brilliant solution for those of you that are willing to accept the risk or have implemented a password protected page on your site, etc. to allow for item entry to the system. This documentation covers the steps to achieve that using a few plugins. So let’s get started!
To get started we will need to download the following plugins and then activate them in our website’s WordPress dashboard.
- Gravity Forms – Single-handedly the best form plugin for WordPress.
- Gravity Forms WPDB Connect – This plugin adds a “feed” to your gravity forms. You can map your form fields to the database and the columns within the database at the time of the form submission. This is what is going to put all of the inventory item information into the various WP Inventory Manager tables.
- Optionally use Restrict Content Pro – This will allow you to restrict the page(s) with the editing form to certain people depending on your needs (signed-in users, specific users, etc.).
All of the above plugins are necessary to proceed. Once you have them, please keep reading.
Note: This will NOT work if you have Advanced Inventory Manager (AIM) installed. If you have AIM installed, please follow the steps through this document. At the end, there will be a link for you to continue on for additional setup steps.
Core Only: Advanced Inventory Manager NOT installed.
1. Step One
Using only the standard WP Inventory Manager the process is very simple. You just need to understand the database table a bit and then you are off to the races.
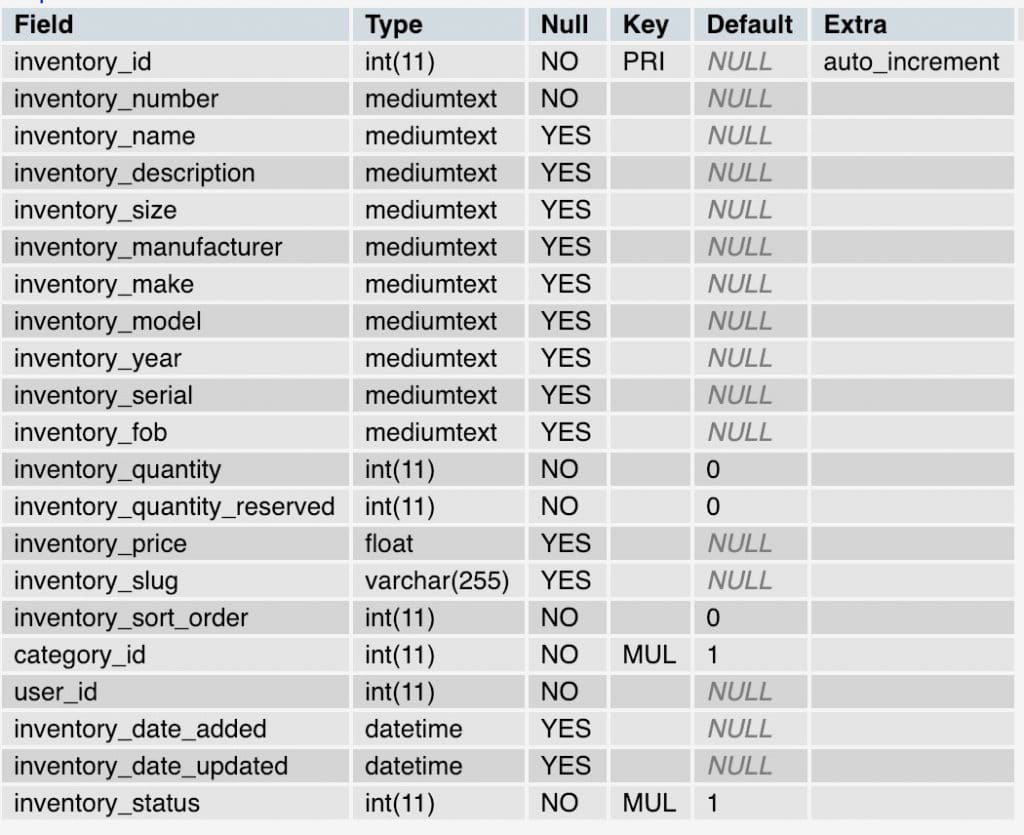
The above image shows the columns inside of the wpinventory_item table. You will map your form fields to these columns.
2. Step Two
When you are inside of a form in the dashboard, at the top of the page, you will drop down the “Settings” tab:
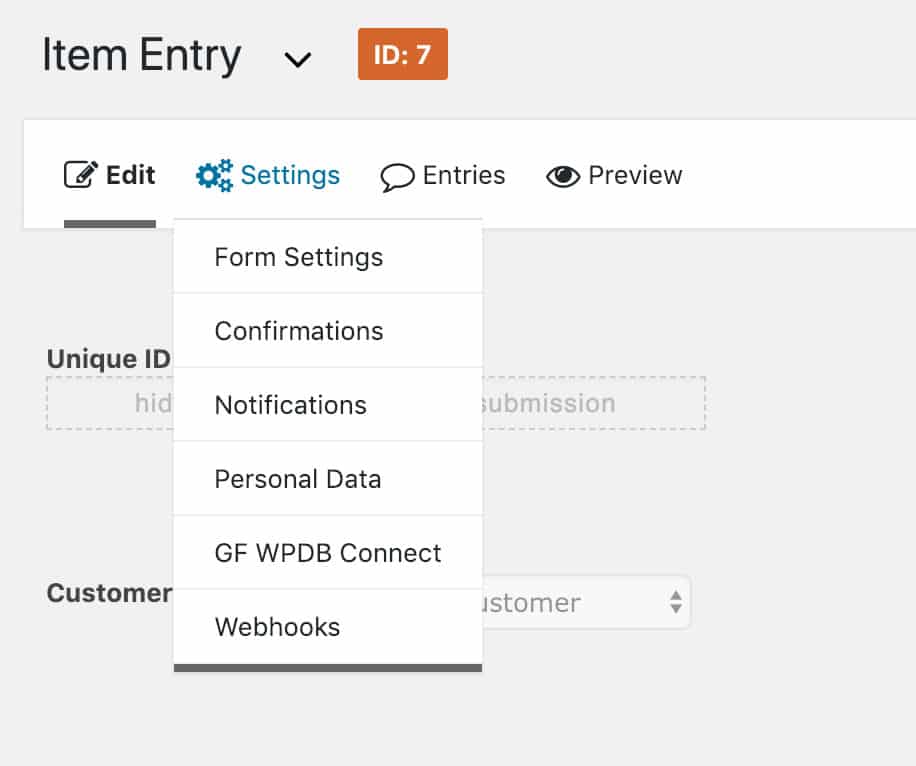
You want to select the “GF WPDB Connect” option. Once you have done so you end up on a page to setup your first feed. At the top of the page, hit the “Add New” button. You then have to provide two pieces of information: name of the feed and what table it is modifying.
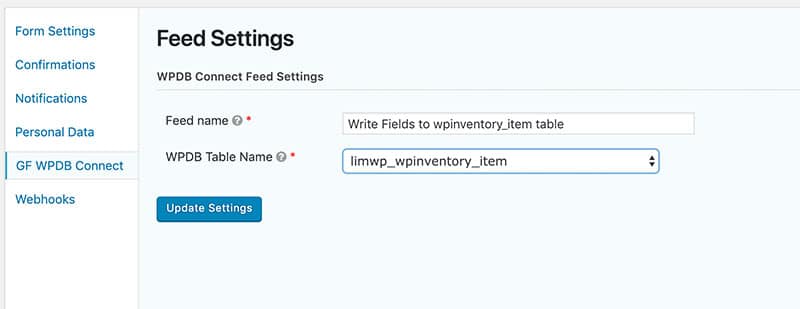
As you see above, we have given it a useful name to describe what the feed is doing. The second field, the dropdown, is where we selected our wpinventory_item table.
Note: ‘limwp_’ is our table prefix. Your’s will/can be different. By default, the wordpress database prefix is ‘wp_’.
Hit update settings, and you wind up on the page to make your feed.
3. Step Three
We are assuming at this point that you have made your fields in your form. Everyone will have their own set of needs and therefore the fields will vary. But usually you have an item name, make or model, and quantity. The screenshot above that shows the database columns. Those are the columns your form fields will map to. We are going to target: inventory_name, inventory_make, inventory_status, and inventory_quantity. Again, you can do all or just a few, it is up to you.
Below you see that we have mapped our name, make, quantity, and status fields.
Note: The status field is default to 1 which is inactive. If you want the item to be active right away, you must set it’s value to 2. 1 is inactive, 2 is active. So, we have a number field that is a hidden field in our Gravity Form. That field is “Inventory Status” and the value is set to 2. Tip: If you want people to add items, but don’t want them to be automatically available on the front end; then keep the inventory_status at the default 1. This will allow people to submit the item, and an administrator to review before marking it active.
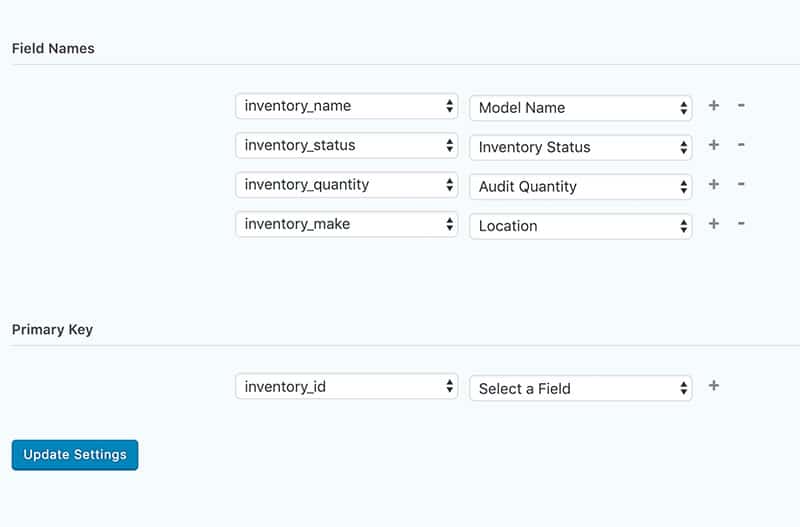
The fields on the left are the database fields and the fields on the right are our fields in our Gravity Form. You will see at the bottom is the “Primary Key” option. You can leave this blank because it will write it automatically for you. Hit the “Update Settings” button once you have mapped all of your fields.
That is it. You can now visit your form on the front end of your website, fill it out, and hit submit. You should now see another item in your WP Inventory Manager in the dashboard.
Note: If you have AIM installed, you need to continue now to the Add Inventory Items via Front End with Advanced Inventory Manager.
