Adding Items via Front End with Advanced Inventory Manager
This documentation requires the following plugins:
- Gravity Forms – Single handedly the best form plugin for WordPress.
- Gravity Forms WPDB Connect – This plugin adds a “feed” to your gravity forms. You can map your form fields to the database and the columns within the database at the time of the form submission. This is what is going to put all of the inventory item information into the various WP Inventory Manager tables.
- Gravity Form Perks – This is an add on comprised of many add ons that enhances Gravity Forms. It is necessary to run the following plugin “Unique ID”.
- Gravity Forms Unique ID – This “perk” (add on) is a field that you can use in any form to make a unique number.
Note: It is highly recommended that you read the documentation for adding an item without AIM first. It will be assumed that you understand the fundamentals of that in order to setup the feed using Advanced Inventory Manager. We will be building onto that documentation in the steps below.
You should have already had the Gravity Forms and Gravity Forms WPDB Connect plugins installed from the basic setup. Now, to be able to enter items with AIM installed, we have to incorporate the other two: Perks and Unique ID.
1. Step One
Now that you have installed the Perks and Unique ID add ons you will see a new field in the “Advanced Fields” section within your form called “Unique ID”
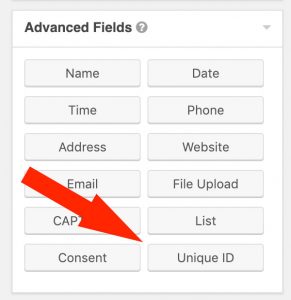
This field is the field we are going to use to make our inventory_id field. In the regular setup, you will recall this graphic of all of the regular item columns in the database:
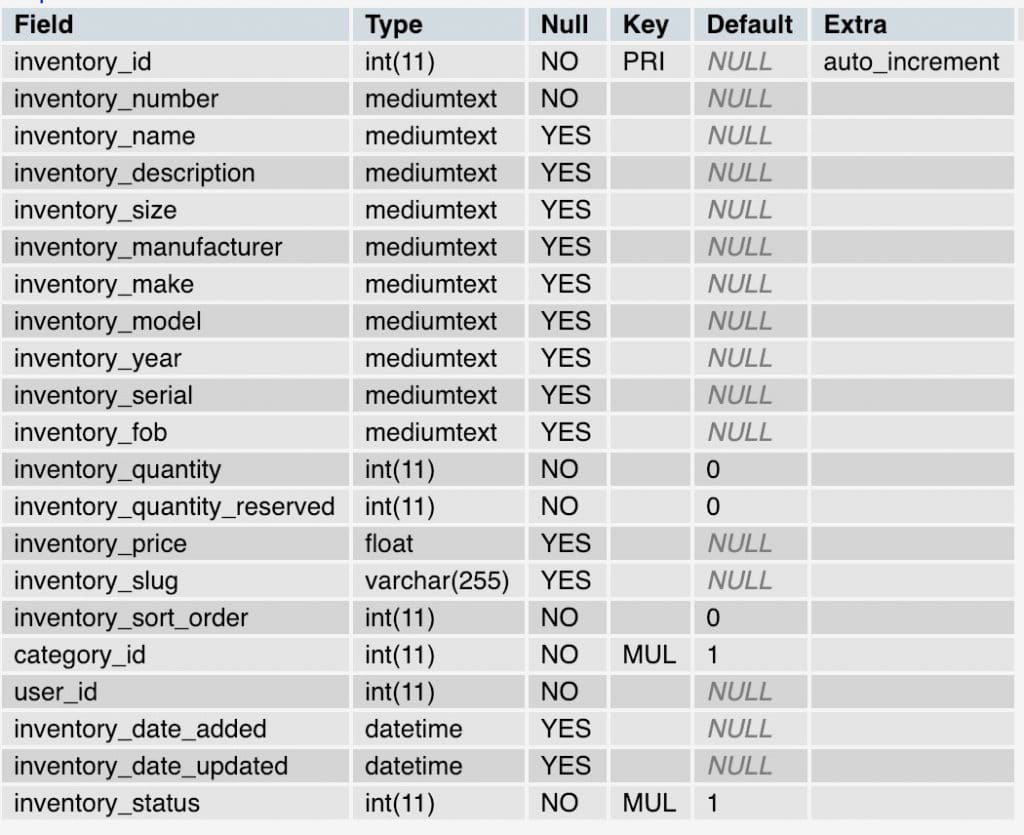
Before, we did not need to set the inventory_id field because the database would auto increment it for us. However, with AIM installed, we must set it because we also have to write the record with the inventory_id to the wpinventory_aim_inventory_to_type table as well as the wpinventory_aim_inventory_field_value table. We have to make sure they match identically otherwise the database will not associate the record and it won’t work. So, we click on the “Unique ID” field from our Advanced Fields list in our form and put it in our form.
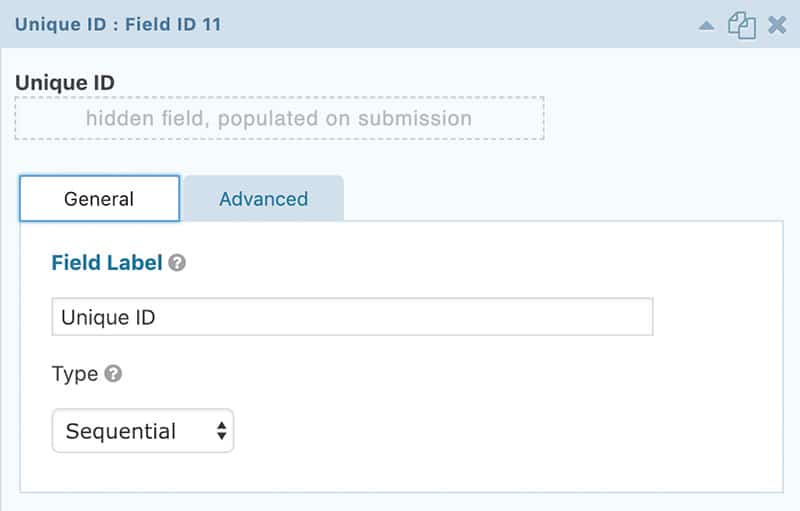
You want to select the “Sequential” option as the type. Then, hit the “Advanced” tab:
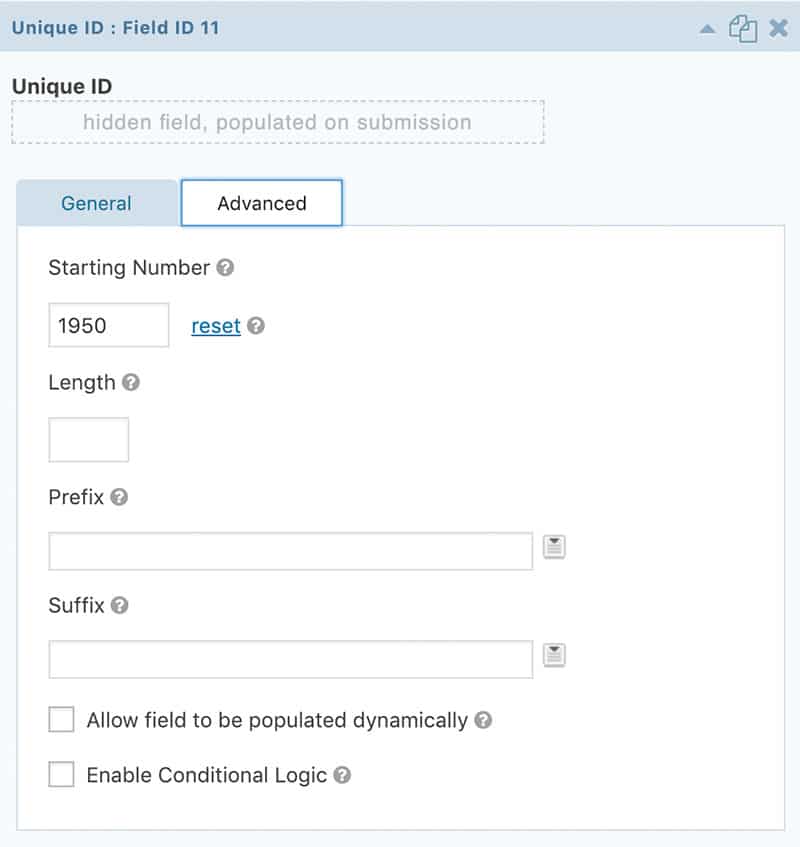
Here is an important setting, “Starting Number”. You want to set that higher than the amount of products you have in your inventory database right now. So, if you have 10,000 items in your database, you want to set it higher than that. I recommend some cushion, so 10,100 would be just fine. You see here in the screen shot that we set ours to 1950. That is because we had 1900 items about in the system. What this is going to do is start the inventory at this new, higher number. We have to define it so the system is not going to interfere with any existing records. If no records exist, then set it to something like 10.
2. Step Two
At this point it is assumed that you have setup your Unique ID with proper starting number and you have built out your Gravity Form with all of the fields you want to collect. It is time to get all of our information together so we can begin mapping the fields and setting up our feeds. But first lets take a look at the two other database tables we will need to understand:
wpinventory_aim_inventory_to_type

This is just a relational database table we need to feed values to so it can correctly associate the records.
wpinventory_aim_inventory_field_value

This table holds the values of your custom AIM fields. So if you make a text field, a dropdown select field, or a textarea; this is where it is going to go.
3. Step Three
Now we can start to setup all of our feeds from our form. Our form must contain the following:
- Inventory Id – This field is hidden and is the “Unique ID” field mentioned above. It will be mapped to the inventory_id columns in the database tables. (hidden field)
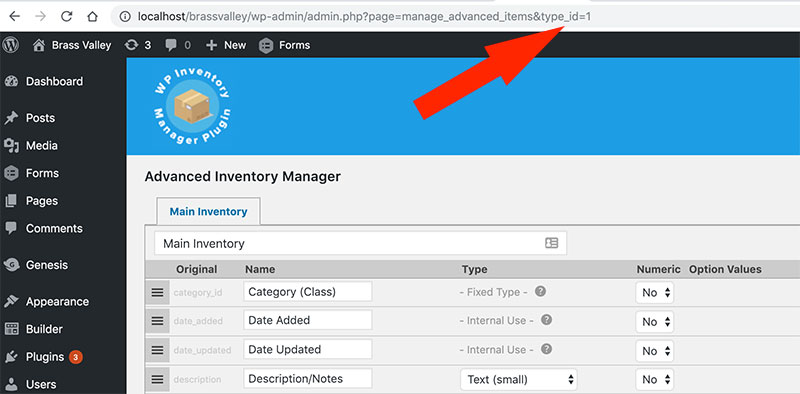
- Type ID – This hidden field is the AIM type ID. You find this ID by clicking a type tab to manage in the dashboard and the ‘type_id’ will be a parameter in the URL (see below steps with screen shot). This field is mapped to the ‘type_id’ columns in the database tables. (hidden field)
- Type Field ID – The ID of any particular field in an inventory type. (hidden field)
- Value – This will be the value of the saved custom type field. You will need to have a hidden field pair between this field and the hidden “Type Field ID”. The type field id will be the id of the type field we get below so we can store it in the table. The visible field you make for the user to fill in is the field you map to the ‘value’ column in the wpinventory_aim_inventory_field_value table.
So let’s get started!
A. How to get the Inventory ID
Getting the inventory ID is the “Unique ID” field that we have because we loaded the necessary plugins at the beginning of this exercise. We set it to a number greater than the current inventory rows in the DB. This is setup in the Gravity Form itself.
B. How to get the Type ID
This is a bit tricker, but not very difficult. To get this, you simply visit the “Advanced Management” tab in your WP Inventory menu of your dashboard. There, you will have a tabbed display of all of your inventory types. Click one of the tabs. After you click a tab, you will see the ‘type_id’ parameter in the URL like so:
C. How do I get the Type Field ID
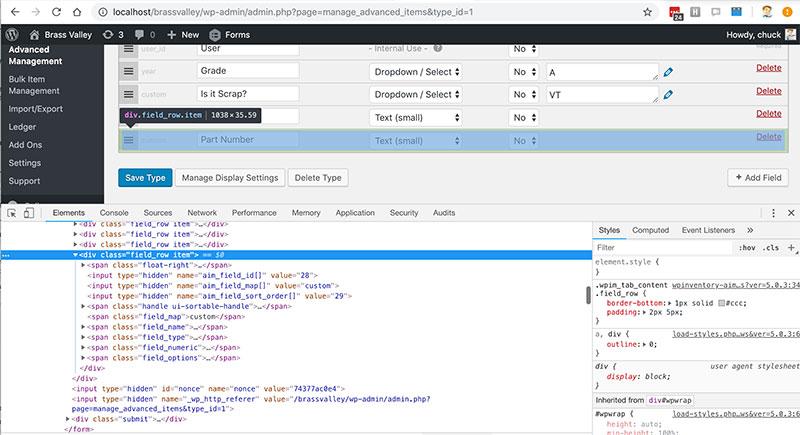
This is the trickiest of all and requires you to open your developer console in your browser. We are going to look at a custom field we made called “Part Number”:
Zoomed in on the input:
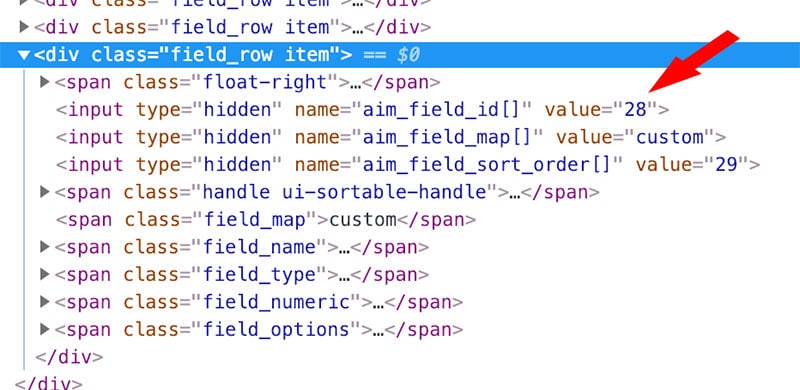
Here we can see that this particular field (Part Number) has a custom field ID of 28. You can find all of your field IDs in this fashion.
D. How do I get the value
This one is easy. It is any field you want to map from your form. So, you just make a visible field for “Part Number”. Then, we will map that to the ‘value’ field in the following step.
4. Step Four
Now we setup our feeds. There will be at least three (3) for sure, but could be more (depending on how many custom fields). The first feed we setup is to make the item in the regular wpinventory_item table.
Table Feed: wpinventory_item
It will be exactly the same as we did in the documentation for the regular core feed:
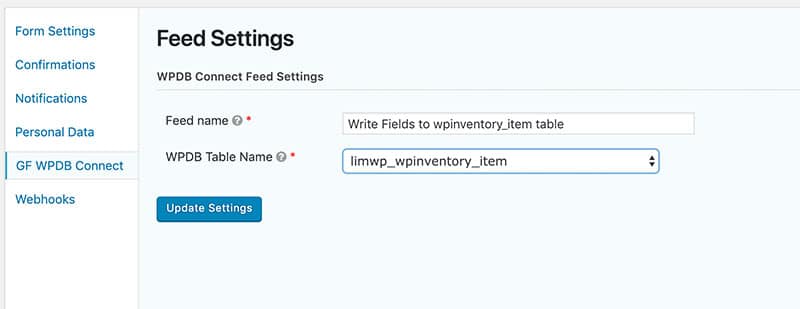
Note: Remember that ‘limwp_’ is just a table prefix. Yours will be different. But the table name is ‘wpinventory_item’
Now this time when we map our fields, at the bottom of the page, we are going to select the “Primary Key” as our “Unique ID” field we made (in the regular setup without AIM we did not have to set this):
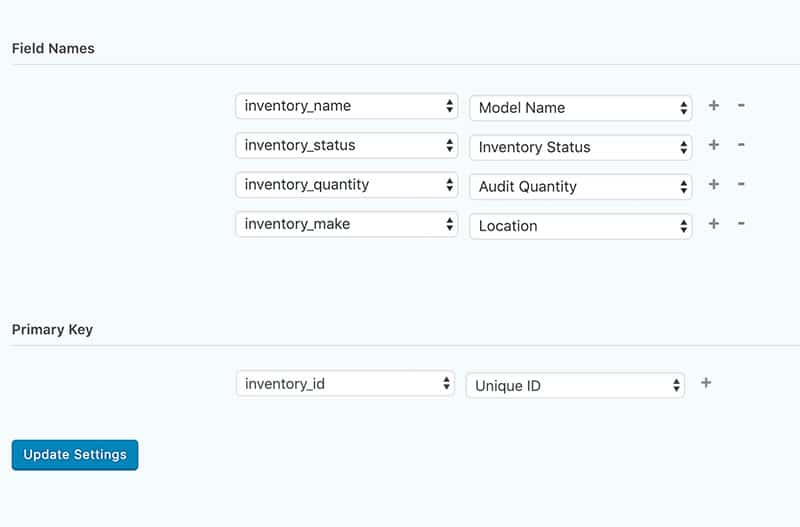
Note: We re-purposed the ‘inventory_make’ field and made it a “Location” field. The left hand side is the fields in the datbase table, and the right hand side is the fields we are mapping from our Gravity Form.
Table Feed: wpinventory_aim_inventory_to_type
For this table, we will need to know the type_id and the inventory_id which we showed above how to obtain. Remember, the inventory_id is always the “Unique ID” field we setup. So we already have that. In our Gravity Form select a “Number” field from your fields list. Make this field hidden and give it the value of your type ID. This was the ‘type_id’ parameter in the URL from the step above. In the screen shot that type_id was qual to 1. So, we will set the value to equal 1:
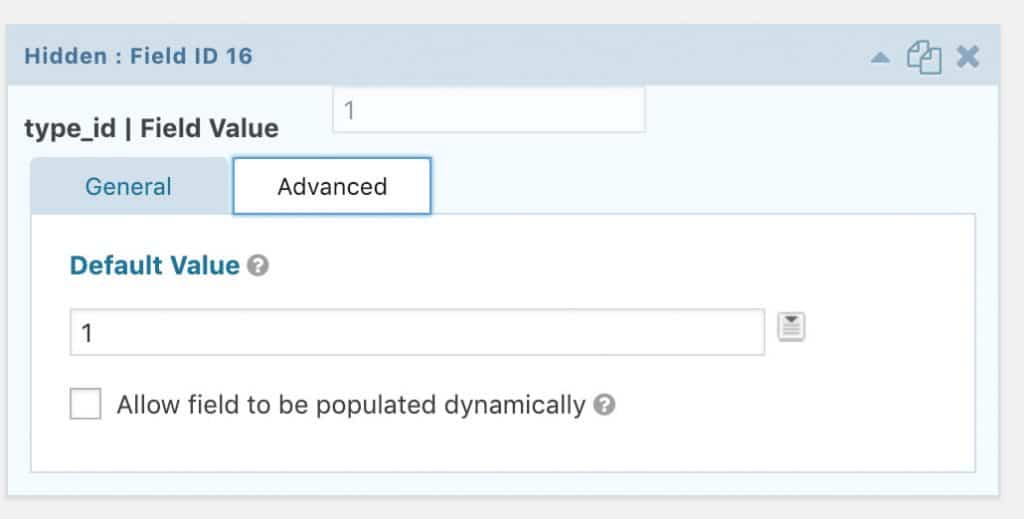
As you see, we set a value of 1 for this hidden field. The value of the type_id. So with these two pieces of information, we are now ready to setup our feed to the wpinventory_aim_inventory_to_type table:

And we map the fields to the table like so:
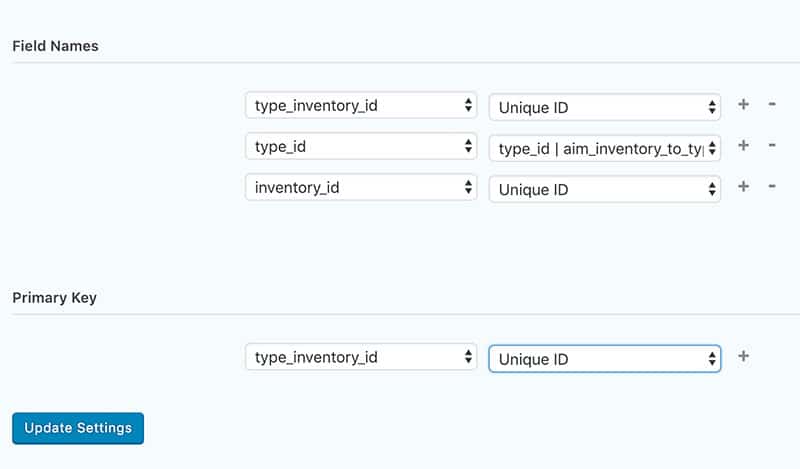
Notice that we use the “Unique ID” in three different spots. The first column we map to is the type_inventory_id. The second column we map to is our type_id column and we map that to the hidden field we created above setting that specific type_id. Which was equal to 1. The third column is the inventory_id and again, this is our “Unique ID” field. Lastly, at the bottom, is the “Primary Key” settings. We want to set that to our “Unique ID” field as well.
Table Feed: wpinventory_aim_inventory_field_value
Note: If you don’t have any custom fields to map, and are only mapping the core fields to the wpinventory_item table; then you can stop here. You are done. However, if you do have custom fields you created and want to save their values, please continue
This table will store the values of our custom fields. For each custom field we need a pair of fields. One hidden with the value of the ID of the custom field in AIM. And one visible that is filled out on the form by the user that we map to the ‘value’ column. We begin by adding these two fields.
In your form, select a “Number” field and make it hidden. Set it’s default value equal to the custom field ID. We showed how to get this above and it was equal to 28 for the field “Part Number” that we created.

It is created the exact same way you did the type_id field in the previous feed above. Just this time we make the field value 28, the ID of the custom field we created in AIM. You also see that it is labeled so we can tell what it is for. This says “type_field_id | Part #”. So when we are in the form, we know what this hidden field represents – the field ID for part number.
Then you simply make the field for “Part Number” like so:

We will map this field to the ‘value’ column. Let’s setup the feed!
Just like the other feeds above, we begin by creating a new feed and naming it and selecting which table we are going to write to. This table is the wpinventory_aim_inventory_field_value

And we map the fields as follows:
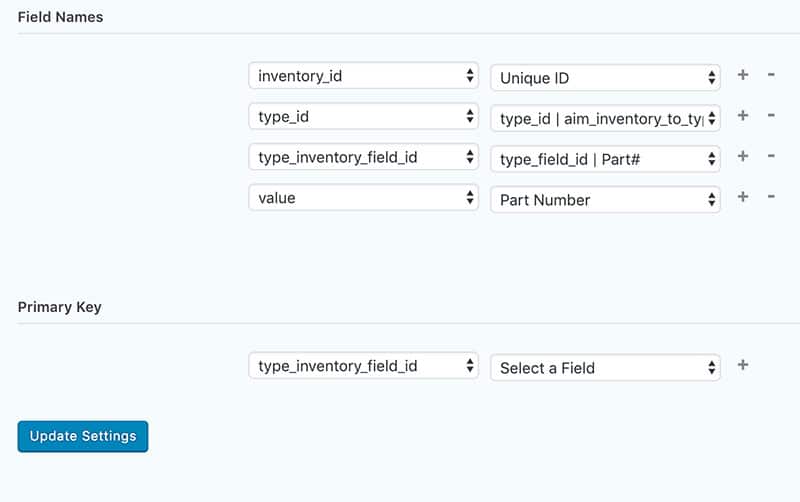
Once again, the inventory_id is always set to our “Unique ID” field we created. So map it to that. The ‘type_id’ is already in the form as a hidden field because we set that field up in the form already. So, simply map it. Now we map the inventory field ID which was the hidden field we just created with the value 28 (the ID of the custom field made in AIM). That hidden field is mapped to the ‘type_inventory_field_id’ in the database table. Then, lastly, is the ‘value’ column. That is any field you want, but we made the “Part Number” field above. So we map that field to the value in the table.
We do not need to map the “Primary Key” setting as the primary key in that table is the ‘type_inventory_field_id’ and it will auto-increment on it’s own. No need to set it as it has no relational value in the database.
Note: If you have multiple different custom fields, you just repeat the process for adding feeds to the wpinventory_aim_inventory_field_value table. You have to have two: a hidden and visible. You set the hidden to the field ID in AIM and visible one to whatever you want the user to fill out. You repeat this process setting up an individual feed for each custom field you may have.
IMPORTANT: As a last note, this entire process needs to be done per inventory type. We covered one inventory type where type_id was equal to 1. If you have multiple types of inventory, you just repeat this process using a different Gravity Form for each. Then, in the steps above where you set your hidden field ‘type_id’ equal to 1, you would set that equal to the next type ID you were doing. Then, setup all your feeds for that form using the process above.
Bottom line: Every type of inventory setup in AIM would need it’s own form with type_id and it’s own feeds.
