wpim_admin_edit_after_$field

With this hook, you can add your own HTML input anywhere under any of the system / core fields.  This occurs in the item entry / edit page in the dashboard. Here is a list of actions for each field:

  • wpim_admin_edit_form_after_number
  • wpim_admin_edit_form_after_name
  • wpim_admin_edit_form_after_slug
  • wpim_admin_edit_form_after_status
  • wpim_admin_edit_form_after_category
  • wpim_admin_edit_form_after_description
  • wpim_admin_edit_form_after_size
  • wpim_admin_edit_form_after_manufacturer
  • wpim_admin_edit_form_after_make
  • wpim_admin_edit_form_after_model
  • wpim_admin_edit_form_after_year
  • wpim_admin_edit_form_after_serial
  • wpim_admin_edit_form_after_fob
  • wpim_admin_edit_form_after_quantity
  • wpim_admin_edit_form_after_quantity_reserved
  • wpim_admin_edit_form_after_images
  • wpim_admin_edit_form_after_media
  • wpim_admin_edit_form_after_sort
  • wpim_admin_edit_form_end

We will pick one at random from above:  wpim_admin_edit_form_after_media


/**
 * @param $item
 * @param $inventory_id
 */
function my_custom_function( $item, $inventory_id ) {
	$html  = '<tr>';
	$html .= '<th>Your Field Name / Label</th>';
	$html .= '<td>';
	$html .= '<input type="text" name="your_field_name" id="your_field_name" value="">';
	$html .= '</td>';
	$html .= '</tr>';

	echo $html;
}

add_action( 'wpim_admin_edit_form_after_media', 'my_custom_function', 10, 2 );

wpim_admin_pre_edit_item

This hook loads on the admin dashboard.  It is fired immediately when clicking into an item to edit it, before the item details are rendered to the page.


/**
 * @param $item
 */
function my_custom_function( $item ) {
    // Use this hook to place a custom message or tool tip or anything else above the edit item fields in the item edit details
}

add_action( 'wpim_admin_pre_edit_item', 'my_custom_function' );

Labels

Labels

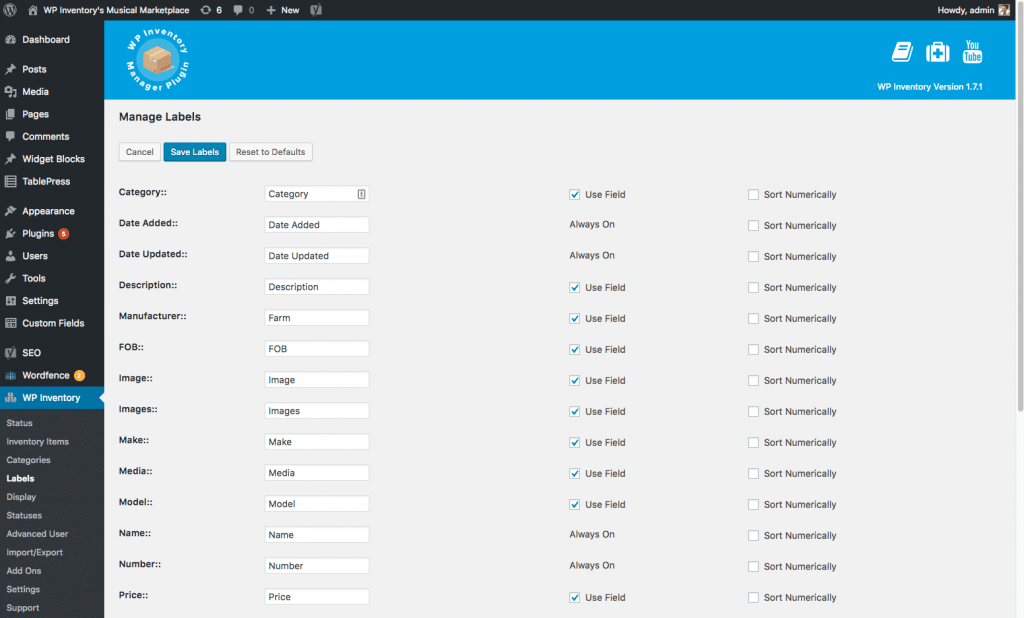
Field labels are easily modified to suit your needs

The fields are used to represent what data you are trying to show the user.  So, for example, the product description label is “Description” by default.  If you want that to say “Product Information” then you are in control of that on this page.  Essentially we allow you the ability control what the language is for each piece of inventory you are trying to manage.  With that being said, if you change a label in the dashboard, the label will also be changed in the product pages in the dashboard.  For example, if you were to go to a product in the dashboard after updated a label, that label would now show whatever you changed it to.  And of course, that change will also be seen on the web page by the user.

You’ll also see a checkbox next to each label that says “Use Field”.  If you uncheck that box, it will completely remove the field from the products page available items on the dashboard.  In other words, when you go to look at a product or to add a new one, that field will not even be listed.  The reason behind this is to allow the admin or person controlling the inventory the ability to only load the information they need to use and leave out the rest.  This makes the flow faster and less prone to mistakes by accidentally adding something in somewhere that should not be.  You can also choose whether or not a field is sorted numerically here.

Next step – Display Settings!