Save time on maintenance with Bulk Item Management
Update any fields on any range of items
The Bulk Item Management add-on is ideal for users who need to update a large number of inventory items in a short amount of time. The plugin is smart, able to filter items based on any field with a wide variety of qualifiers and data criteria. Then once they’re selected, any of the chosen items’ fields can be updated, not just the ones selected. Find out how you can save time now with the following instructions, or follow along with this video tutorial:
Installation
- Purchase and Download the Bulk Item Management add-on.
- Install the add-on through the WordPress dashboard by navigating to the “Plugins” tab.
- After browsing and uploading the ZIP file, activate the plugin.
- After entering the license key, there will be a new link under the WP Inventory tab in the dashboard called “Bulk Item Management.”
Updating Inventory in Bulk
- Find Items Matching Criteria
- Following “Where,” select the field you’d like to target. This can be any of the default fields, as well as any custom fields created with Advanced Inventory Manager.
- Select the qualifier from the following options: is Equal To, Starts With, Ends With, Contains, Does Not Contain, Greater Than, Less Than. Some options may not be available depending on the chosen field.
- Enter your specific criteria based on the preceding two options.
- If necessary, click the “Add Search Criteria” button and repeat steps 1.1 – 1.3 to create more than one filter statement.
- Modify Matching Items
- Tick the “Modify Matching Items” checkbox.
- Following “Update,” select the field you’d like to update. This can be any of the default fields, as well as any custom fields created with Advanced Inventory Manager.
- Select the instruction from the following options: Replace with, Append with, Prepend with, Multiply By, Divide By, Add To, Subtract From. Some options may not be available depending on the chosen field.
- Enter your specific update value based on the preceding two options.
- If necessary, click the “Add Field to Update” button and repeat steps 2.2 – 2.4 to create more than one update statement.
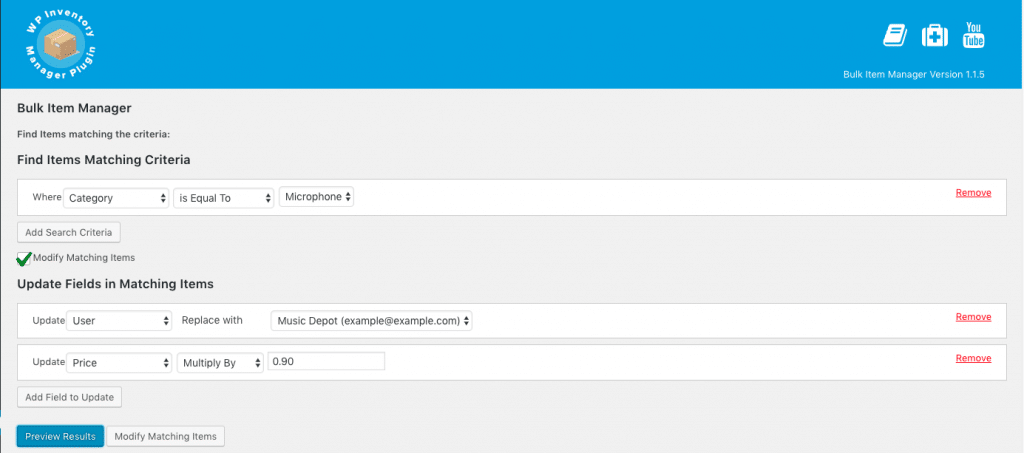
- Finalize the Update
- Click the “Preview Results” button to see how the statements defined in steps 1 and 2 will affect your inventory items.

- If there are no changes needed, click the “Modify Matching Items” button to finalize the update.
- Click the “Preview Results” button to see how the statements defined in steps 1 and 2 will affect your inventory items.
Bulk Item Manager Settings
There is one setting to the Bulk Item Management add-on available in the “Bulk Management” tab of the Settings page.
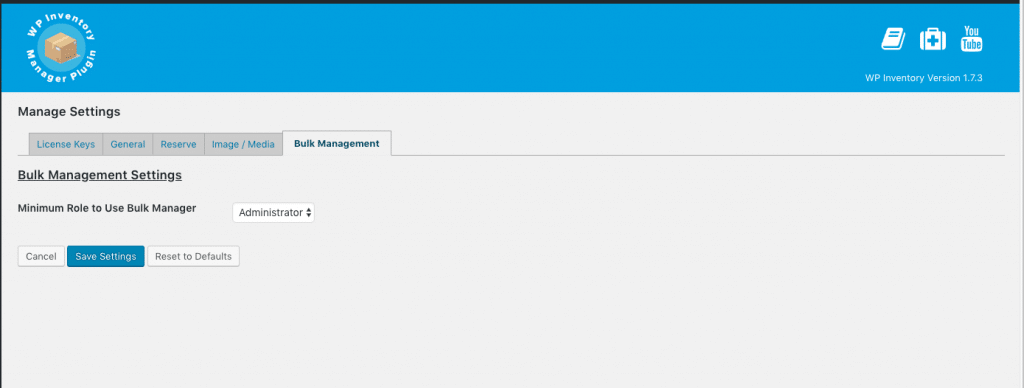
- Minimum Role to Use Advanced Item Manager – This sets the role that a user must have to utilize the Bulk Item Management form.
