wpim_admin_items_pre_listing

This hook runs in the admin directly before loading all of the items.

function my_custom_function($data) {
   $data; // Parameters / rules to display the items.  Such as hide low, status, order, etc
    
    /**
     * array (size=17)
    'order' => string 'inventory_name' (length=14)
    'page_size' => string '20' (length=2)
    'page' => int 0
    'name' => string '' (length=0)
    'include_category' => int 1
    'inventory_status' => string '' (length=0)
    'inventory_id' => null
    'inventory_slug' => null
    'category_id' => null
    'category_name' => null
    'category_slug' => null
    'user_id' => null
    'search' => string '' (length=0)
    'hide_low' => string '0' (length=1)
    'hide_low_quantity' => string '20' (length=2)
    'type_id' => int 1
    'dir' => string '' (length=0)
     */

   // Do whatever you want from here!
}

add_action('wpim_admin_items_pre_listing', 'my_custom_function');

Default Theme Setup

Default Theme Setup

If you choose to use the default theme there are a few things you need to know.

  1. Under the “WP Inventory” tab you need to go to “Settings”.  Then, the tab “General”.  Then the sub-tab “Item Display”.
  2. For the “Theme” option, select “Default Theme”.
  3. Now on the “Display” page you need to set the image or images at the top of the “Details” page settings if you want the two column display.  The system looks for the image or images field at the top of the list and if it is there, it lays-out the image/images to the left and all other fields to the right.  If you do not set the image or images at the top, it will layout in a single column.
  4. In addition, as an option, you can put the “Make” and “Model” field side by side if they come together in the sequence.  So in your display settings if you drag the “Make” field in, and then “Model” directly under it, the system will put them on one line separated by a ” – “.  Here is an example of what the page may look like once you take these actions:

Shortcode Attribute Linking and Where Clause

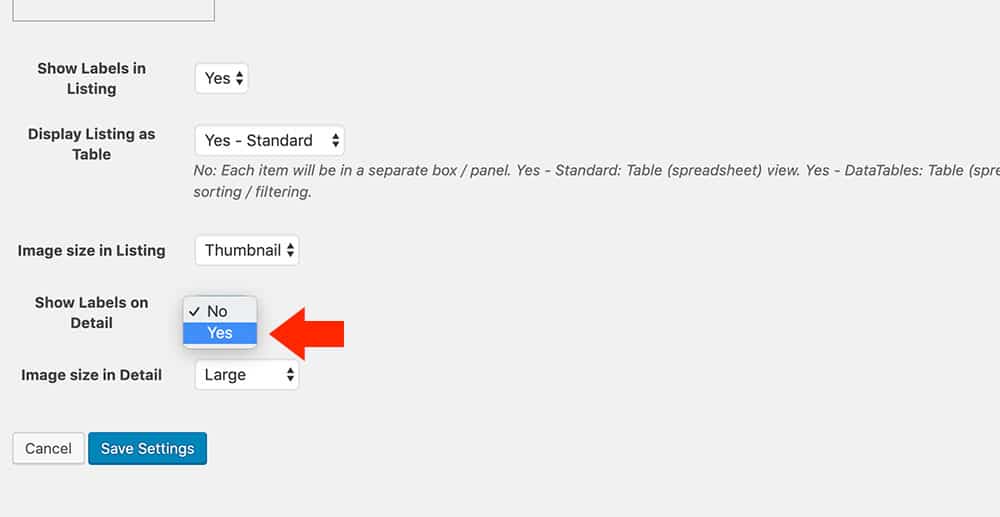
Note: The following does not work with Advanced Inventory Manger custom fields.  This ability is for regular system fields only.

The shortcode allows you to “chain” or “link” various attributes as well.  This is very powerful.  For example, if we had a car dealership website, we could list out a specific make and model like so:

 [wpinventory make="Chevy" model="Tahoe"] 

Lets take it a step further, and add the specific year of Tahoe’s we want to display:

 [wpinventory make="Chevy" model="Tahoe" year="2017"] 

And, we can even take it a step further using the new custom “where” clause.  So, if you wanted to showcase certain Tahoes that fall under a certain price, you could do:

 [wpinventory make="Chevy" model="Tahoe" year="2017" where="price >= 20000"] 

That would tell whatever page you have that shortcode on to output the 2017 Chevy Tahoes that are greater than $20,000.00.

Lets take it another step.  Lets say you want all the 2017 Chevy Tahoes that are above $5000.00, but you only want to display them if the quantity you have on hand is above a certain amount (that way you know you never truly run out and have a few at the dealership):

 [wpinventory make="Chevy" model="Tahoe" year="2017" where="price > 5000 AND quantity >= 3"] 

That would output all 2017 Chevy Tahoes that cost $5000.00 or more and are not below the quantity of three.  Meaning there are at a minimum of three of them on the lot.

Lastly, is the absolute power of the “where” clause.  It is essentially allow you to write your own SQL queries.  If you don’t know what those are, then you may not want to attempt to use it.  It can throw an errorif the query is not correct.  So, if you do try to use the where clause, then make sure your page is loading the inventory as desired.  Now, with all that being said, the power of the “where” clause all by itself could do what we did above if we just wrote it as:

[wpinventory where="make='Chevy' AND model='Tahoe' AND year='2017' AND price > 5000 AND quantity >= 3"]

The above shortcode uses single quotes to surround the value you are checking for and it is all inside of the where clause.  There are many many things you can do with this functionality if you are knowledgeable with SQL.

Hide Add to Cart for Certain User Roles

You can suppress the add to cart on both the listing and detail page in this fashion:

Listing Page:

In your theme’s functions.php file add the following code.  Where you see ‘customer’, ‘administrator’; you can add more like ‘, ‘subscriber’, ‘editor’, … etc.  That will suppress the button from any logged in user NOT assigned one of those roles.


add_filter('wpim_cart_hide_button_in_listing','wpim_button_by_role');
function wpim_button_by_role( $hide ) {
$current_user = new WP_User( get_current_user_id() );
$user_role = ( ! empty( $current_user->roles ) ) ? array_shift( $current_user->roles ) : NULL;

if ( ! $user_role || ! in_array( $user_role, array( 'customer', 'administrator' ) ) ) {
$hide = TRUE;
}

return $hide;
}


Detail Page:

The detail page can suppress the add to cart in one of the following two ways:

1.  Template Override: –  copy the reserve_cart/views/add-to-cart.php template to the theme’s wpinventory/views/add-to-cart.php folder, then at the top add:


$current_user = new WP_User( get_current_user_id() );
$user_role    = ( ! empty( $current_user->roles ) ) ? array_shift( $current_user->roles ) : NULL;

if ( ! $user_role || ! in_array( $user_role, array( 'customer', 'administrator' ) ) ) {
return;
}

2.  Filter:   Hook into this filter and add this function which leverages the already-existing function used to hide the button on the listing page under the “Listing Page” heading above  (this is the “recommended” way, but either will work).


add_filter( 'wpim_get_template_part_path_<wbr />reserve-form.php', 'wpim_hide_button_in_detail', 99999, 1 );

function wpim_hide_button_in_detail( $template ) {
if ( wpim_button_by_role( FALSE ) {
// return nothing, which will cause the system to NOT render the template.
return '';
}

return $template;
}

Display

Display Tab

Setting up the product listing page and the product detail page

The “Display” tab in the dashboard will bring up a screen that allows the user to drag and drop available fields into different sections, which will make that field display in the specified section. You can choose which fields will display in the Inventory Listing, Detail Pages, Admin Listing, and website Search Results.  Essentially, whatever information you want to display on the listing page and the detail page, you just drag and drop into that view.  You can have as little as one piece of information or all available fields showing.  Also, remember that any labels you turn off and don’t use, will not show up here as an available field.

Below the drag and drop fields, you’ll also find a few more settings related to the display of labels and images. These settings are optimized by default, but you’re able to customize for specific use cases here.

Almost done! Let’s add inventory!

Widgets

Widgets

Widgets can be found under your Appearance->Widgets menu on the left-hand side of your WordPress dashboard.  Dragging and dropping a WP Inventory Manager widget into a sidebar will display that particular widget’s functionality in the sidebar it was assigned. By default, WP Inventory Manager comes with two widgets: “WP Inventory Categories” and “WP Inventory Latest Items.”

The “WP Inventory Categories” widget allows you display inventory items from a specified category. “WP Inventory Latest Items” simply displays a specified number of the latest inventory items entered into the system.

Do Your Own Styling

Use your own styles

You can add your own styles to affect the display

If you are comfortable with CSS and would like to add your own styles, simply write your CSS to your theme’s style.css file.  If you are using a child theme, you would write it to the style.css file in that child theme’s folder.  Child themes are used commonly in 3rd party, purchased, WordPress themes.  Child theme style sheets allow you to override styles from plugins or the parent theme.  See the codex here for a more in-depth review of child themes.

Default Style Options

Default style options

The WP Inventory Manager comes with a standard set of styling options.  If you choose not to use our styles, you can turn them off in the settings.  Our styles are meant for layout only and we try very hard not to do anything that will interrupt your theme’s styles.  We don’t set font sizes, colors, and keep all styles contained within our html wrapper.  Most of the styles revolve around the detail page layout to support a two column design.  To achieve this, simply make sure that the image or images field is the first item in the display settings list here:

This would result in the details page looking like this:


Where the images are on the left, and all the rest is on the right.

Note: See how “Laptop” and “MacBook Pro (early 2013)” are side by side?  That is the “Make” and “Model” fields.  If they are put one after the other as they are in the screen shot label settings above; then they will display inline like this.

And lastly, if you want to make the labels show up with these, you just have to navigate to your labels setting page again and scroll down to the bottom.  You will want to set the setting “Display labels on Detail” as depicted in this screen shot:

And after you save, you can go back to the front end and refresh and it will now look like this:

Styling

Customize the Look of Your Inventory

Styling your inventory pages

By default, WP Inventory is configured to use many of your theme’s styles as possible. However, not every theme is the same, and sometimes elements will not style as appropriate. Or maybe you want to customize your inventory listing beyond the default theme styles. It is possible to style and give your inventory pages a nice look in a few different ways.  One way is to use your own custom styles.  Simply write your styles to your theme or child theme’s style.css file.  Another way is to hire an outside web developer do it for you based on a professional web design, and refer them to our CSS documentation (linked below).

Getting Started Using the Template Override System

Getting Started Using the Template Override System

The short version: to use the template override system, you will copy any files in the plugin “views” folder that you’d like to override from the core plugin folder, and paste them into a new folder in your theme (wpinventory > views). You can make any changes you want to that copied file, and the plugin will automatically take your custom template and prioritize it over the default plugin file.

The long version:

Step One:

First you’ll need to access your site’s files – the exact method to do so will vary depending on your hosting solution. Your files may be stored locally on your computer, or you may need to access them via FTP. No matter the case, once you have the files open, you’ll need to find the wpinventory plugin folder. Within that folder is a folder titled “views” that contains all of the available templates to override. You can find a reference on the available files and what frontend display they affect here. As an example, let’s say we wanted to override the look of the item detail page. The screenshot below shows the path to find the relevant file. Once you find it, copy the file.

Step Two:

Inside of your website’s theme folder, create a new folder titled “wpinventory”. Within that folder, create another new folder titled “views”. Then, paste the copied file from step one into the “views” folder you just created. Ensure you don’t change the name of the file! The screenshot below shows an example path.

Step Three:

The file you copied into a new folder in step two will now override the default plugin file! You can make as many changes as you need to the HTML layout or other data, and your work will not be lost even after updating the plugin.

As mentioned before, custom development of this nature falls out of the scope of our license support. However, we understand that the template override system may be a bit daunting for those unfamiliar with PHP. Don’t worry, there’s still an option to reach out for help.  We offer a paid service for custom template development. If you need help customizing a view for your site, please Complete our Contact Form to reach out for more information.