wpim_admin_pre_edit_item

This hook loads on the admin dashboard.  It is fired immediately when clicking into an item to edit it, before the item details are rendered to the page.


/**
 * @param $item
 */
function my_custom_function( $item ) {
    // Use this hook to place a custom message or tool tip or anything else above the edit item fields in the item edit details
}

add_action( 'wpim_admin_pre_edit_item', 'my_custom_function' );

wpim_admin_items_pre_listing

This hook runs in the admin directly before loading all of the items.

function my_custom_function($data) {
   $data; // Parameters / rules to display the items.  Such as hide low, status, order, etc
    
    /**
     * array (size=17)
    'order' => string 'inventory_name' (length=14)
    'page_size' => string '20' (length=2)
    'page' => int 0
    'name' => string '' (length=0)
    'include_category' => int 1
    'inventory_status' => string '' (length=0)
    'inventory_id' => null
    'inventory_slug' => null
    'category_id' => null
    'category_name' => null
    'category_slug' => null
    'user_id' => null
    'search' => string '' (length=0)
    'hide_low' => string '0' (length=1)
    'hide_low_quantity' => string '20' (length=2)
    'type_id' => int 1
    'dir' => string '' (length=0)
     */

   // Do whatever you want from here!
}

add_action('wpim_admin_items_pre_listing', 'my_custom_function');

wpim_post_delete_item

This function is ran just before the system process your item deletion.


/**
 * @param $inventory_id
 * @param $data
 * @param $subject
 * @param $message
 */
function my_custom_function($inventory_id, $data, $subject, $message) {
    // Do whatever you want with these pieces of information.  With the inventory_id you can even lookup the item info.
    // You can send info to another database table, send out an email, etc.
}

add_action('wpim_post_delete_item', 'my_custom_function', 10, 4);

wpim_pre_delete_item

This function is ran just before the system process your item deletion.


/**
 * @param $inventory_id
 * @param $data
 * @param $subject
 * @param $message
 */
function my_custom_function($inventory_id, $data, $subject, $message) {
    // Do whatever you want with these pieces of information.  With the inventory_id you can even lookup the item info.
    // You can send info to another database table, send out an email, etc.
}

add_action('wpim_pre_delete_item', 'my_custom_function', 10, 4);

Reserve System

Reserve System

The reserve system is a nice feature to help convert your users to paying clients!

Using the reserve system allows you to enable a reserve form on your inventory item pages.  A user can fill in this reserve form and they will then be allowed to pick it up at a later time.  They get an email confirmation and the administrator also gets a confirmation email.  In addition, the quantity decreases by the reserve amount automatically in the system. For more information, please refer to the Reserve Setting section in the Quick Start Guide.

Be advised that emails being sent are dependent on your server settings and/or host environment.  For best results with regards to receiving emails, we strongly recommend the WP Mail SMTP plugin.

Previewing reservation entries

This is possible with our Ledger Add-On.  By default, the reservation system does not keep journal entries of the emails or for whom reserved the item(s).  If you would like a log of this from the dashboard as well as ability to invoice; then you will need the Ledger Add-On as well.

Shortcode

Shortcode

Learning and mastering the shortcode will enable you to effectively manage your inventory

The shortcode is something that is used on your page to display your inventory.  The base shortcode we use in order to display our inventory is:

[wpinventory]

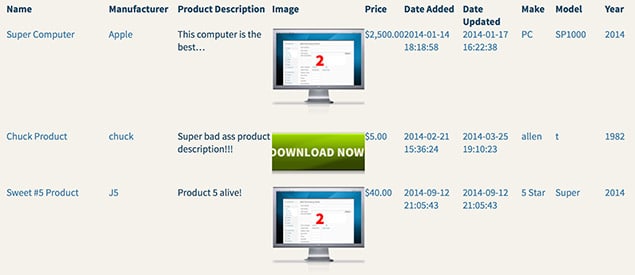
Upon installation of the WP Inventory Manager and going through the quick start process, you will be ready to display the products you have entered.  Creating a page in your WordPress dashboard such as a “Shop” page, or “Inventory” page, would be a great page to insert the shortcode.  Simply drop in the shortcode [wpinventory] and save the page.  Next, go to your website and navigate to that page.  You should now see your inventory listed and it should look something like this.

Inventory Listing Page

Note: If you want to rearrange the fields order in which they display, for example the image first, then you would just update the display settings in the “Display” tab. Also, there are no styles attached to this, it is a bare bones listing. For styles, you may use the built in styles, fall back on your theme styles, or have a developer make custom styles for you.

By clicking into one of these items you will land on the inventory item’s details page which will list out all of the information you defined for it to show in the display tab.

For more advanced usage of the shortcode, please read our shortcode options guide.

Displaying Inventory

Displaying Inventory

You can display the inventory in just about any fashion you can imagine!

Through the use of the shortcode options it is possible to display your inventory just the way you want it.  You can display all inventory, a specific category of inventory, a specific product, and many more options.  In addition to what you can display, you may also choose one of our default styles in the “Display” tab in the dashboard.  Choosing a default style will display your inventory according to the color scheme you choose.  If one of the default styles does not meet your needs,  you may always look into the option of custom styles.

To learn more about displaying your inventory please see the following resources:


Displaying Inventory

Displaying Inventory

You can display the inventory in just about any fashion you can imagine!

Through the use of the shortcode options it is possible to display your inventory just the way you want it.  You can display all inventory, a specific category of inventory, a specific product, and many more options.  In addition to what you can display, you may also choose one of our default styles in the “Display” tab in the dashboard.  Choosing a default style will display your inventory according to the color scheme you choose.  If one of the default styles does not meet your needs,  you may always look into the option of custom styles.

To learn more about displaying your inventory please see the following resources:


Adding Inventory

Adding inventory

Inventory items can be added and edited by clicking on the “Inventory Items” menu item in your dashboard.  From there, you will see a screen that looks like the screenshot below. When you add any inventory items, they will automatically display in the table at the bottom. If you have numerous inventory items, you can search for specific ones with the fields above.

Screen Shot 2016-04-17 at 11.45.47 AM

To add an item, simply click the “Add Inventory Item” button. You’ll be taken to a page that allows you to enter information to create your first item.  Once you’ve finished, feel free to add as many items as you want, there is no limit.  Below is what the form will look like where you can enter the information, with your own custom settings and labels displayed. For an in-depth breakdown of the fields, please refer to this page.

Screen Shot 2016-04-17 at 11.51.29 AM

Congratulations, the WP Inventory Manager plugin is now configured for your use! Let’s move on to displaying your new inventory items using the shortcode.

Setting Up Inventory Items

Setting up your inventory items

The following will detail how to properly setup inventory items and manage them

When you setup your inventory items you want to think about the “architecture” of your inventory management.  This means, what inventory is going to be associated to which category or categories.  Aside from that, you should have images for inventory items (if applicable) and all of the information below necessary to setup your inventory.

  1. To get started, go to the “Inventory Items” link under the WP Inventory tab in your WordPress dashboard.
  2. Click the “Add Inventory Item” button.
  3. You will now see the available fields to fill out to manage inventory.  The following is a list of default fields when installing the plugin.  You may change the text of these fields in the display options or you can turn them off completely.  Turning them off will also render them unavailable when adding new items to your inventory.
    1. Number – This is for labeling a product and keeping them separated and organized.  It is not a serial number and is different in the fact that it can be used as a unique identifier for several products that may be associated to a given serial number, for example.
    2. Name – This is your inventory item name.
    3. Category – This drop down allows you to associate the product to a category.
    4. Product Description – The description text for your product/inventory item.
    5. Manufacturer – Manufacturer of your inventory item.
    6. Make – The make of the item.
    7. Model – The model of the item.
    8. Year – What year the item was made or published, etc.
    9. Serial # – A serial number.  This is very valuable and is essential in the architecture of your inventory management.  Serial numbers should not change.  They are meant to be a branding and used for the duration and life of the item.  In addition, no other item, past or future, should use the serial number of another.  This is for record keeping and should be thought of, to use an analogy, as a social security number is unique to an individual.  Social security numbers are never re-used and issued to only one person.  As should be a serial number to an inventory item or product.
    10. Quantity – Represents the amount on hand you have of this particular inventory item. In the admin listing, items below the low stock threshold set in the settings will display with a red background.
    11. Quantity Reserved – You can enter an initial amount of the quantity that is reserved.  Any new reservations will be reflected here as well and will not be allowed to go to a negative value.
    12. Price – The price for your item.
    13. Images – Any images you have associated to the item.
    14. Media – All media such as PDF, Word Docs, music files, video files, etc.; should be uploaded through the media option.  This could be materials and things that are related to the inventory item you want people to have.
    15. Sort Order – Providing a sort order and managing them will allow you to control what order your inventory item is shown in when being displayed in the inventory listing page view.

Again, all of these labels can be easily changed or turned off by visiting the display options tab.