Default Theme Setup

Default Theme Setup

If you choose to use the default theme there are a few things you need to know.

  1. Under the “WP Inventory” tab you need to go to “Settings”.  Then, the tab “General”.  Then the sub-tab “Item Display”.
  2. For the “Theme” option, select “Default Theme”.
  3. Now on the “Display” page you need to set the image or images at the top of the “Details” page settings if you want the two column display.  The system looks for the image or images field at the top of the list and if it is there, it lays-out the image/images to the left and all other fields to the right.  If you do not set the image or images at the top, it will layout in a single column.
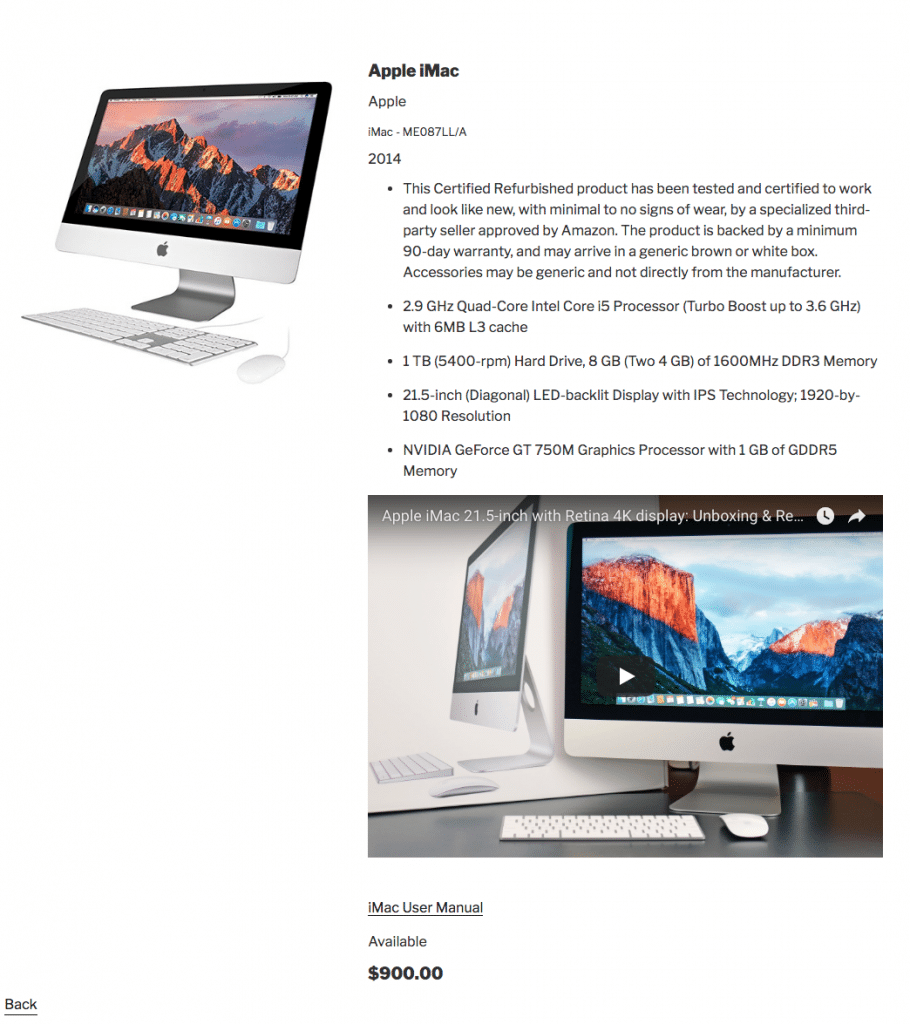
  4. In addition, as an option, you can put the “Make” and “Model” field side by side if they come together in the sequence.  So in your display settings if you drag the “Make” field in, and then “Model” directly under it, the system will put them on one line separated by a ” – “.  Here is an example of what the page may look like once you take these actions:

Displaying Inventory

Displaying Inventory

You can display the inventory in just about any fashion you can imagine!

Through the use of the shortcode options it is possible to display your inventory just the way you want it.  You can display all inventory, a specific category of inventory, a specific product, and many more options.  In addition to what you can display, you may also choose one of our default styles in the “Display” tab in the dashboard.  Choosing a default style will display your inventory according to the color scheme you choose.  If one of the default styles does not meet your needs,  you may always look into the option of custom styles.

To learn more about displaying your inventory please see the following resources:


Adding Inventory

Adding inventory

Inventory items can be added and edited by clicking on the “Inventory Items” menu item in your dashboard.  From there, you will see a screen that looks like the screenshot below. When you add any inventory items, they will automatically display in the table at the bottom. If you have numerous inventory items, you can search for specific ones with the fields above.

Screen Shot 2016-04-17 at 11.45.47 AM

To add an item, simply click the “Add Inventory Item” button. You’ll be taken to a page that allows you to enter information to create your first item.  Once you’ve finished, feel free to add as many items as you want, there is no limit.  Below is what the form will look like where you can enter the information, with your own custom settings and labels displayed. For an in-depth breakdown of the fields, please refer to this page.

Screen Shot 2016-04-17 at 11.51.29 AM

Congratulations, the WP Inventory Manager plugin is now configured for your use! Let’s move on to displaying your new inventory items using the shortcode.

Configuration

Configuring WP Inventory Manager

Excellent!  You have installed the WP Inventory Manager successfully.  Lets get it all setup!

The WP Inventory Manager has a great deal of control over the management and display of your inventory items.  You have the ability to define your own label text, to set endpoints/SEO friendly links, use shortcodes to display various inventory, and much more.  The purpose of this document is to step through the configuration process in a detailed, step-by-step process.  The first place we will start is the main page of the WP Inventory tab.

Main Tab

This page is your quickest way to get things going.  Following these six steps will get you going on a basic level within minutes!

WP Inventory Main Tab

The first step is to setup your inventory categories.  Clicking this link takes you to the inventory categories page where you can then add as many categories as you would like.  Some examples of categories may be:  skis and snowboards.  Those two categories would be a great way to keep inventory for skis in a category called “skis” and snowboards in a category called “snowboards”.  Later, in the shortcode options section, we will demonstrate how to list products specifically from various categories.

After setting up categories, it’s also worthwhile to evaluate your need for custom Statuses. You can find the two default statuses in the menu item of the same name – Active (shown in on the frontend, can be reserved) and Inactive (hidden on the frontend, can’t be reserved). We’ve seen several use cases using custom statuses such as featured items and putting items on backorder.

Inventory Category

The second link on the WP Inventory Manager main tab is the “Settings” link where the plugin is configured.

Next step – Settings!

Installation

Installation

Installing the WP Inventory Manager Plugin and Add Ons

The following set of instructions will allow you to install your plugin and activate it.

  1. Download the plugin (along with any add ons) and save the ZIP file(s) to your computer
  2. From here, we recommend a simple installation through the WordPress dashboard.

Installing Through WordPress Dashboard:

  1. Login to your WordPress dashboard
  2. Navigate to your “Plugins” tab on the lefthand menu
  3. At the top of that page, click the “Add New” buttonAdd New Plugin
  4. At the top of the next page, click the “Upload Plugin” buttonUpdate Plugin
  5. Browse to your downloaded ZIP file, or drag and drop the file into the file selection box. Make sure the file is still a ZIP – do not unzip it. Once the ZIP file is loaded, click “Install Now.”Browse Plugin
  6. The next page will tell you the plugin was successfully installed and give you an option to “Activate Now”
  7. After activating the plugin, it is now installed and ready to be configured.

If you’re unable to install via the WordPress dashboard, please contact us for support to install WPIM via FTP. Next step, configuration.