Display

Display Tab

Setting up the product listing page and the product detail page

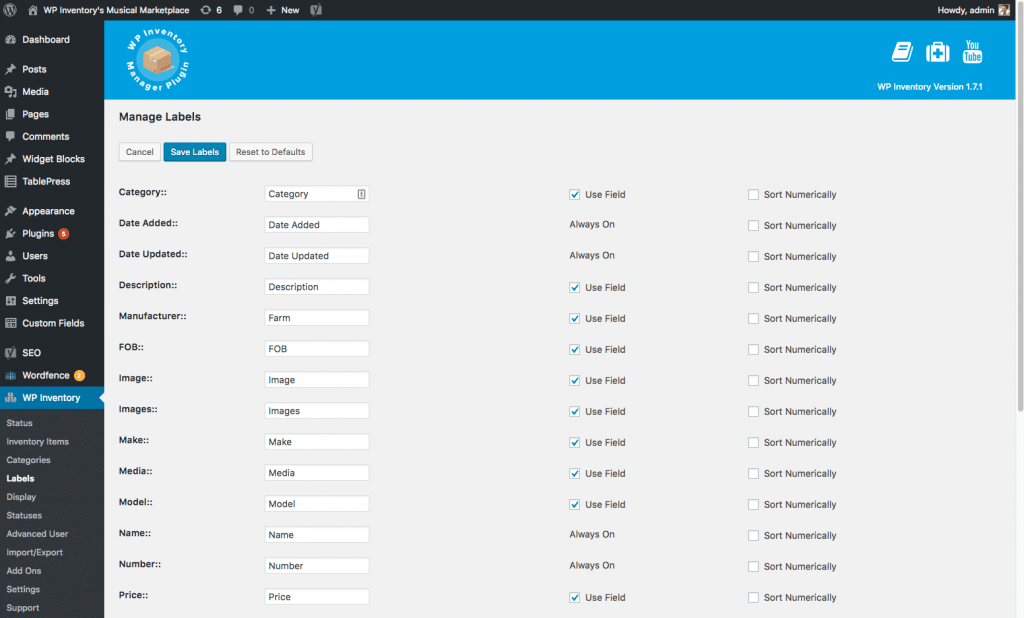
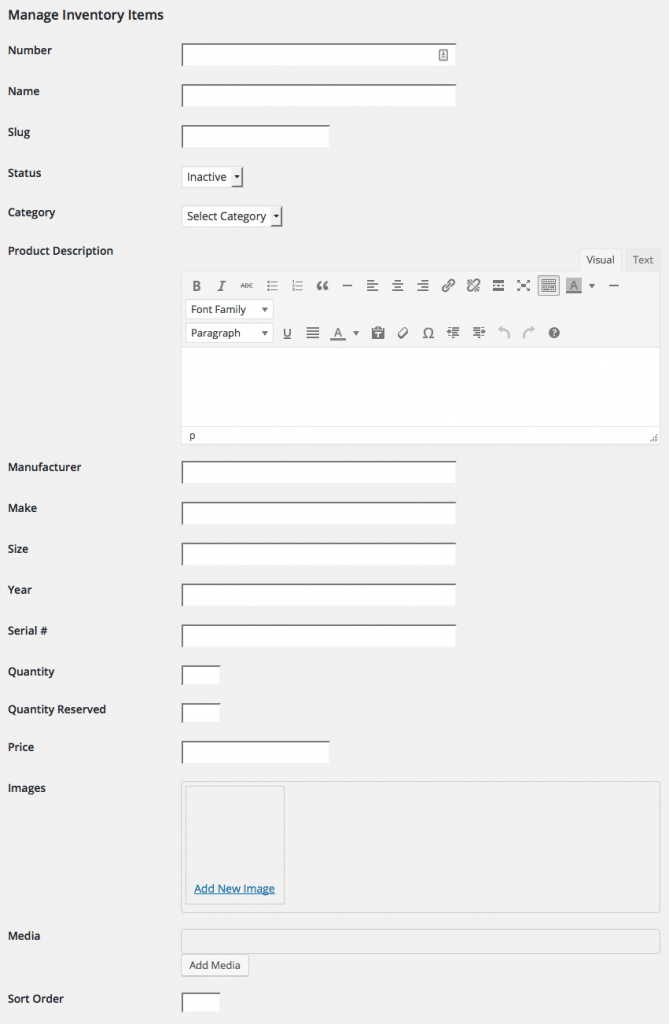
The “Display” tab in the dashboard will bring up a screen that allows the user to drag and drop available fields into different sections, which will make that field display in the specified section. You can choose which fields will display in the Inventory Listing, Detail Pages, Admin Listing, and website Search Results.  Essentially, whatever information you want to display on the listing page and the detail page, you just drag and drop into that view.  You can have as little as one piece of information or all available fields showing.  Also, remember that any labels you turn off and don’t use, will not show up here as an available field.

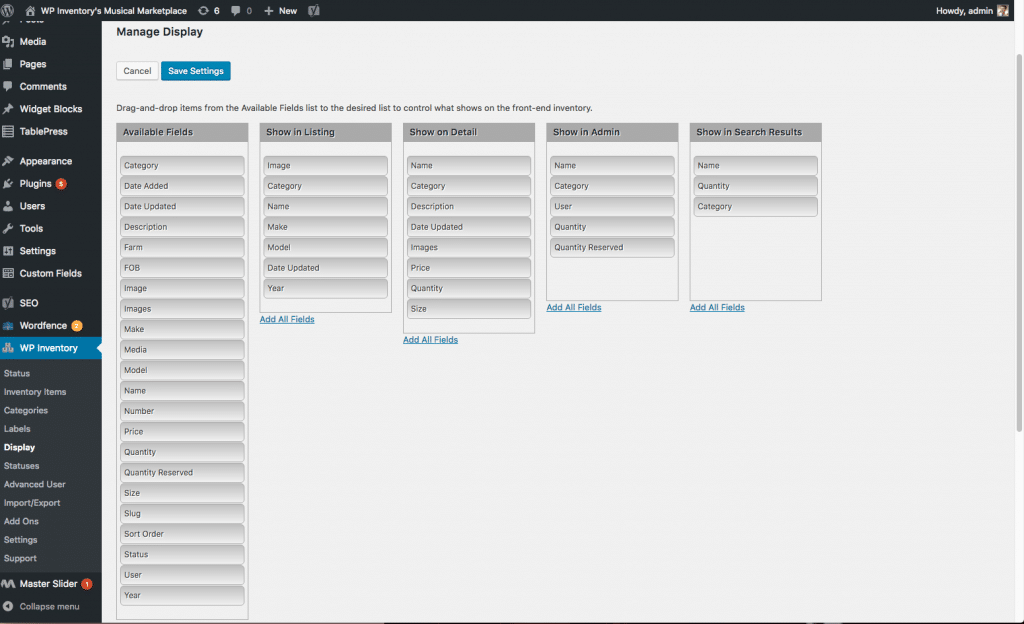
Below the drag and drop fields, you’ll also find a few more settings related to the display of labels and images. These settings are optimized by default, but you’re able to customize for specific use cases here.

Almost done! Let’s add inventory!

Labels

Labels

Field labels are easily modified to suit your needs

The fields are used to represent what data you are trying to show the user.  So, for example, the product description label is “Description” by default.  If you want that to say “Product Information” then you are in control of that on this page.  Essentially we allow you the ability control what the language is for each piece of inventory you are trying to manage.  With that being said, if you change a label in the dashboard, the label will also be changed in the product pages in the dashboard.  For example, if you were to go to a product in the dashboard after updated a label, that label would now show whatever you changed it to.  And of course, that change will also be seen on the web page by the user.

You’ll also see a checkbox next to each label that says “Use Field”.  If you uncheck that box, it will completely remove the field from the products page available items on the dashboard.  In other words, when you go to look at a product or to add a new one, that field will not even be listed.  The reason behind this is to allow the admin or person controlling the inventory the ability to only load the information they need to use and leave out the rest.  This makes the flow faster and less prone to mistakes by accidentally adding something in somewhere that should not be.  You can also choose whether or not a field is sorted numerically here.

Next step – Display Settings!

Displaying Inventory

Displaying Inventory

You can display the inventory in just about any fashion you can imagine!

Through the use of the shortcode options it is possible to display your inventory just the way you want it.  You can display all inventory, a specific category of inventory, a specific product, and many more options.  In addition to what you can display, you may also choose one of our default styles in the “Display” tab in the dashboard.  Choosing a default style will display your inventory according to the color scheme you choose.  If one of the default styles does not meet your needs,  you may always look into the option of custom styles.

To learn more about displaying your inventory please see the following resources:


Adding Inventory

Adding inventory

Inventory items can be added and edited by clicking on the “Inventory Items” menu item in your dashboard.  From there, you will see a screen that looks like the screenshot below. When you add any inventory items, they will automatically display in the table at the bottom. If you have numerous inventory items, you can search for specific ones with the fields above.

Screen Shot 2016-04-17 at 11.45.47 AM

To add an item, simply click the “Add Inventory Item” button. You’ll be taken to a page that allows you to enter information to create your first item.  Once you’ve finished, feel free to add as many items as you want, there is no limit.  Below is what the form will look like where you can enter the information, with your own custom settings and labels displayed. For an in-depth breakdown of the fields, please refer to this page.

Screen Shot 2016-04-17 at 11.51.29 AM

Congratulations, the WP Inventory Manager plugin is now configured for your use! Let’s move on to displaying your new inventory items using the shortcode.

Configuration

Configuring WP Inventory Manager

Excellent!  You have installed the WP Inventory Manager successfully.  Lets get it all setup!

The WP Inventory Manager has a great deal of control over the management and display of your inventory items.  You have the ability to define your own label text, to set endpoints/SEO friendly links, use shortcodes to display various inventory, and much more.  The purpose of this document is to step through the configuration process in a detailed, step-by-step process.  The first place we will start is the main page of the WP Inventory tab.

Main Tab

This page is your quickest way to get things going.  Following these six steps will get you going on a basic level within minutes!

WP Inventory Main Tab

The first step is to setup your inventory categories.  Clicking this link takes you to the inventory categories page where you can then add as many categories as you would like.  Some examples of categories may be:  skis and snowboards.  Those two categories would be a great way to keep inventory for skis in a category called “skis” and snowboards in a category called “snowboards”.  Later, in the shortcode options section, we will demonstrate how to list products specifically from various categories.

After setting up categories, it’s also worthwhile to evaluate your need for custom Statuses. You can find the two default statuses in the menu item of the same name – Active (shown in on the frontend, can be reserved) and Inactive (hidden on the frontend, can’t be reserved). We’ve seen several use cases using custom statuses such as featured items and putting items on backorder.

Inventory Category

The second link on the WP Inventory Manager main tab is the “Settings” link where the plugin is configured.

Next step – Settings!

Installation

Installation

Installing the WP Inventory Manager Plugin and Add Ons

The following set of instructions will allow you to install your plugin and activate it.

  1. Download the plugin (along with any add ons) and save the ZIP file(s) to your computer
  2. From here, we recommend a simple installation through the WordPress dashboard.

Installing Through WordPress Dashboard:

  1. Login to your WordPress dashboard
  2. Navigate to your “Plugins” tab on the lefthand menu
  3. At the top of that page, click the “Add New” buttonAdd New Plugin
  4. At the top of the next page, click the “Upload Plugin” buttonUpdate Plugin
  5. Browse to your downloaded ZIP file, or drag and drop the file into the file selection box. Make sure the file is still a ZIP – do not unzip it. Once the ZIP file is loaded, click “Install Now.”Browse Plugin
  6. The next page will tell you the plugin was successfully installed and give you an option to “Activate Now”
  7. After activating the plugin, it is now installed and ready to be configured.

If you’re unable to install via the WordPress dashboard, please contact us for support to install WPIM via FTP. Next step, configuration.


Quick Start Guide

WP Inventory Manager Quick Start

Put yourself on the fast track to managing your inventory like a rock star!

The list of tutorials to the left will provide you with all the necessary tools you need to install, setup, and get your inventory displayed on your website using the WP Inventory Manager plugin.  Each document has detailed instructions with helpful screenshots, making for an easy-to-follow set of instruction.  These quick start guides will walk you through installing WP Inventory Manager, and get you started entering and displaying your inventory items in no time!

Let’s get started with Installation!

Or, if you’d rather follow along in video form, you can find the same information in this tutorial: