Display

Display Tab

Setting up the product listing page and the product detail page

The “Display” tab in the dashboard will bring up a screen that allows the user to drag and drop available fields into different sections, which will make that field display in the specified section. You can choose which fields will display in the Inventory Listing, Detail Pages, Admin Listing, and website Search Results.  Essentially, whatever information you want to display on the listing page and the detail page, you just drag and drop into that view.  You can have as little as one piece of information or all available fields showing.  Also, remember that any labels you turn off and don’t use, will not show up here as an available field.

Below the drag and drop fields, you’ll also find a few more settings related to the display of labels and images. These settings are optimized by default, but you’re able to customize for specific use cases here.

Almost done! Let’s add inventory!

Labels

Labels

Field labels are easily modified to suit your needs

The fields are used to represent what data you are trying to show the user.  So, for example, the product description label is “Description” by default.  If you want that to say “Product Information” then you are in control of that on this page.  Essentially we allow you the ability control what the language is for each piece of inventory you are trying to manage.  With that being said, if you change a label in the dashboard, the label will also be changed in the product pages in the dashboard.  For example, if you were to go to a product in the dashboard after updated a label, that label would now show whatever you changed it to.  And of course, that change will also be seen on the web page by the user.

You’ll also see a checkbox next to each label that says “Use Field”.  If you uncheck that box, it will completely remove the field from the products page available items on the dashboard.  In other words, when you go to look at a product or to add a new one, that field will not even be listed.  The reason behind this is to allow the admin or person controlling the inventory the ability to only load the information they need to use and leave out the rest.  This makes the flow faster and less prone to mistakes by accidentally adding something in somewhere that should not be.  You can also choose whether or not a field is sorted numerically here.

Next step – Display Settings!

Settings

WP Inventory Settings

A complete and comprehensive guide

When you first arrive at the settings page you will be presented with a page that looks like this:

WPIM Settings

This screen itself is where you enter the license keys to activate WP Inventory Manager, as well as any extensions you have installed. However, at the top of the page, you’ll find a menu where you can find many more settings broken down by section. Let’s break each section down and describe what each setting does.

  • General Settings
    • Permission Settings (see image reference)
      • Minimum role to add/edit items –  This setting allows you to set what level of user your site must be in order to actually interact with the inventory aspect of your website.  Where an editor by WordPress standards would have a great deal of power over normal WordPress content, checking administrator on this page will make it so only administrators have privileges to add or delete inventory items.  Essentially your staff can see the inventory and all its information, but would not be able to make any additions or subtractions surrounding it.
      • Allow users to edit – For this setting, you choose between “Any Items,” which allows users to edit the entire inventory, or “Only Their Own Items.” For example, if “Bob” went to an inventory item that was entered by “Ted”, then “Bob” would be able to see that item and its information, but would not be able to change that information.  The only person that could do that would be “Ted.”
    • Item Display Settings (see image reference)
      • Use SEO URLs – By default, the plugin uses the inventory ID in order to display the inventory item.  So a link would look something like:  www.yoursite.com/inventory/?inventory_id=3.  If you want that to have SEO value for search engines, you would want it to have more meaning.  That is what the SEO URLs setting does.  Ticking it to “yes” will make it so the URL uses the inventory name.  So when it is being used, that same link above would look like this now:  www.yoursite.com/inventory/product-name/.  This gives the URL relevance, readability, and adds to the organization of your website.
      • SEO End-point – This allows you to tell the URL structure what folder you want it coming off of.  For example, setting this end-point to “shop” will produce a link that looks like such:  www.yoursite.com/shop/product-name/.  The end-point will be the point in the URL where all products are directed off of.  This is highly valuable for SEO.
      • Shortcode on Home? – If you’re using the WP Inventory display shortcode on your home page, enable this setting to ensure proper functionality.
      • Theme – WP Inventory Manager comes with a default theme for a basic display of your inventory items on the front-end. If you’d rather use CSS to create your own page display, choose “No Theme.”
      • Use Media Fields – This allows you to turn off the ability to add any media types other than basic images.  Turning it on will do the reverse, allowing you to accept all types of media.  Types of media include, but are not limited to, videos, file documents such as PDF or Word Docs, downloadable files, etc.
      • Items Per Page –  On the listing page, this is the number of items to show before the pagination occurs.  By default, it is set to display 20 items on the listing page before it makes another page to display the next set of 20 items.
      • Hide Items Low Quantity – This allows you to unlist inventory items when the quantity dips below a specified threshold. In the admin listing, items below the low stock threshold will display with a red background.
      • Hide Items Below Quantity – This is the threshold for the “Hide Items Low Quality” setting.
    • Date Format Settings (see image reference)
      • Date Format –  This allows you to choose from various different date display options for your inventory items.  Choose one that fits your needs or preferences.
      • Time Format –  This allows you to choose from various different time display options for your inventory items.  Choose one that fits your needs or preferences.
    • Currency Format Settings (see image reference)
      • Currency Symbol –  This is the symbol you want to use to denote the type of currency your inventory items are in.
      • Currency Symbol Location –  Allows you to format the position of the currency symbol, either before or after the numbers of the price.
      • Currency Thousand Separator –  This setting allows you to choose what symbol you want to use for thousands differentiation in the price. The default value is a comma.
      • Currency Decimal Separator – This setting allows you to choose what symbol you want to use for the decimal place in the price. The default value is a period.
      • Currency Precision (decimal places) –  This setting allows you to choose how finite you would like to set your pricing.  The global standard is two decimal places.  However, there may be special cases as not all cases are the same.  For that reason, it may be necessary to have more control over the budget of inventory items.
    • Search Settings (see image reference)
      • Include Inventory in Search – Enabling this setting will return a result for your product inventory which leads to a specified page when a user uses the search functionality of your website.
      • Search Results Link to – This is the specified page that will be linked for the inventory search result. You can choose any page that contains the WP Inventory Manager display shortcode.
  • Reserve Settings
    • General Settings (see image reference)
      • Allow Visitors to Reserve Items –  This setting will allow you the ability to allow users to reserve items or not.  A user can give his/her information and reserve a specified quantity of the inventory item.
      • Ask for Quantity When Reserving – This allows the user to specify the quantity when they are reserving an inventory item. Can be disabled to allow vendor-decided quantity.
      • Decrease Qty in System on Reserve – If enabled, this setting will automatically decrease the quantity of an inventory item when a user reserves it.
      • Send-to Email When Reserve – This allows you to specify an email address to send notifications to when a user reserves an inventory item. If left blank, it will default to the site admin email address.
      • Send Reserve Confirmation – If enabled, this will send a notification to the user when they reserve an inventory item.
      • Reserve Message – This allows you to customize the message that is displayed on the web page when a user reserves an inventory item.
    • Form Settings
      • These settings allow you to customize the reserve form that the user fills out to reserve an item. You can determine the form title, field titles, whether a field is required or not, and button text.
  • Image / Media Settings
    • Image Settings (see image reference)
      • Placeholder Image – This allows you to set a default image for your inventory items when no other image is specified.
      • Clicking Image Displays Larger Image – When enabled, this setting will add a link inventory item images on the listing page that will display a larger version of the image.
      • Open Media in New Window – This setting allows you to determine whether inventory item image files will open in the same tab or a different browser window.
      • Rebuild Image Thumbnails –  When you change a product image size via media settings, etc., then it is necessary to rebuild or re-generate that thumbnail or image to be used in place of the previous one.
    • Slideshow Settings
      • This page allows you to customize the media file slideshow for inventory item listings. You can customize the slide speed, whether the slideshow is automatic or not, captions, size, and more!

Any new extension you install (e.g. Advanced User Management or Import / Export) will create another tab on the settings page for the add on-specific settings. These will be covered more in depth in their specific section of the documentation. Next step, Labels!

Widgets

Widgets

Widgets can be found under your Appearance->Widgets menu on the left-hand side of your WordPress dashboard.  Dragging and dropping a WP Inventory Manager widget into a sidebar will display that particular widget’s functionality in the sidebar it was assigned. By default, WP Inventory Manager comes with two widgets: “WP Inventory Categories” and “WP Inventory Latest Items.”

The “WP Inventory Categories” widget allows you display inventory items from a specified category. “WP Inventory Latest Items” simply displays a specified number of the latest inventory items entered into the system.

Importing and Exporting Inventory

Importing and Exporting Inventory Items

How can I import (or export) inventory?

You may be starting a new website and want to transfer all of your inventory items from the old one to the new one.  You might want to keep a backup log each week, month, etc. of your inventory.  Or, you may still be using the old Legacy version of Inventory and want to upgrade to the new version’s database structure.  There are many reasons you may want to export and import as you can see, and we have made it fairly simple. You can either utilize the following instructions, or follow along with this tutorial video:

Installation

    1. Purchase and Download the Import and Export add-on.
    2. Install the add-on through your WordPress dashboard by navigating to the “Plugins” tab.
    3. After browsing and uploading the ZIP file, activate the plugin.
    4. After you enter your license key, there will be a new link under your “WP Inventory” tab in the dashboard called “Import/Export”, click it.
    5. You will see a page similar to this:Import and Export

Exporting Inventory Items

  1. To perform a full export, simply click the “Export All Inventory” button, and all of your inventory data will be exported to a CSV file format (which can be opened with a variety of tools, including Microsoft Excel).
  2. To export only certain items, simply go to “WPInventory => Inventory Items, filter the items you want to export, and click “Export” at the bottom of the listing)

Importing Inventory Items

    1. First, check out the sample import file that is included in the plugin. It can be found inside the plugin folder, and is titled sample_import_file.csv. This file illustrates the various supported formats and columns.
    2. When importing, you’ll be provided the opportunity to “map” the columns in your file to the fields that exist in the database. This is much easier to do if your CSV spreadsheet includes a row at the top with “Column headings” – the names of the columns that you want to map to.Import and Export
    3. If you are importing categories, you have two choices:
      • Ensure all categories exist in the system prior to importing, in which case they can be matched either by ID, or by name.
      • Or, check the box to “create categories if not found”, and the categories will be created for you.
  1. If you do not need to import statuses, simply don’t include a status column, and all items will import as “active”. If you DO need to import statuses, please be sure that the statuses exist in the system, and that your “status” column matches properly. Just like categories, you can match EITHER by ID, or by name. Note that if a name is NOT matched, the system does not create the status, but rather will assign that item to the first “active” status that it finds in the system.
  2. If you are using Advanced Inventory Manager, and want to import multiple inventory “types”, the process is the same, however you will need to import each type in a separate CSV file so that the mapping can be performed properly.
  3. Remember – if you get an import wrong, you can simply start the import process again, and a notice will let you know that “there are X imported items already”, as well as give you an option to remove those items.
  4. To associate an image with item during import, first upload it to your WordPress media center, and then enter the link to that image as the data for an “Image” column in your CSV.

Do Your Own Styling

Use your own styles

You can add your own styles to affect the display

If you are comfortable with CSS and would like to add your own styles, simply write your CSS to your theme’s style.css file.  If you are using a child theme, you would write it to the style.css file in that child theme’s folder.  Child themes are used commonly in 3rd party, purchased, WordPress themes.  Child theme style sheets allow you to override styles from plugins or the parent theme.  See the codex here for a more in-depth review of child themes.

Default Style Options

Default style options

The WP Inventory Manager comes with a standard set of styling options.  If you choose not to use our styles, you can turn them off in the settings.  Our styles are meant for layout only and we try very hard not to do anything that will interrupt your theme’s styles.  We don’t set font sizes, colors, and keep all styles contained within our html wrapper.  Most of the styles revolve around the detail page layout to support a two column design.  To achieve this, simply make sure that the image or images field is the first item in the display settings list here:

This would result in the details page looking like this:


Where the images are on the left, and all the rest is on the right.

Note: See how “Laptop” and “MacBook Pro (early 2013)” are side by side?  That is the “Make” and “Model” fields.  If they are put one after the other as they are in the screen shot label settings above; then they will display inline like this.

And lastly, if you want to make the labels show up with these, you just have to navigate to your labels setting page again and scroll down to the bottom.  You will want to set the setting “Display labels on Detail” as depicted in this screen shot:

And after you save, you can go back to the front end and refresh and it will now look like this:

Styling

Customize the Look of Your Inventory

Styling your inventory pages

By default, WP Inventory is configured to use many of your theme’s styles as possible. However, not every theme is the same, and sometimes elements will not style as appropriate. Or maybe you want to customize your inventory listing beyond the default theme styles. It is possible to style and give your inventory pages a nice look in a few different ways.  One way is to use your own custom styles.  Simply write your styles to your theme or child theme’s style.css file.  Another way is to hire an outside web developer do it for you based on a professional web design, and refer them to our CSS documentation (linked below).

Getting Started Using the Template Override System

Getting Started Using the Template Override System

The short version: to use the template override system, you will copy any files in the plugin “views” folder that you’d like to override from the core plugin folder, and paste them into a new folder in your theme (wpinventory > views). You can make any changes you want to that copied file, and the plugin will automatically take your custom template and prioritize it over the default plugin file.

The long version:

Step One:

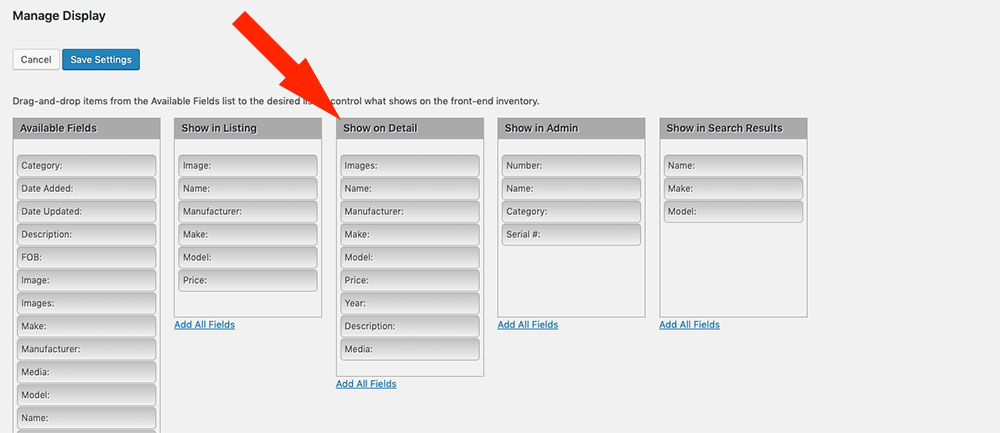
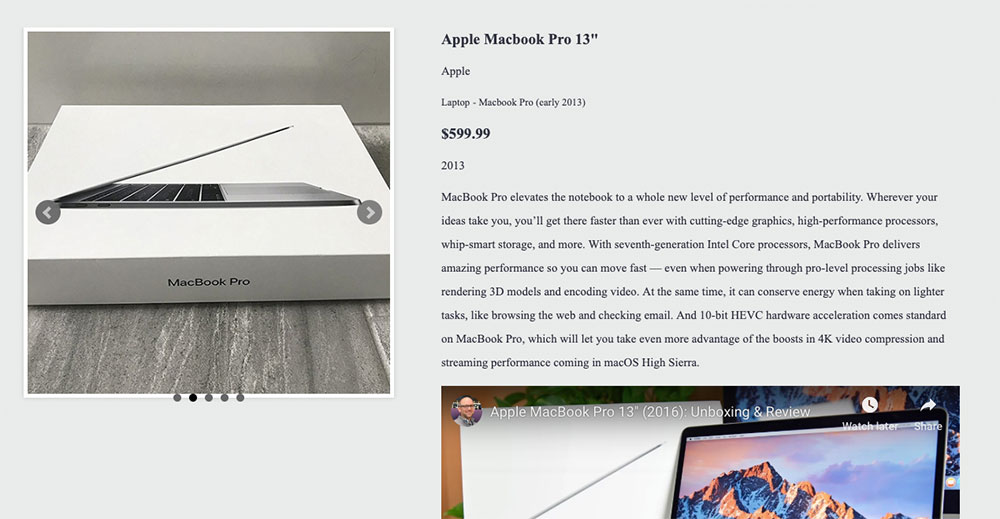
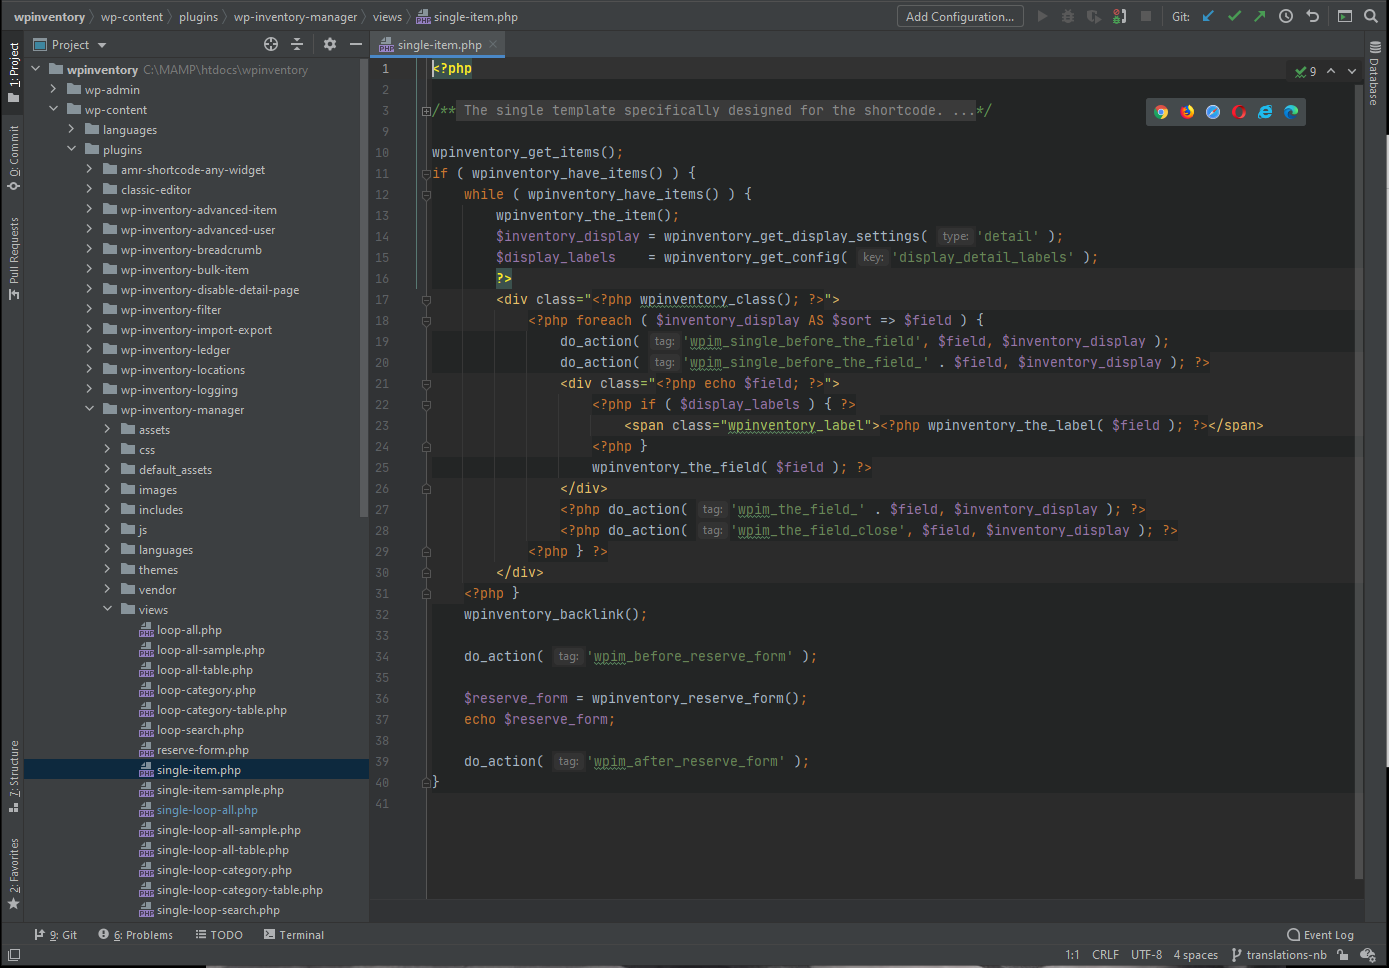
First you’ll need to access your site’s files – the exact method to do so will vary depending on your hosting solution. Your files may be stored locally on your computer, or you may need to access them via FTP. No matter the case, once you have the files open, you’ll need to find the wpinventory plugin folder. Within that folder is a folder titled “views” that contains all of the available templates to override. You can find a reference on the available files and what frontend display they affect here. As an example, let’s say we wanted to override the look of the item detail page. The screenshot below shows the path to find the relevant file. Once you find it, copy the file.
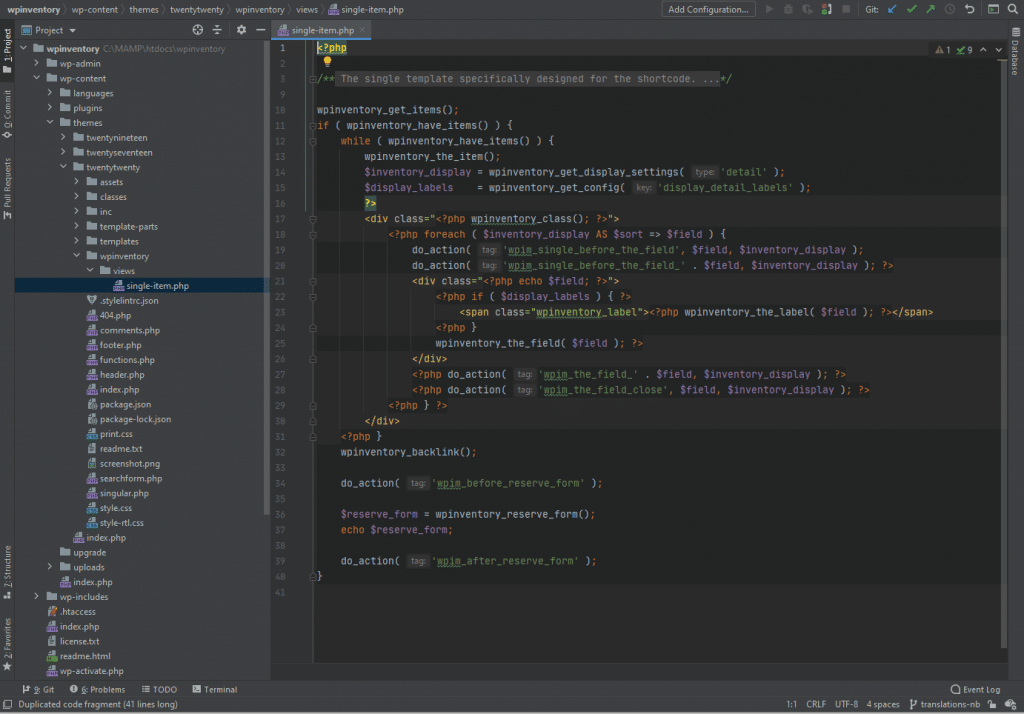
Step Two:

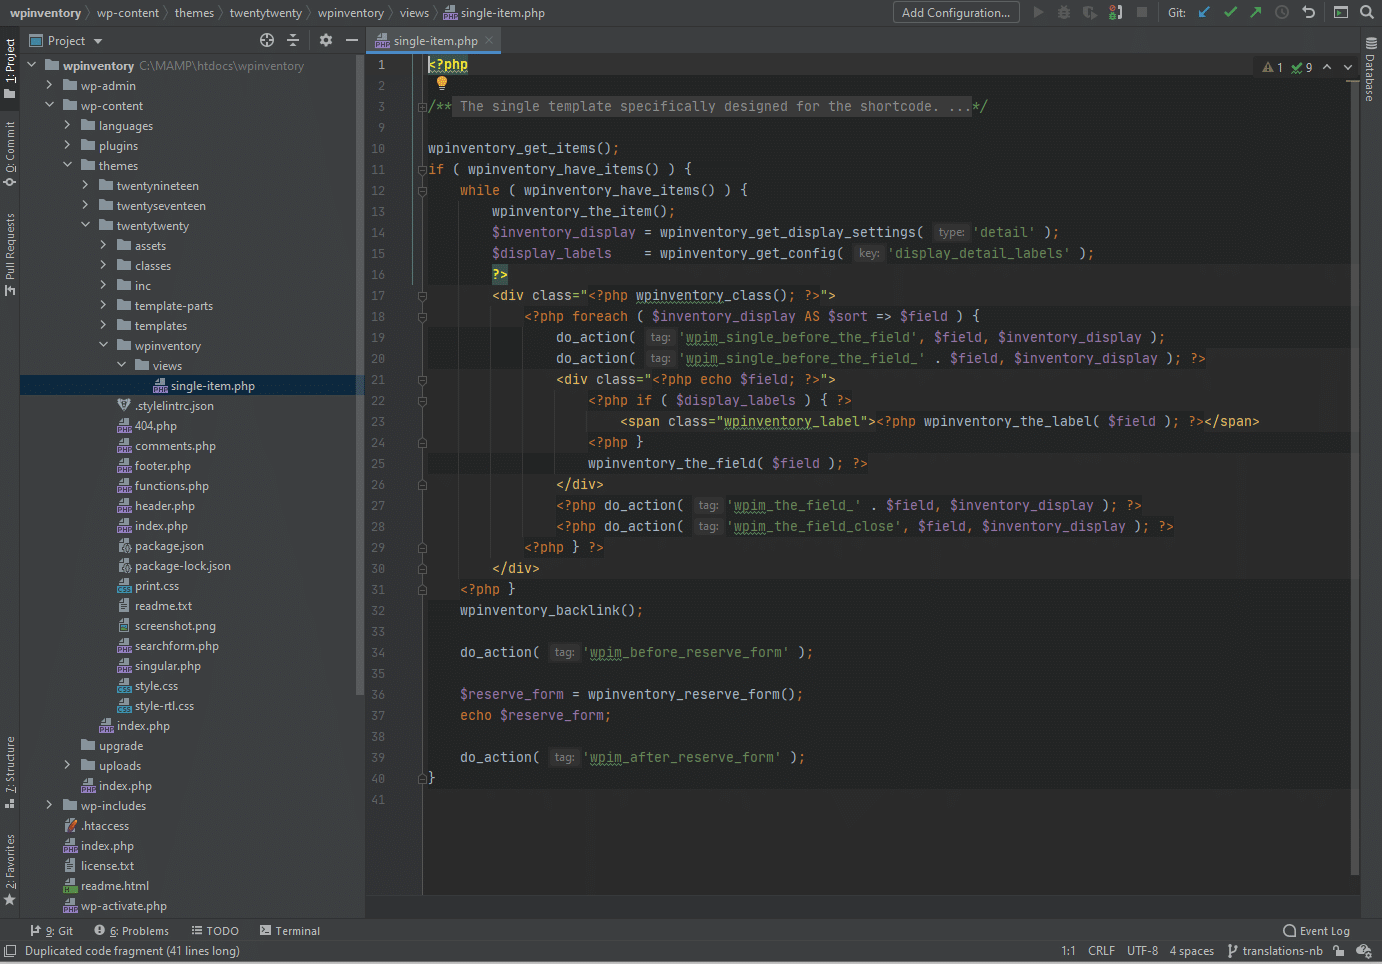
Inside of your website’s theme folder, create a new folder titled “wpinventory”. Within that folder, create another new folder titled “views”. Then, paste the copied file from step one into the “views” folder you just created. Ensure you don’t change the name of the file! The screenshot below shows an example path.

Step Three:

The file you copied into a new folder in step two will now override the default plugin file! You can make as many changes as you need to the HTML layout or other data, and your work will not be lost even after updating the plugin.

As mentioned before, custom development of this nature falls out of the scope of our license support. However, we understand that the template override system may be a bit daunting for those unfamiliar with PHP. Don’t worry, there’s still an option to reach out for help.  We offer a paid service for custom template development. If you need help customizing a view for your site, please Complete our Contact Form to reach out for more information.

Template Override System

WP Inventory Manager Template Override

What is a template override?

We’ve designed WP Inventory to be developer-friendly, meaning anyone with a working knowledge of PHP can go in and edit the plugin files. However, you don’t want your changes to be erased every time you update the plugin.  This is where the template override system comes in handy. A template override allows you to change the output, or even the HTML of the page via your own custom programming.  In short, the template override system provides a way for you to craft custom templates for displaying your inventory, without altering the core plugin files. This system ensures you can create frontend pages that meet your exact need, without risking them being overwritten when you update the WP Inventory plugin. Ready to get started? Dive into more details on the righthand sidebar, or click here to learn how to use this handy system.

Please be aware that working with the template override system falls outside the scope of our license support. However, we understand that the template override system may be a bit daunting for those unfamiliar with PHP. Don’t worry, there’s still an option to reach out for help.  We offer a paid service for custom template development. If you need help customizing a view for your site, please Complete our Contact Form to reach out for more information.