Reserve System

Reserve System

The reserve system is a nice feature to help convert your users to paying clients!

Using the reserve system allows you to enable a reserve form on your inventory item pages.  A user can fill in this reserve form and they will then be allowed to pick it up at a later time.  They get an email confirmation and the administrator also gets a confirmation email.  In addition, the quantity decreases by the reserve amount automatically in the system. For more information, please refer to the Reserve Setting section in the Quick Start Guide.

Be advised that emails being sent are dependent on your server settings and/or host environment.  For best results with regards to receiving emails, we strongly recommend the WP Mail SMTP plugin.

Previewing reservation entries

This is possible with our Ledger Add-On.  By default, the reservation system does not keep journal entries of the emails or for whom reserved the item(s).  If you would like a log of this from the dashboard as well as ability to invoice; then you will need the Ledger Add-On as well.

Shortcode Options

Shortcode options

Here is a list of all of the core fields

Use these shortcodes to display your WordPress inventory management data on any page or post in WordPress.

  • inventory_name
  • inventory_make
  • inventory_model
  • inventory_year
  • inventory_serial
  • inventory_fob
  • inventory_status
  • inventory_quantity
  • inventory_quantity_reserved
  • inventory_price
  • inventory_number
  • inventory_sort_order

  • inventory_description
  • inventory_size
  • inventory_manufacturer
  • inventory_slug
  • category_id
  • category_name
  • category_slug
  • user_id
  • hide_low
  • hide_low_quantity
  • page
  • page_size

For example:

[wpinventory inventory_make="Chevy" inventory_model="Tahoe" inventory_year="2011"]

This shortcode would show all 2011 Chevy Tahoes in the system.

The following are some possible examples to do various things

  • [wpinventory category_name="Your category name here"]

    – This shortcode attribute will show all inventory items associated with a category given the category name is 100% identical to the category name you want to use to display.  Meaning, uppercase and spaces and punctuation all the same.

  • [wpinventory category_slug="category-slug"]

    – This is the slug of the category as defined in the dashboard under the category you setup.  To edit the slug simply navigate to the WordPress dashboard under the WP Inventory tab and “Categories”.  Editing the category will give you the ability to change the slug.  This enables you to manager your category names and the slugs for the URLs you want to use separately.

  • [wpinventory category_id="5|7|12"]

    – Using this attribute will allow you to display only one category at a time, or multiple categories.  To display only one category, just put in that category ID and that is it.  To display multiple categories, simply separate each ID with a pipe (|) separator.

  • [wpinventory inventory_id="175"]

    – The attribute inventory_id will show only that one inventory item.  Put this on individually made inventory pages for example.

  • [wpinventory product_id="175"]

    – Alias for inventory_id above, this does the same exact thing.  It allows you to list one specific item.  In this case the attribute is specific to the point it is a “product”.  You may pick which you prefer to use.

  • [wpinventory inventory_slug="product-slug"]

    – Another way to list one item specifically.  Using it’s inventory slug label.

  • [wpinventory user_id="5"]

    – Here we can show all inventory items on a page associated to the user “x”. Meaning, all inventory items entered by that specific user and that user alone. You will have to know the user’s ID for this. You can find that by hovering the user in the WordPress dashboard under the “users” tab. When you hover that user, at the bottom of your screen it should show the URL of that user link. In that URL, you will see “user_id=”x”. That is the id you need for this shortcode attribute to work. Also, you will not be able to see your own personal user ID while you are logged in. WordPress just does not show it to you. So, you need to log in as another user. If you are the only user or, were the first user, then your user ID is “1”.

  • [wpinventory page="3"]

    – A numeric value to indicate which page in the number of pages to view.

  • [wpinventory page_size="15"]

    – A numerical value to set how many items to display on a page before having to go to the next page.

  • [wpinventory inventory_search="search term here"]

    – Any text you want that will be “searched for” within the inventory item.

  • [wpinventory inventory_status="2"]

    – Filter items by their status. Uses the status ID of the status, and works with custom or edited statuses as well. By default:

    • Active    = 2
    • Inactive = 1
  • [wpinventory hide_low="0"]

    – This is an override setting.  If you set this to “0” then that is saying “do not” honor the hide low quantity setting in the general settings.  Which will in turn display all inventory.

  • [wpinventory hide_low_quantity="20"]

    – This is another override.  Say you have your general quantity hide low set to 30 in the system.  This example would now show any quantity that is 20 or more.

    Example of these two together:

  • [wpinventory hide_low="1" hide_low_quantity="20"]

    – Note:  We set the hide_low equal to : 1 –  This means “enable hide” and has to be accompanied by the hide_low_quantity parameter.

    – The only necessary usage of this shortcode combination is if you do not have a general hide low quantity setting set, however for this particular list of items you do want to hide items of a certain quantity or lower.

  • [wpinventory inventory_year="2018"]

    – This will show inventory belonging to a specific year.

  • [wpinventory backlink="off"]

    – This will hide the back-link that is on the details page if set to “off” or “false”.

Advanced User Control

If you are a licensed user and have a valid Advanced User Control license, then you may do the following to display inventory items on the front end.  Please note that these options are only available for the Advanced User Control version 1.1.0 and up.

  • [wpinventory user_id="self-or-none"]

    – This will display all of the inventory items for the logged in user.  If logged out, it will display no inventory items at all.

  • [wpinventory user_id="self-or-all"]

    – This will display all of the inventory items for the logged in user.  If logged out, it will display all of the inventory items.

  • [wpinventory user_id="self-or-template" template="your-template-file.php"]

    – This will display all of the inventory items for the logged in user.  If logged out, it will display a custom template of information utilizing the template override system.  Simply create a .php file and put it in the “views” folder.  Then, above in the shortcode where it says “template=”, provide the file name.  For example:  file.php.  The “.php” extension isn’t necessary but can be included.  This allows for a much better user experience and allows you to give the proper directions to the user in order to view or get started to view inventory items on your site.

Advanced Inventory Manager

  • [wpinventory type_id="1"]

    – Accepts a number value for the ID of the inventory type you wish to display.  Does not support multiple IDs due to the fact you can set the display setting differently for each type of inventory based on the amount of fields in each type you have.

Locations

  • [wpinventory location="1|2|3"]

    – Accepts a number value for the ID of the location you wish to display.  Can also be separated with a comma to add multiple locations.  IDs are found in the location table in the dashboard admin.

Reserve Cart

  • [wpinventory_checkout]

    – Place this shortcode on a page you intend to display the checkout cart and reservation form for the user to complete the reservation.

  • [wpinventory_cart]

    – Displays the cart contents and totals with a button to go to checkout.

Advanced Search Filter

The Advanced Search Filter can be displayed on the frontend using the shortcode:

[wpinventory_advanced_search]

You can find more details on these filters and the available shortcode parameters in the Advanced Search documentation.

Sorting Display

  • [wpinventory order="name DESC"]

    – This will sort the inventory on the page by the ‘name’ field and it will order it in reverse alphabetical order.  So from Z to A.  If you leave out the “DESC” then it will sort the inventory by the ‘name’ field in alphabetical order, or from A – Z.  Lastly, the “DESC” is not case sensitive.  So it could be “DesC” and still work. You can do this type of combination for virtually any field EXCEPT date fields.  For example, to order by the “Sort Order” values you would use:

    [wpinventory order="inventory_sort_order"]
  • You can use any of the standard fields listed at the top of this page to order items.

Ordering by two or more fields

  • [wpinventory order="quantity DESC, number ASC"]

    – allows multiple sort parameters. This would sort first by quantity descending, then number ascending.  Try using other combinations to suit your needs.

Combining Shortcode Attributes

You can also combine shortcode attributes, like the example below. You can find more information on the Shortcode Attribute Linking page.

[wpinventory page="3" page_size="15" category_id="5|7|12"]

Shortcode

Shortcode

Learning and mastering the shortcode will enable you to effectively manage your inventory

The shortcode is something that is used on your page to display your inventory.  The base shortcode we use in order to display our inventory is:

[wpinventory]

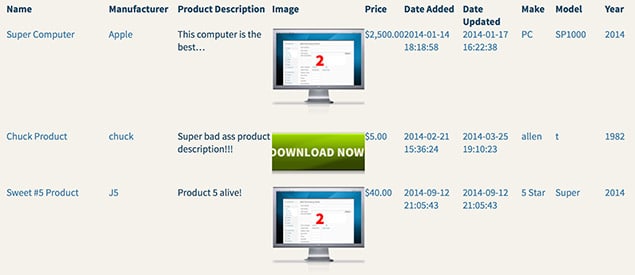
Upon installation of the WP Inventory Manager and going through the quick start process, you will be ready to display the products you have entered.  Creating a page in your WordPress dashboard such as a “Shop” page, or “Inventory” page, would be a great page to insert the shortcode.  Simply drop in the shortcode [wpinventory] and save the page.  Next, go to your website and navigate to that page.  You should now see your inventory listed and it should look something like this.

Inventory Listing Page

Note: If you want to rearrange the fields order in which they display, for example the image first, then you would just update the display settings in the “Display” tab. Also, there are no styles attached to this, it is a bare bones listing. For styles, you may use the built in styles, fall back on your theme styles, or have a developer make custom styles for you.

By clicking into one of these items you will land on the inventory item’s details page which will list out all of the information you defined for it to show in the display tab.

For more advanced usage of the shortcode, please read our shortcode options guide.

Displaying Inventory

Displaying Inventory

You can display the inventory in just about any fashion you can imagine!

Through the use of the shortcode options it is possible to display your inventory just the way you want it.  You can display all inventory, a specific category of inventory, a specific product, and many more options.  In addition to what you can display, you may also choose one of our default styles in the “Display” tab in the dashboard.  Choosing a default style will display your inventory according to the color scheme you choose.  If one of the default styles does not meet your needs,  you may always look into the option of custom styles.

To learn more about displaying your inventory please see the following resources:


Adding Inventory

Adding inventory

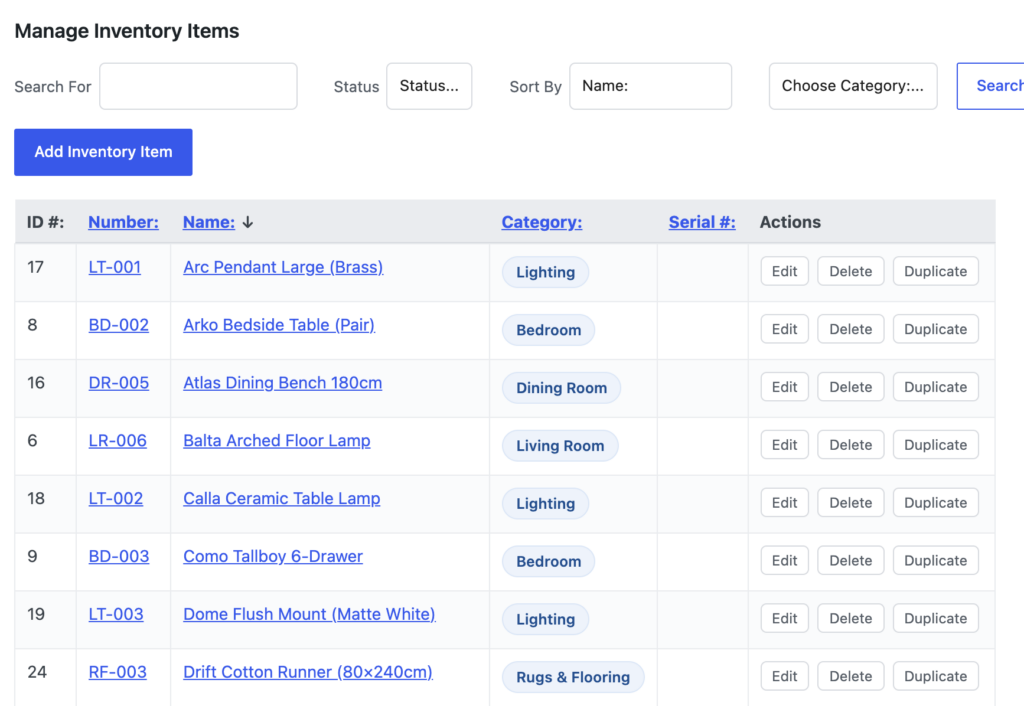
Items can be added and edited by clicking on the “Inventory Items” menu item in your dashboard. From there, you will see a screen that looks like the screenshot below. When you add any items, they will automatically display in the table at the bottom. If you have numerous inventory items, you can search for specific ones with the fields above.

The Manage Inventory Items screen, showing the search filters, the Add Inventory Item button and the list of items

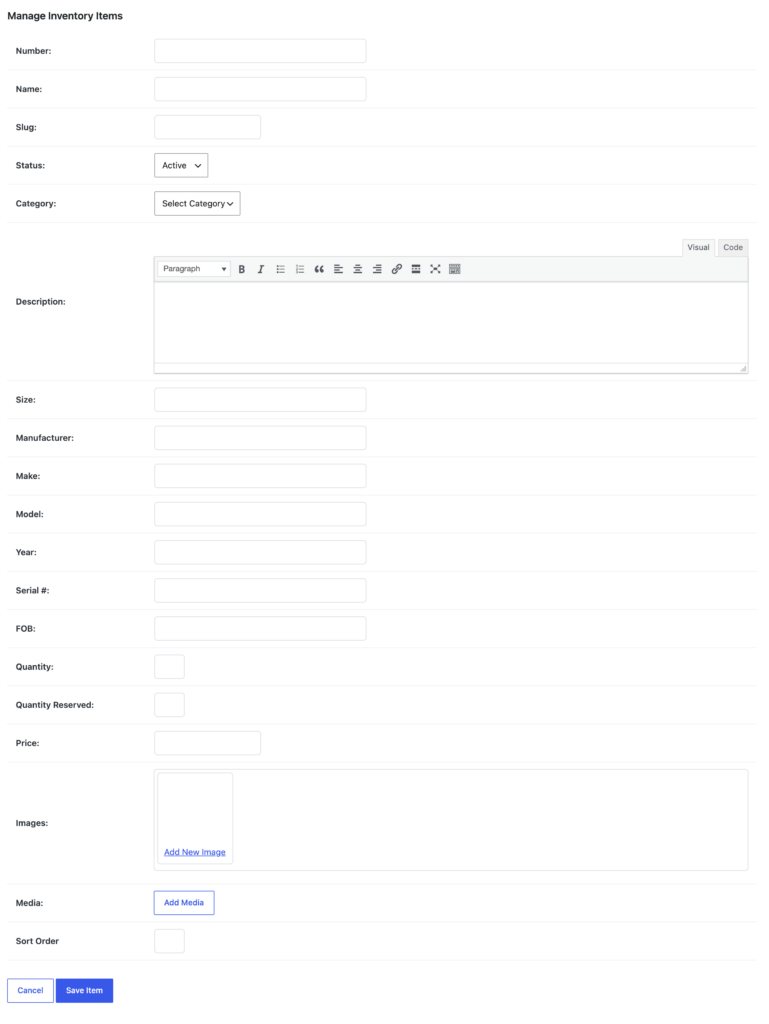
To add an item, simply click the “Add Inventory Item” button. You’ll be taken to a page that allows you to enter information to create your first item. Once you’ve finished, feel free to add as many items as you want, there is no limit. Below is what the form will look like where you can enter the information, with your own custom settings and labels displayed. For an in-depth breakdown of the fields, please refer to this page.

The Add Inventory Item form, with fields for number, name, status, category, description, price, images and media

Congratulations, the plugin is now configured for your use! Let’s move on to displaying your new items using the shortcode.

Configuration

Configuring WP Inventory Manager

Now that WP Inventory Manager is installed, the next step is to configure it for your inventory.

WP Inventory Manager gives you control over how you manage and display inventory items. You can create categories and statuses, customize labels, configure SEO-friendly URLs, and use shortcodes to control where inventory appears on your site.

This guide walks through the initial configuration step by step. We will start with the main WP Inventory dashboard.

Main Dashboard

The main WP Inventory page gives you a quick overview of your inventory. It shows your total number of items, highlights low-stock and out-of-stock items, and provides shortcuts to the main setup options.
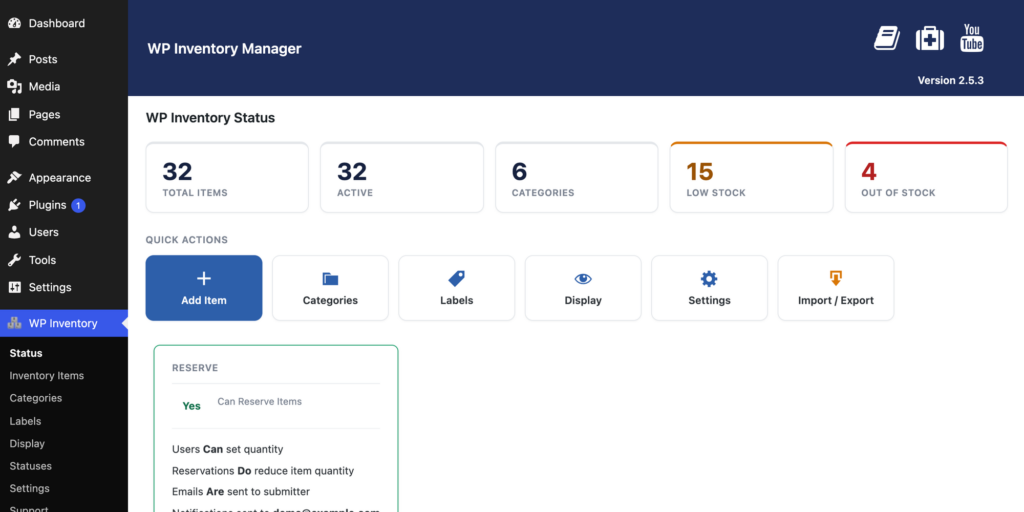
The WP Inventory Status dashboard showing item totals, low stock and out of stock counts, and quick actions

From here, you can start by creating your inventory categories.

Categories

Categories help organize your inventory into logical groups. Go to WP Inventory → Categories to create and manage them.

For example, a rental shop might create separate categories for Skis and Snowboards. Each inventory item can then be assigned to the appropriate category.

The Manage Categories screen listing inventory categories with their sort order

Categories can also control which inventory items appear on different pages. For example, you can use a shortcode to display only items from a specific category.

We cover these options in more detail in the shortcode options documentation.

Statuses

Statuses describe the current state of an inventory item. They also control whether visitors can see that item on the front end.

Every inventory item has a status. By default, WP Inventory Manager includes two:

  • Active – visible on the front end and available for reservation.
  • Inactive – hidden from the front end and unavailable for reservation.

Using an inactive status lets you remove an item from public view without deleting it. The item keeps its record, history, and quantity, but no longer appears to visitors.

You can manage statuses under WP Inventory → Statuses.
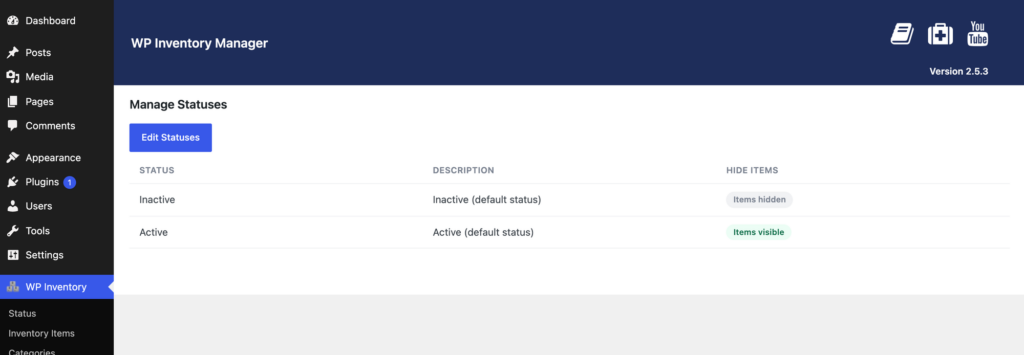
The Manage Statuses screen showing Active and Inactive with their visibility tags

Creating Custom Statuses

Click Edit Statuses to modify the existing statuses or create your own.

Each status can have a name, an internal description, a sort order, and a visibility setting. The visibility setting determines whether items with that status appear on the front end.

Custom statuses can make inventory management more descriptive without changing what visitors see. For example, you could create statuses for:

  • Featured items
  • Backordered items
  • Sold items that you want to keep in your records
  • Items that are currently being repaired

Once your categories and statuses are ready, the next step is to configure the plugin’s main settings.

Next step: Configure WP Inventory Manager settings →

Quick Start Guide

WP Inventory Manager Quick Start

Put yourself on the fast track to managing your inventory like a rock star!

The list of tutorials to the left will provide you with all the necessary tools you need to install, setup, and get your inventory displayed on your website using the WP Inventory Manager plugin.  Each document has detailed instructions with helpful screenshots, making for an easy-to-follow set of instruction.  These quick start guides will walk you through installing WP Inventory Manager, and get you started entering and displaying your inventory items in no time!

Let’s get started with Installation!

Or, if you’d rather follow along in video form, you can find the same information in this tutorial:

30-day money-back guarantee

Reviews on WordPress.org

Trusted by 134,000+ businesses since 2013

★★★★★

"Created an online museum for my club. Really impressive plugin. Support was responsive and helpful."

@hackrepair

★★★★★

"Excellent, clean, simple inventory management. Well structured code — use it right away or customize it to your liking."

@techlocally

★★★★★

"We purchased the entire suite. Installation was easy, small issues were fixed immediately, and the guidance during setup was invaluable."

@design4dotcom

★★★★★

"Plugin support was helpful and rapid. Highest mark."

@drgar

★★★★★

"Great support. Very thorough when looking for a solution, and upfront with exactly how to fix it or institute a workaround."

@shoidahl

★★★★★

"I used this plugin and eventually hired the developers for all my WordPress work. Responsive, competent, and clean code. Would recommend to anyone."

@justenhong