Tutorials

How to Add Search and Filters to Your WordPress Inventory List

A WordPress inventory list works fine at 20 items. At 200, visitors need a way to search and narrow it down.

A WordPress inventory list works fine at 20 items. Visitors scroll, they find what they want, everyone is happy.

At 200 items it stops working. People land on the page, scroll for four seconds, see no way to narrow anything down and leave. You never hear about it because nobody emails you to say your catalog was hard to browse.

The fix is already sitting in your plugin. WP Inventory Manager ships with a filter bar in the free version and most sites have simply never switched it on.

This guide covers how to enable it, how to control it from the shortcode and when to move up to faceted filtering.

Step 1: Turn on the built-in filter bar

The free version of WP Inventory Manager includes a filter form that renders above your item listing. It is controlled by a single setting.

In your WordPress admin, go to WP Inventory > Settings and find the option labelled Display Filter at Top of Item Listing. Set it to Yes and save.

That is the whole step. Reload any page that carries your [wpinventory] shortcode and the filter bar appears above the list.

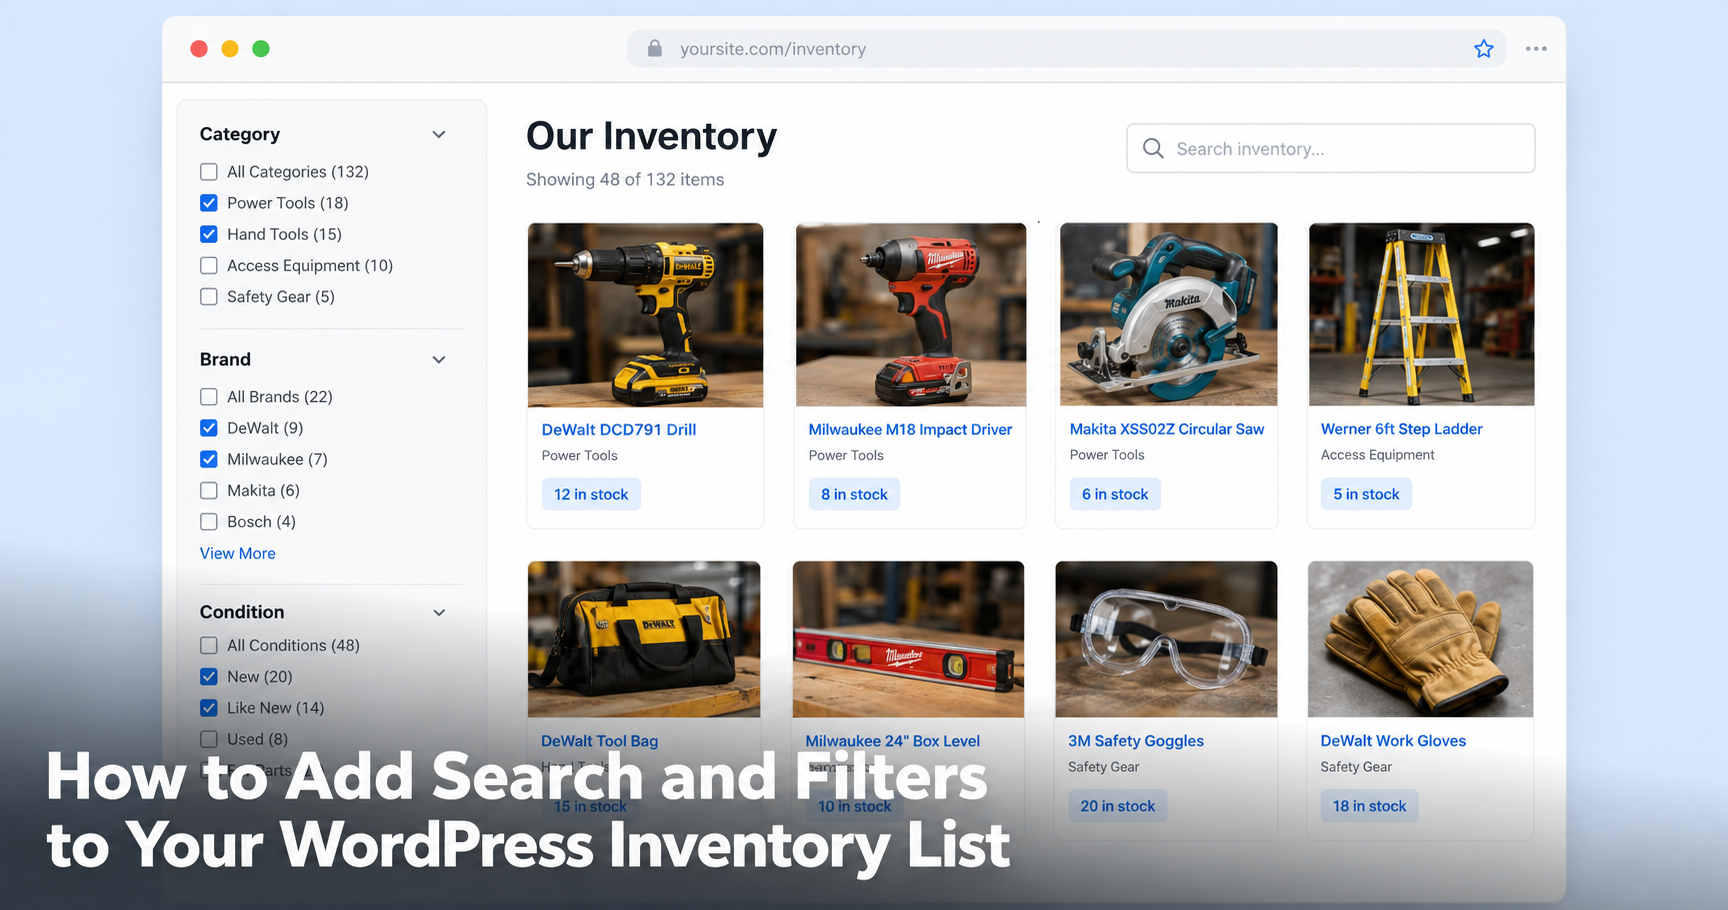
Example: A tool rental shop in Portland lists 180 items on one page. Before switching the filter on, visitors had to scroll through concrete mixers to reach ladders. After switching it on, a visitor types “ladder” in the search box, picks the Access Equipment category and lands on eight items instead of 180.

What you get for free

The built-in filter bar gives visitors four controls without any extra plugin:

  • Keyword search. A text box that matches against your item fields.
  • Status dropdown. Filters by the statuses you have configured, for example Available, On Loan or Sold.
  • Sort dropdown. Lets visitors reorder the list by any field you have marked as sortable.
  • Category dropdown. Narrows the list to a single category.

All four submit together with one button. It is a plain form, so it works with caching, works without JavaScript and adds no measurable weight to the page.

Step 2: Control the starting view from the shortcode

The filter bar handles what visitors do. The shortcode handles where they start.

The [wpinventory] shortcode accepts parameters that pre-filter the list before anyone touches a control. The useful ones are category, category_id, inventory_status, inventory_search, order and page_size.

This matters more than it sounds. Instead of one enormous list with a filter bar on top, you can build several focused pages and let the filter bar refine each one.

A practical pattern

Say you rent equipment in three broad groups. Rather than a single page, create three:

  • A Power Tools page using [wpinventory category="Power Tools" page_size="25"]
  • An Access Equipment page using [wpinventory category="Access Equipment" page_size="25"]
  • A full catalog page using plain [wpinventory] for anyone who wants to browse everything

Each page now ranks for its own keyword, each one loads faster and the filter bar still lets visitors narrow further.

If you have not set up your listing pages yet, our guide on displaying inventory with the shortcode covers the parameters in detail and the full list lives in the user documentation.

Step 3: Know when the free filter runs out

The built-in bar covers keyword, status, sort and category. That is enough for most catalogs.

You have outgrown it when one of these is true:

  • You need to filter by custom fields. Manufacturer, size, colour, condition or model year. The free bar filters by category and status only.
  • Visitors need to combine filters. Red and size large and in stock, all at once, rather than one dropdown at a time.
  • A page reload each time is too slow. The free bar submits a form. Every refinement is a full page load.
  • You want filters in your sidebar. The free bar sits above the listing. It cannot move into a theme widget area.

Step 4: Add faceted filters with Advanced Search

The Advanced Search Filter add-on replaces the single-row bar with a checkbox sidebar that re-queries the list over AJAX.

Visitors tick boxes and the results update without a page reload.

Once the add-on is active, a new Advanced Search screen appears under the WP Inventory menu. The setup screen has two halves.

Choosing which fields become filters

The left column lists every field on your items with a checkbox beside each one. Tick a field to make it appear in the filter.

Drag the rows up and down to set the order they appear in on the front end.

Ordering the values inside each field

Click the folder icon next to a field and its distinct values load in the right-hand panel. Drag them into the order you want.

The panel also holds a More separator: values above it are visible immediately, values below it stay hidden until a visitor clicks View More.

This is the part most people skip and it is the part that does the work. A manufacturer filter with 40 brands is unusable as a wall of checkboxes. Put your top six above the More tag and the rest below it and the same filter becomes readable.

Example: A bike shop tracks 340 frames. They expose three filters: Frame Size, Brand and Condition. Brand has 22 values, so the four brands they actually stock in volume sit above the More separator. Average time to find a specific frame drops from open-ended scrolling to three clicks.

Placing the filter on your site

You have two options. Drop the shortcode onto the same page as your listing:

[wpinventory_advanced_search title=”Filter” display_as=”checkboxes” disable_ajax=”0″]

Set display_as="dropdowns" if checkboxes take too much vertical space.

Leave disable_ajax="0" to keep live updating, or set it to 1 if your theme conflicts with the AJAX call.

Alternatively use the bundled widget. Drag WP Inventory Advanced Search Filter into any theme widget area and it renders the same sidebar in your existing layout.

The add-on is included in the All Access plan alongside Pro, Locations Manager, Reserve Cart and Advanced User Control.

If the filter does not appear

Three causes account for almost every support ticket on this:

  • The setting is off. Check WP Inventory > Settings for Display Filter at Top of Item Listing and confirm it reads Yes.
  • Caching. Your host or CDN is serving the pre-change version of the page. Purge both layers, not just one.
  • Custom field facets are empty. Advanced Search can only expose custom fields when the Advanced Item Manager add-on is active and a field type is configured. Without a type, the values cannot be resolved and the facet stays blank.

One more worth knowing: the Advanced Search admin screen respects a role setting. If a staff member cannot see the screen, check which role you set as the minimum for managing Advanced Search.

Frequently asked questions

Does WP Inventory Manager include search in the free version?

Yes. The free version includes a filter bar with a keyword search box, a status dropdown, a sort dropdown and a category dropdown.

It is controlled by the Display Filter at Top of Item Listing setting under WP Inventory > Settings and is switched on by default.

Can visitors filter my inventory by custom fields like brand or size?

Not with the free filter bar, which covers category and status.

Custom field filtering requires the Advanced Search Filter add-on and the fields themselves come from the Advanced Item Manager add-on. Both are included in the All Access plan.

Do the filters update without reloading the page?

The free filter bar submits a standard form, so it reloads the page.

Advanced Search uses AJAX and updates the listing in place. You can turn the AJAX behaviour off with disable_ajax="1" if your theme interferes with it.

Can I put the inventory filter in my sidebar?

Yes, with Advanced Search. The add-on registers a widget that you can drag into any theme widget area, so the filter sits in your existing sidebar rather than above the listing.

Does any of this require WooCommerce?

No. WP Inventory Manager and all of its add-ons run independently of WooCommerce.

The search and filter features work on any WordPress site, including sites with no ecommerce functionality at all.

Set up your filters in ten minutes

Every parameter, setting and shortcode in this guide is documented with examples. Work through the listing and filter sections and your catalog becomes searchable this afternoon.

Read the Documentation → Browse Add-Ons →

Google Sheets vs a WordPress Inventory Plugin: Which Should You Use?

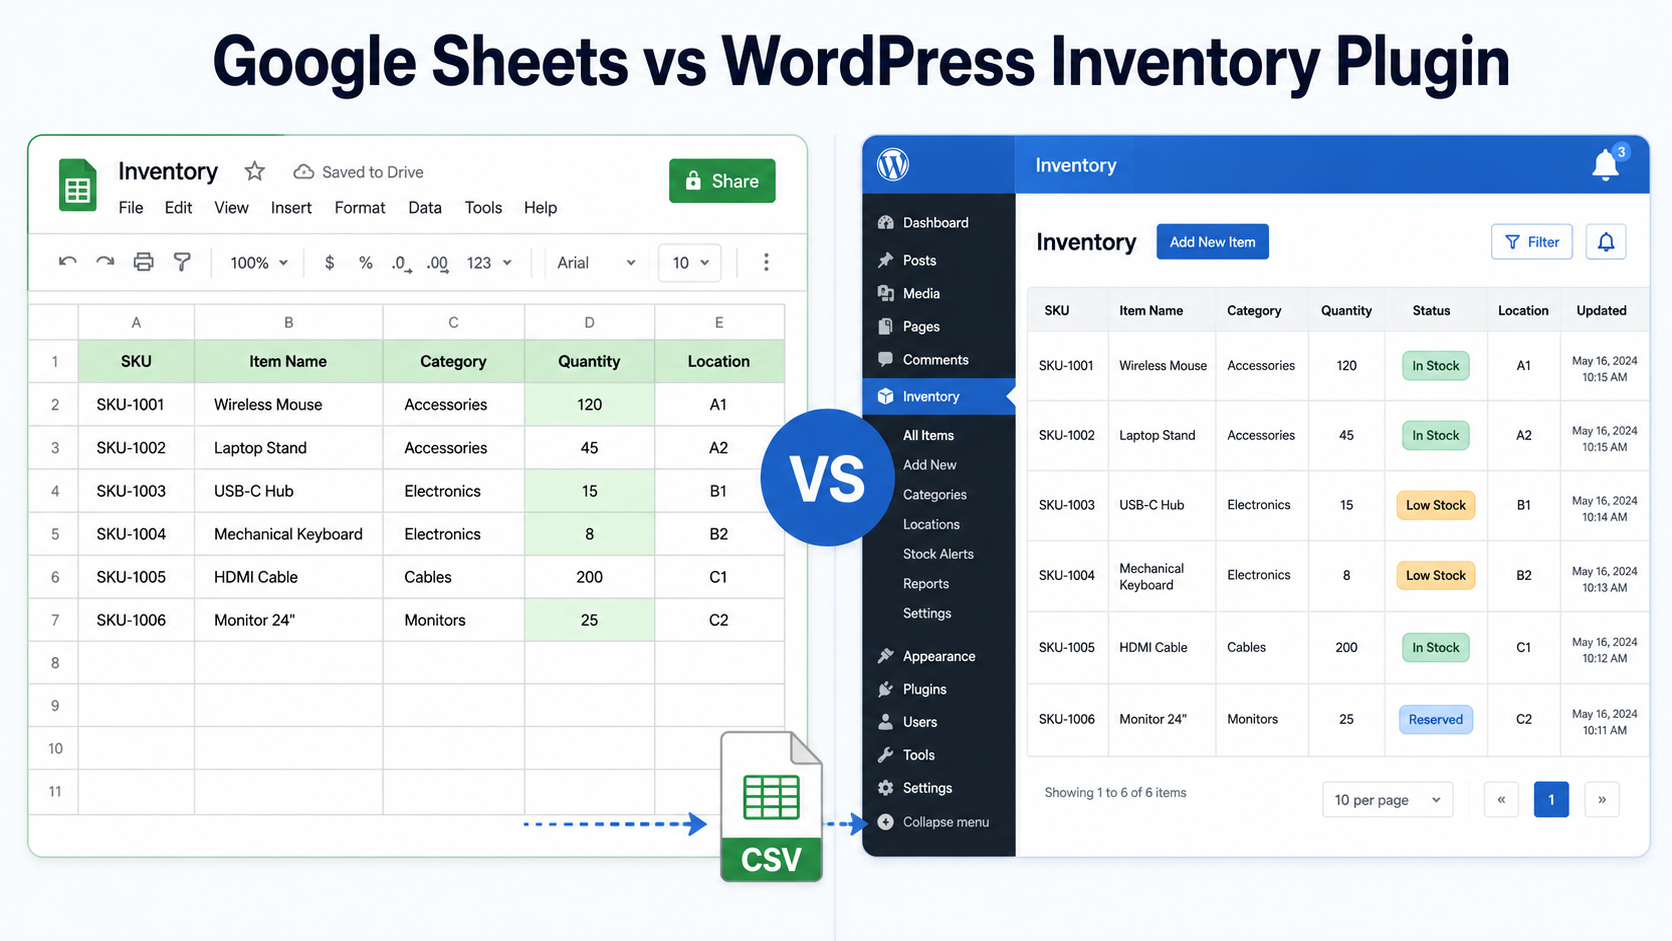
Nearly every business that tracks inventory in WordPress started the same way: with a spreadsheet. And that was the right call. Google Sheets is free, familiar and faster to set up than any plugin. The question is not whether Sheets works. It is when it stops working, and what you actually get when you graduate to a dedicated inventory plugin.

This comparison lays out where each option wins, where each breaks and how the two can work together instead of against each other.

Where Google Sheets wins

Credit where due. For certain situations, a spreadsheet is the correct tool:

  • Cost. Free, forever, no license renewals.
  • Zero learning curve. Everyone on your team has used a spreadsheet.
  • Total flexibility. Any column you can imagine, any formula you can write.
  • Fast start. A working stock list exists ten minutes after you open a blank sheet.

If you are one person tracking fifty items that never appear on your website, stay in Sheets. Sincerely. You do not have a problem a plugin needs to solve yet.

Where Google Sheets breaks

The trouble starts when the business grows past the sheet. The failure points are predictable.

It is not connected to your website

If your catalog, availability list or rental gear lives on a WordPress site, every spreadsheet edit is double entry. You update the sheet, then you update the site, and the day you forget one of them, they disagree. We wrote about the result in our out-of-sync inventory guide: nobody knows which number is right.

History gets overwritten

A cell holds one value. Type over a quantity and yesterday’s number is gone, along with who changed it and why. Version history in Sheets technically exists, but reconstructing stock movements from revision snapshots is nobody’s idea of a workflow.

Everyone edits everything

Sheets sharing is all or nothing. Anyone with edit access can change any cell, delete any row and break any formula. There are no roles, no per-person limits and no record of responsibility.

No alerts

A spreadsheet never emails you that stock ran low. You find out when a customer asks for something you do not have.

What a WordPress inventory plugin does differently

WP Inventory Manager keeps your inventory inside WordPress itself, which changes four things immediately:

  • One source of truth. The list your team edits in the admin is the same list your website displays. Update once and both are current.
  • Front-end display built in. A shortcode publishes your catalog to any page, filterable and searchable, with no copy-paste step.
  • Accountability. WordPress roles control who can edit inventory. Pro adds quantity change tracking and the Ledger add-on keeps a full transaction history.
  • Alerts. Low-stock email notifications fire when quantity drops below your threshold, before the shelf is empty.

The trade-off is real: a plugin costs money past the free tier and asks you to learn a new screen. That is the honest price of moving from a private list to a system your team and website share.

Side-by-side comparison

Google Sheets WP Inventory Manager
Price Free Free core; Pro $79/yr; all add-ons $199/yr
Setup speed Wins the first ten minutes Wins every week after
Shows on your website No (embeds are clumsy, read-only) Yes, natively via shortcode
Multi-user control All or nothing WordPress roles + Advanced User Control
Stock history Overwritten Change tracking (Pro), full ledger with costs and invoices (Ledger add-on)
Low-stock alerts None Built in
Flexibility Unlimited formulas Custom fields cover most needs

The answer most businesses actually want: both

This is not a divorce. The Import/Export add-on connects the two worlds through CSV, which Google Sheets speaks natively.

  • Build in Sheets, run in WordPress. Download your sheet as CSV and import it. Fields map automatically, categories are created on the fly and image URLs in your sheet are fetched remotely.
  • Report in Sheets. Export all inventory, or just items matching a search, back to CSV whenever your accountant or board wants a snapshot.
  • Undo button included. Imports can be rolled back, so a bad CSV does not wreck your catalog.
Example: A parts supplier with 900 SKUs built its master list in Google Sheets over three years. Moving to WordPress took one afternoon: export to CSV, import via WP Inventory → Import/Export, review the automatic field mapping and publish the catalog with a shortcode. The old sheet still gets a fresh export before every quarterly stock count.

Step-by-step instructions live in our import tutorial and the Import/Export documentation.

Frequently asked questions

Can WordPress pull inventory directly from Google Sheets?
Not live. WP Inventory Manager exchanges data with Sheets through CSV files using the Import/Export add-on: download your sheet as CSV and import it, or export inventory back out for reporting. There is no real-time sync, which for most catalogs is a feature: your website is not one accidental cell edit away from being wrong.
When should I move from a spreadsheet to an inventory plugin?
Three reliable signals: more than one person edits stock, your inventory needs to appear on your website, or you have been burned by a quantity nobody can explain. Any one of them means the spreadsheet is costing more than the plugin would.
Will I lose my spreadsheet data when I switch?
No. Export your sheet as CSV and the Import/Export add-on maps your columns to inventory fields automatically, creates categories as needed and can even fetch images from URLs in your sheet. Imports are also reversible via rollback.
Is a free spreadsheet not enough for a small business?
Sometimes it is. One person, a small catalog and no website display is a fine fit for Sheets. The free version of WP Inventory Manager exists precisely so you can test the switch without spending anything.
Can my team keep using spreadsheets for reports?
Yes. Export all inventory or a filtered subset to CSV at any time and open it straight in Google Sheets or Excel. Many businesses run WordPress as the source of truth and Sheets as the reporting layer.

Keep the spreadsheet. Add the system.

Start with the free plugin, import your existing sheet in an afternoon and see the difference a connected inventory makes. Your spreadsheet is one CSV export away whenever you want it.

Compare Plans and Pricing →

What Is an Inventory Ledger? How to Track Stock History in WordPress

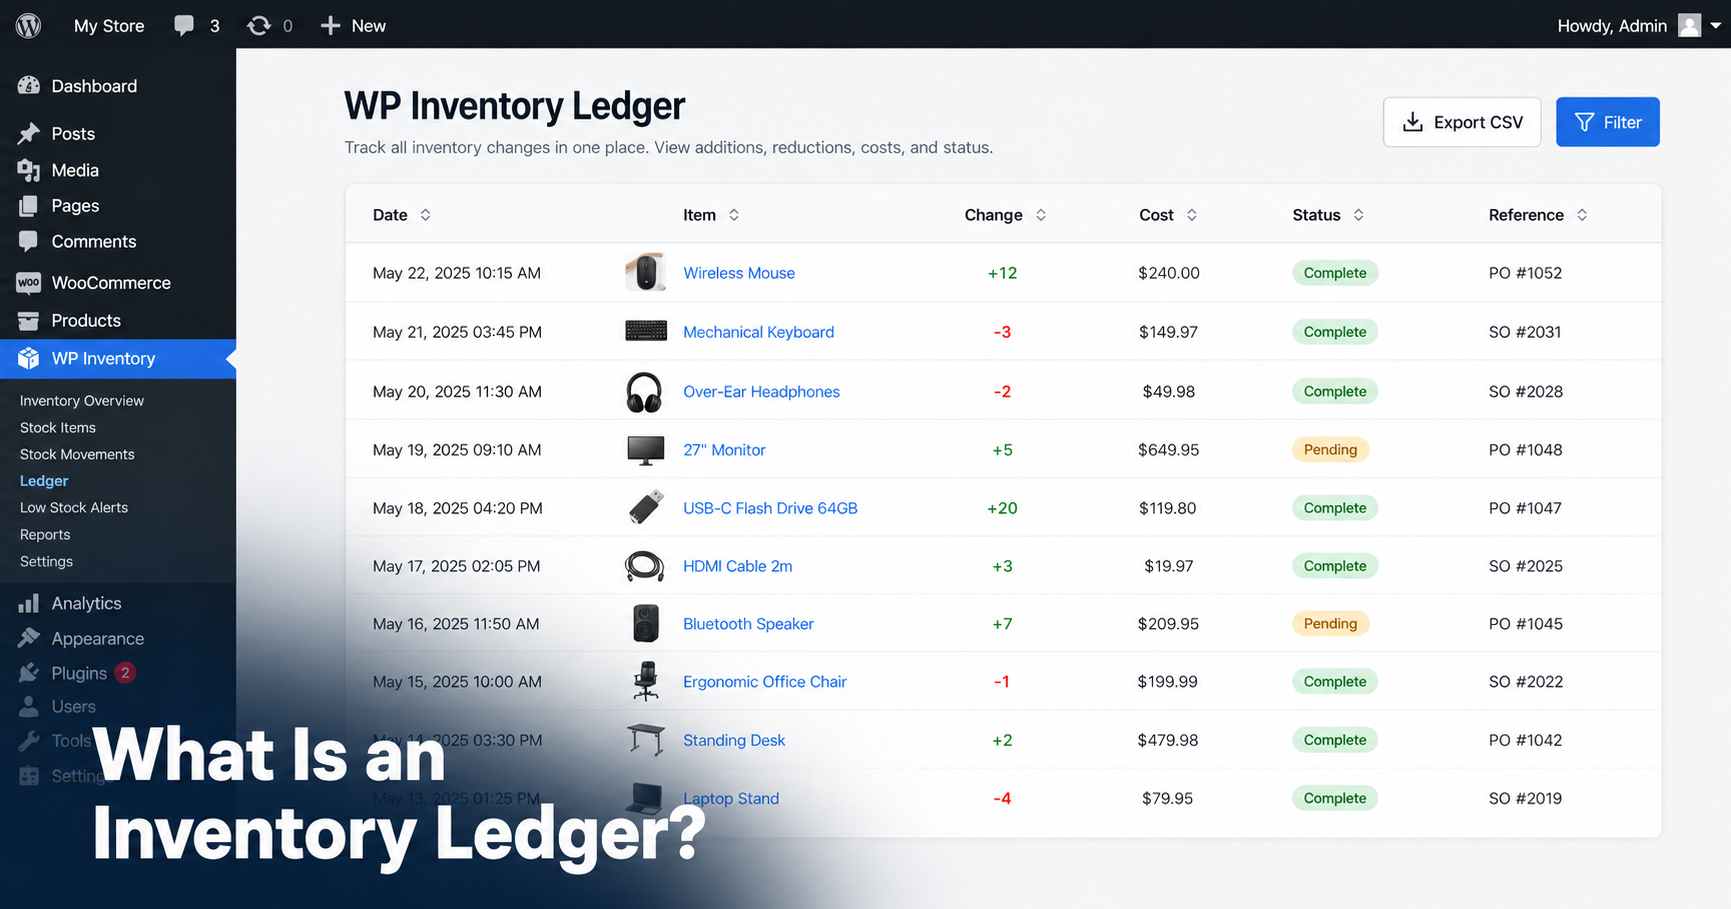
Inventory ledger in WordPress showing stock history entries in WP Inventory Manager

Every inventory system can tell you how much stock you have right now. Very few can tell you how you got there. If you have ever stared at a quantity field wondering who changed it, when and why, you already understand the problem an inventory ledger solves.

This post explains what an inventory ledger is, why a spreadsheet makes a poor one and how to keep a real ledger inside WordPress using the WP Inventory Ledger add-on.

What is an inventory ledger?

An inventory ledger is a running record of every stock movement: each addition, subtraction, reservation or transfer, logged with the date, the quantity involved and what the change was for.

Where a stock count answers “how much do we have,” the ledger answers “what happened.” Together they give you the two things every inventory question comes down to: the current state and the story behind it.

A useful ledger entry captures five things:

What it records Why it matters
Date Reconstruct any period after the fact
Item and quantity Which item moved and by how much
Description The reason: a delivery, a sale, a reservation, a write-off
Cost and value Turns a log into a financial record
Status Pending, complete or cancelled, so holds never blur into finished transactions

Why a spreadsheet makes a poor ledger

Most small businesses keep stock history in a spreadsheet, if they keep it anywhere. The problems show up within a month.

  • Overwritten history. A spreadsheet cell holds one value. Type the new quantity and the old one is gone, along with any record of why it changed.
  • No accountability. When three people share a sheet, nobody can say who made which change.
  • Manual discipline. The log is only complete if every person records every movement, every time. One busy afternoon breaks the chain.
  • Disconnected from the website. If your catalog lives in WordPress, every spreadsheet update is double entry. Eventually the two disagree, and you will not know which one is right.

That last point matters most. The fix for out-of-sync inventory is not more careful typing. It is keeping the record where the inventory already lives. We covered the sync problem in depth in our guide to fixing out-of-sync inventory in WordPress.

Keeping a ledger inside WordPress

The WP Inventory Ledger add-on adds a transaction ledger to WP Inventory Manager. Once activated, a Ledger screen appears under the WP Inventory menu in your WordPress admin.

The key difference from a spreadsheet: entries create themselves. The ledger hooks into WP Inventory Manager, so when an item’s quantity is saved or a reservation comes in through the reserve form, the movement is recorded automatically. You can also add entries by hand for anything that happens off the website.

What each entry records

Every ledger entry stores the date, an order ID, an order status, a description, the quantity moved and the cost. The ledger tracks cost separately from price, so you can record what an item cost you as well as what you charge for it.

Entries carry one of three statuses: Pending, Complete or Cancelled. The ledger screen filters by each, so open reservations never mix with finished transactions.

Reservations and invoices

If you use the reserve system, the ledger picks up each reservation as it arrives. A settings toggle controls whether stock is deducted the moment a reservation comes in or only after you review it.

From there you can generate an invoice directly from recorded entries and save it as a PDF. For rental businesses and B2B suppliers who take reservations through their reserve form, that closes the loop from hold to paperwork without leaving WordPress.

Example: A camera rental shop rents out a gimbal stabilizer. The reservation lands in the ledger as Pending with the renter’s details. When the gear ships, the shop marks it Complete and generates the invoice as a PDF. Two weeks later the owner asks why stabilizer stock dipped in June. The answer is one filter away, with dates, quantities and values attached.

Who can see the ledger

A permissions setting controls the minimum WordPress role allowed to use the ledger, from Administrator down to Subscriber. Your bookkeeper can read the history without being able to touch your plugin settings.

Setting it up: a 10-minute walkthrough

Assuming WP Inventory Manager is already installed:

  • Install and activate the Ledger add-on from your license keys page.
  • Go to WP Inventory → Settings and find the ledger section. Choose whether reservations deduct stock immediately or after review, and set the minimum role.
  • Open WP Inventory → Ledger and create your first manual entry to record current stock as a starting point.
  • From now on, quantity changes and reservations log themselves. Add manual entries for anything external, like a damaged unit or a trade show giveaway.

The full field-by-field reference lives in the Ledger documentation.

Ledger or quantity history: which do you need?

WP Inventory Pro includes quantity change tracking, which answers “who changed this number and when.” That is an audit trail, and for many businesses it is enough.

The Ledger add-on goes further: costs and values per movement, pending and completed statuses, reservation capture and invoice generation. The rule of thumb is simple. If you only need to see changes, Pro covers it. If you need to account for them, with values and paperwork, you want the ledger.

Both are available à la carte from the downloads page, and the All Access pass bundles Pro with the full add-on library.

Inventory ledger FAQ

What is an inventory ledger in simple terms?
It is a dated list of every stock movement: what came in, what went out, what it was worth and why it happened. Your quantity on hand tells you where you are. The ledger tells you how you got there.
Does WordPress have a built-in inventory ledger?
No. WordPress has no native inventory features at all. You need a plugin such as WP Inventory Manager for stock tracking, plus its Ledger add-on for full transaction history with costs, statuses and invoices.
Do ledger entries get created automatically?
Yes. The Ledger add-on records movements when item quantities are saved and when reservations come in through the reserve form. You can also create, edit and delete entries manually for movements that happen outside the website.
Can I create invoices from my inventory ledger?
Yes. The WP Inventory Ledger add-on generates invoices from recorded entries and saves them as PDFs, which is particularly useful when reservations stand in for orders.
Is an inventory ledger the same as an audit trail?
They overlap. An audit trail records who changed what and when, which WP Inventory Pro provides for quantities. A ledger adds the financial layer: costs, values, transaction statuses and documents like invoices.

Give your inventory a memory

Stock counts tell you where you are. The ledger tells you how you got there, and it starts recording the moment you activate it. Add the Ledger add-on to WP Inventory Manager and stop guessing what happened to your stock.

Get the Ledger Add-On →

How to Add Inventory Tracking to Your WordPress Site Without WooCommerce

If you’re running a small business and want to list and track your physical inventory on your WordPress site, you don’t need WooCommerce to do it.

WooCommerce is built for selling online. If you’re not processing payments through your site, installing it just to manage a stock list is overkill. It adds complexity, slows your site down, and gives you tools you’ll never use.

WP Inventory Manager is a lightweight WordPress plugin built specifically for this. You can install it, configure it, add your items, and have a working inventory catalog live on your site in under an hour.

Here’s exactly how to do it, following the official setup sequence.


What You’ll Need

  • A WordPress site (version 5.0 or later)
  • Admin access to your dashboard
  • Your inventory data: item names, quantities, descriptions, and any images

That’s it. No coding, no WooCommerce, no third-party accounts.


How the Setup Works

Step 1: Install and Activate the Plugin

Go to wpinventory.com and download the plugin ZIP file. Save it to your computer and do not unzip it.

Then in your WordPress dashboard:

  1. Go to Plugins > Add New
  2. Click Upload Plugin at the top of the page
  3. Browse to the ZIP file you downloaded and click Install Now
  4. Once installed, click Activate

You’ll now see a WP Inventory menu item in your left sidebar. That’s your starting point.

If you’re only installing the free version, you can also find it by searching “WP Inventory Manager” in the plugin directory. The upload method is recommended if you’re also installing any paid add-ons, since those aren’t in the public directory.

Step 2: Set Up Your Categories

The first thing the plugin prompts you to do from the main WP Inventory tab is set up categories. Do this before adding any items — it keeps your catalog organized from the start.

Go to WP Inventory > Categories and add your top-level categories.

For example, a restaurant supply company might use: Cookware, Smallwares, Refrigeration, and Furniture. A nonprofit tracking donated goods might use: Clothing, Electronics, Furniture, Books.

The docs also recommend reviewing Statuses at this stage. By default you have Active (visible on the front end, reservable) and Inactive (hidden). If you need additional statuses like “On Backorder” or “Featured,” you can add those now under the Statuses menu item.

Step 3: Configure Your Settings

Go to WP Inventory > Settings. This is where the plugin’s core behavior is defined. A few settings worth getting right from the start:

  • SEO URLs – Enable this so item links use the item name (e.g. /inventory/standing-desk/) instead of an ID number. Much better for search engines.
  • SEO End-point – Sets the base URL folder for all items. Set it to something like inventory or catalog to match your site structure.
  • Items Per Page – Controls how many items appear before pagination kicks in. Default is 20.
  • Hide Items Low Quantity – If you want items to disappear from the front end when stock drops below a threshold, enable this and set the number.
  • Theme – The plugin ships with a default display theme. If you plan to style things yourself with CSS, set this to “No Theme.”
  • Currency settings – Set your symbol, separator, and decimal format if you’re displaying prices.

Don’t feel like you need to configure everything on day one. The defaults are sensible. But SEO URLs and your end-point are worth setting before you publish anything, since changing them later will break existing links.

Step 4: Review Your Labels

Go to WP Inventory > Labels. This is where you rename the default field labels to match your business language.

Out of the box, the plugin uses generic terms like “Inventory Name” and “Quantity.” If your business calls these “Product,” “Stock Count,” or “Units Available,” change the labels here. They’ll update everywhere, in the admin and on the front end, so your team and your customers see consistent language.

This step is quick and easy to skip, but it makes the plugin feel like it was built for your specific operation rather than a generic one.

Step 5: Add Your Inventory Items

Go to WP Inventory > Inventory Items and click Add Inventory Item.

Each item has built-in fields including:

  • Name (required)
  • Category
  • Quantity
  • Description
  • Price (display only, not connected to a checkout)
  • Image
  • Serial Number / SKU
  • Status (Active or Inactive)

Fill in what’s relevant. You don’t have to use every field.

Practical example: A small furniture retailer adding a standing desk would enter: Name “Adjustable Standing Desk,” Category “Desks,” Quantity “12,” Description “Electric height adjustment, 3 memory presets, 60×30 surface,” and upload a product photo. That’s a complete, useful listing.

Add each item one at a time, or if you have a large existing catalog, the Pro version supports CSV import to save time.

Step 6: Display Your Inventory on a Page

Create a new WordPress page (or edit an existing one) where you want your catalog to appear. Add this shortcode:

[wpim_display]

Publish the page. Your inventory catalog is now live.

Visitors can browse by category and search by keyword out of the box. The layout works with most WordPress themes without styling conflicts.

If you want a standalone search bar or category filter, the plugin generates additional shortcodes for those. Check the shortcode options documentation for the full list of display parameters.


When to Upgrade

The free version handles a single location, unlimited items, and the full setup described above. It covers most small businesses completely.

If you need more, the paid add-ons are worth looking at:

  • Multiple locations (warehouse, retail floor, offsite storage): Locations Manager
  • Let visitors reserve or request items: Reserve Cart
  • Advanced filtering and search by custom fields: Advanced Search
  • Full stock tracking with quantity history: Advanced Inventory Manager

WP Inventory Pro bundles several of these for $79/year. The All Access pass at $199/year includes everything.


Your Inventory, Live in 30 Minutes

Install the plugin, set up your categories, configure a few key settings, label your fields, add your items, and drop a shortcode on a page. That’s the complete setup.

From there, you can layer in paid features as your needs grow, but most small businesses won’t need them on day one.

Get started at wpinventory.com.


Frequently Asked Questions

Do I need WooCommerce to use WP Inventory Manager?

No. WP Inventory Manager is a standalone plugin and does not require WooCommerce. It’s built specifically for businesses that want inventory management without an ecommerce platform.

What’s the correct order to set up the plugin?

Install and activate, then: Categories, Settings, Labels, add your Inventory Items, and finally display with the shortcode on a page. Setting things up in this order means your items will inherit the right configuration from the start.

Can I import my existing inventory from a spreadsheet?

CSV import is available in the Pro version. The free version requires adding items manually through the dashboard.

How many inventory items can I add?

There is no hard limit on the number of items in either the free or paid version.

What if I have inventory in more than one location?

The free version supports a single location. For multiple locations (warehouse, store, offsite), the Locations Manager add-on handles this and is included in the Pro and All Access plans.

30-day money-back guarantee

Reviews on WordPress.org

Trusted by 127,000+ businesses since 2013

★★★★★

"Created an online museum for my club. Really impressive plugin. Support was responsive and helpful."

@hackrepair

★★★★★

"Excellent, clean, simple inventory management. Well structured code — use it right away or customize it to your liking."

@techlocally

★★★★★

"We purchased the entire suite. Installation was easy, small issues were fixed immediately, and the guidance during setup was invaluable."

@design4dotcom

★★★★★

"Plugin support was helpful and rapid. Highest mark."

@drgar

★★★★★

"Great support. Very thorough when looking for a solution, and upfront with exactly how to fix it or institute a workaround."

@shoidahl

★★★★★

"I used this plugin and eventually hired the developers for all my WordPress work. Responsive, competent, and clean code. Would recommend to anyone."

@justenhong