WP Logging is a tool to help figure out if there are any problems/errors on your site and the install of the WP Inventory Manager plugin. It is a diagnostic tool that helps developers and our support team to help you with troubleshooting and fixing problems. Please install if you are a developer or have been instructed to by our support team. There is no need for this add on if your site is fully functioning and you do not have any issues.
Install the plugin through your WordPress dashboard by navigating to the “Plugins” tab.
After browsing and uploading the ZIP file, activate the plugin.
Enabling Logging
Once the plugin is installed, you must enable the logging functionality to start recording debug messages. This can be done your WP Inventory settings. Navigate to General Settings > Logging Settings and change the Enable Logging setting to “yes.” We only recommend enabling the Log to Screen setting if directed to do so by the WP Inventory Manager support team.
Accessing the Log
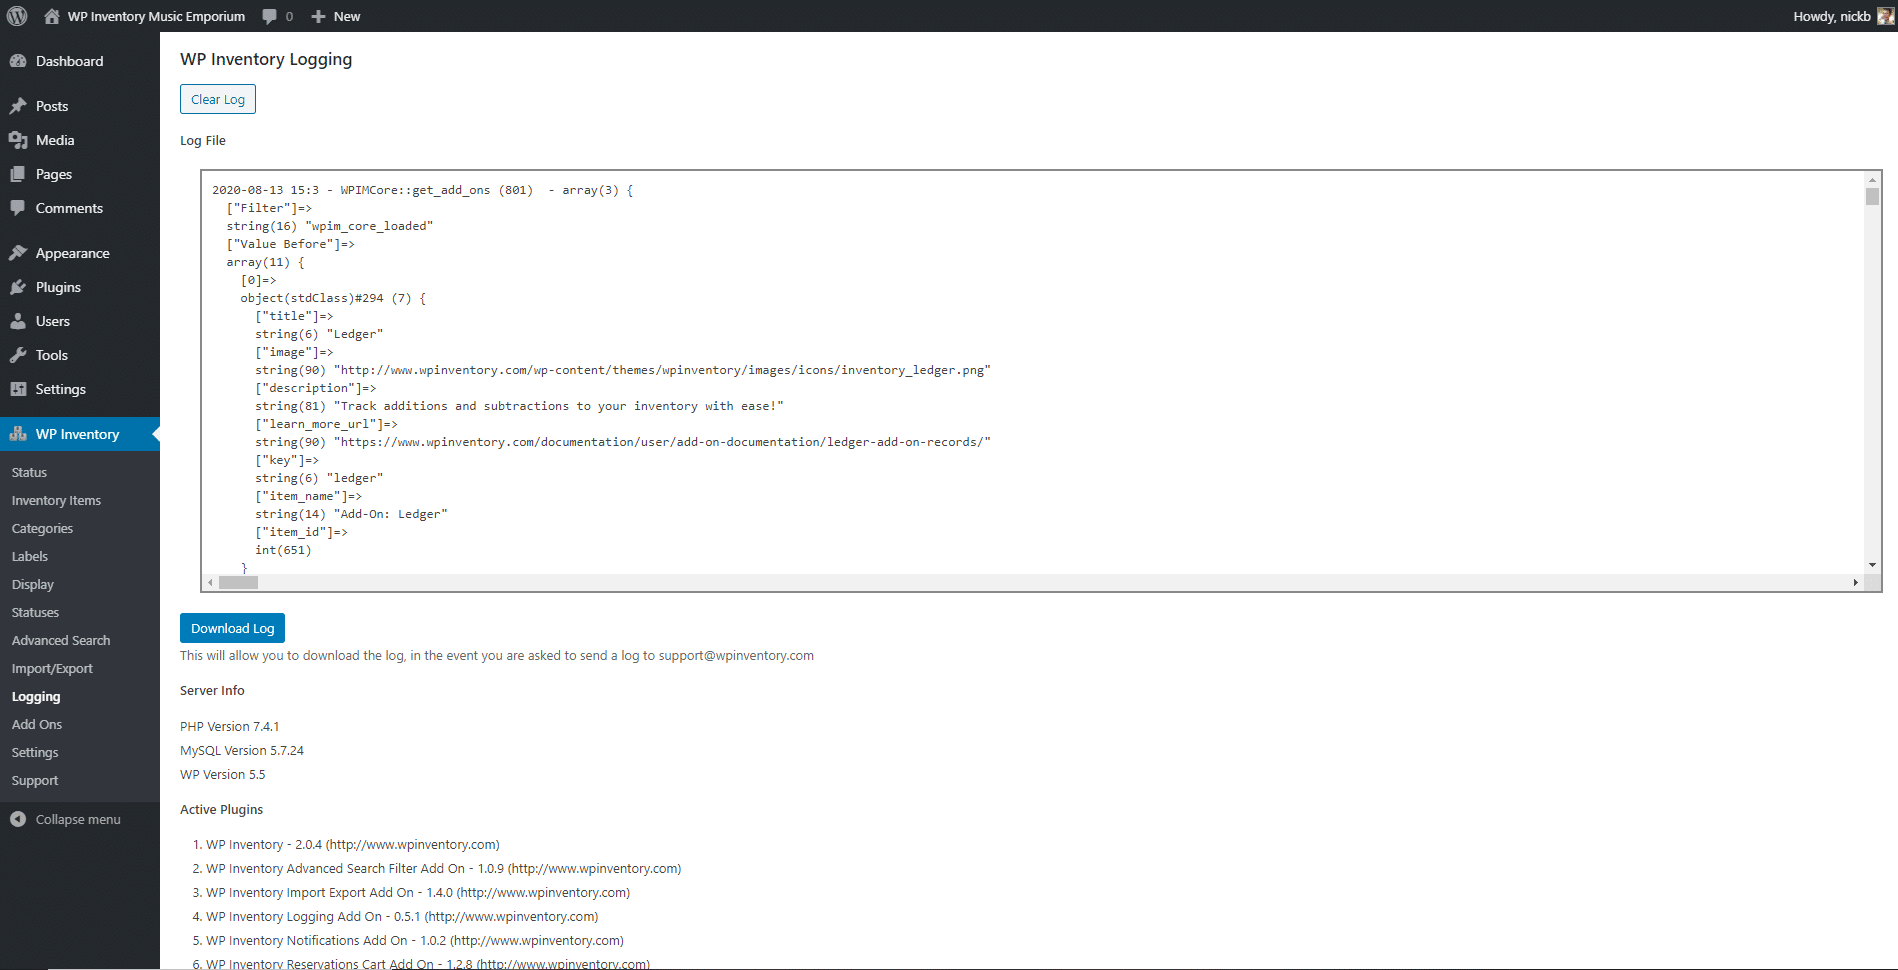
Once enabled, your debug log will be available under the Logging menu option in your WordPress dashboard. Here is where you’ll be able to download the log text file in order to share your site information with WP Inventory Manager support. Please note that the log may take some time to display, as the file size can become quite large. Watch your browser tab’s loading icon to check if the log is still loading or not.
You’re also able to Clear Log from here, which will empty out your debug log file. If you don’t run into any issues or errors, feel free to clear the log regularly to prevent long loading times.
*** Please note this documentation is out of date while we update this add on. The widget is unavailable, and the only option for displaying the filters is dropdowns. We’re working to bring back these prior features to the modern system, we appreciate your patience.
Enhance User Experience with Advanced Search Filters
Keep your users in one place while they sort through your inventory
By default, it’s possible to include Inventory Items in your website search results, but this comes with some inherent problems. It takes your users away from the main page and mixes in other website results, all while being somewhat unclear on what can or can’t be searched for. Enter the Advanced Search Filter add-on. This handy enhancement allows your users access to a customizable list of filters to make searching through your inventory quick and easy. You can either utilize the instructions below, or follow along with this video tutorial:
Install the add-on through your WordPress dashboard by navigating to the “Plugins” tab.
After browsing and uploading the ZIP file, activate the plugin.
Enter your license key on the settings page.
Customizing the Available Fields
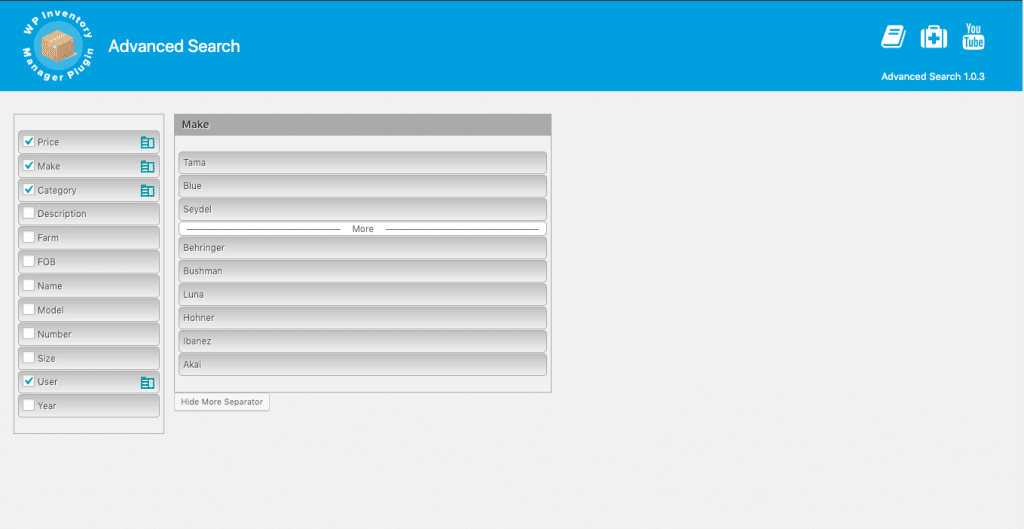
Once the plugin is installed, you can configure the Search Filter by navigating to the Advanced Search menu item, where you will see a set of fields like the image below:
Any field that is checked will be available for your users to filter by. The fields will display in top-to-bottom order, and can be changed by dragging and dropping the fields.
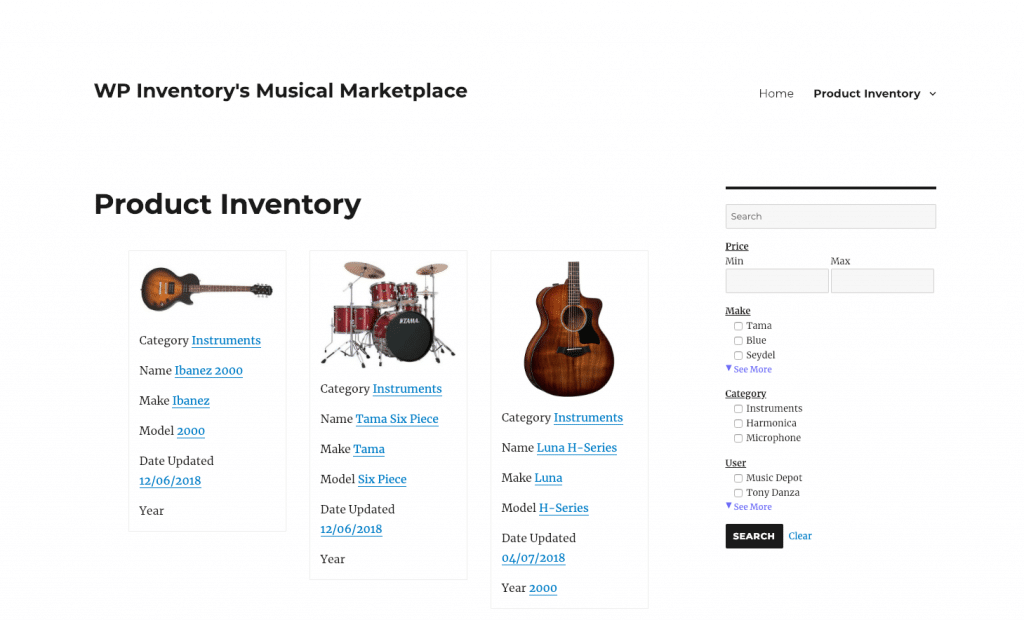
By clicking the green folder icon on the right, you can open up another field to configure the options for each field specifically. Like the main fields, these will display in order, and the order can be changed by dragging and dropping fields. You can also add a “More Separator,” which will hide the option below the separator inside of a dropdown on the frontend. The following configuration will result in a display on the front end like the image below:
Please note that a label will not appear in the Search Filters on the front end if you do not have anything set. For example, if you are using AIM and create a custom field for the number of strings on a guitar, but don’t set that option within any items, then it will not show in the front end as a filter. If the field does not have a value, then it will not be added to the Search Filters.
Displaying the Search Filters
There are two options to display your Search Filters on the front end – either the Advanced Search Filter widget, or the new Advanced Search Filter shortcode. If you do not select at least one field for users to search by, the widget or shortcode will return an error that no fields are selected.
The Shortcode
The Advanced Search Filter can be inserted onto any page using the shortcode: [wpinventory_advanced_search]. This shortcode comes with several parameters you can customize to meet your needs:
title – The title shown at the top of the search filters on the front end. The default is an empty string.
more_text – The text for the More Separator dropdown. The default is “See More”.
less_text – The text for the Less Separator dropdown. The default is “See Less”.
search_button_text – The text for the filter button to initiate a search. The default is “Search”.
clear_search_text – The text for the button to clear the search criteria. The default is “Clear Search”.
form_redirect – Optionally link the search button to a new page. Any chosen filters will apply to the display shortcode and Advanced Search shortcode on the destination page. Default is an empty string.
display_as – A choice between filter options being displayed as checkboxes (with the value “checkboxes”) or dropdowns (with the value “dropdown”). Defaults to checkboxes.
disable_ajax – Toggle the option to update the available search filters dynamically when a user chooses an option with AJAX. Setting this to “1” turns on the option to disable ajax, but the default is 0 with the option to disable ajax turned off.
include_text_search – Toggle whether or not to allow a user to type in their own text search query. Defaults to 0, which is off. Enable by setting the value to “1”, “yes”, or “true”.
Here is an example of the shortcode using every available parameter:
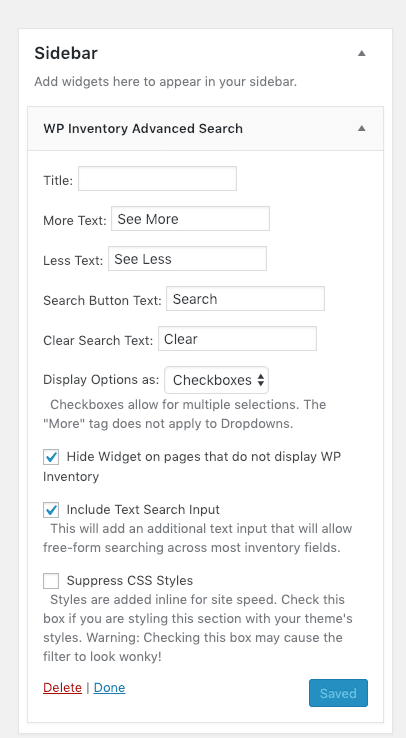
First, in your WordPress menu, navigate to Appearance > Widgets. Here, you can drop the WP Inventory Advanced Search widget into any widgetized area. The widget itself can also be configured to suit your needs:
Title – Optionally set a title for the Advanced Search Widget.
More Text – Allows you to change the text of the More Separator dropdown. Defaults to “See More.”
Less Text – Allows you to change the text of the button to close the More Separator dropdown. Defaults to “See Less.”
Search Button Text – Allows you to change the text of the filter button. Defaults to “Search.”
Clear Button Text – Allows you to change the text of the button to clear the chosen filters. Defaults to “Clear.”
Display Options as – Changes whether filter options are displayed as checkboxes or a dropdown field. Please note that the More Separator does not apply to the dropdown display option.
Disable AJAX – Toggle the option to update the available search filters dynamically when a user chooses an option with AJAX. Setting this to “1” turns on the option to disable ajax, but the default is 0 with the option to disable ajax turned off.
Hide Widget on pages that do not display WP Inventory – When enabled, this option will hide the Advanced Search widget on any page that does not have the WP Inventory display shortcode.
Include Text Search Input – When enabled, this option adds a freeform text field to the top of the Search Filters that allows your users to type in their own search queries.
Suppress CSS Styles – When enabled, this option disables the default CSS styles for the Advanced Search widget, allowing you to customize the widget with your own custom CSS.
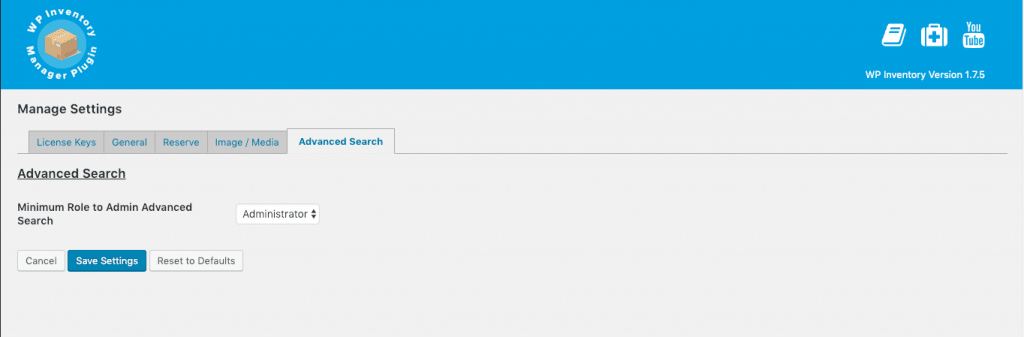
Advanced Search Filter Settings
There is one setting you can use to configure the add-on, found on the Advanced Search tab in the WP Inventory settings page.
Minimum Role to Admin Advanced Search – Sets the minimum user role required to configure the Advanced Search Filter add-on.
Allow your users to reserve multiple items at once
Note: To actually take money, you also need to have the free Stripe.com extension installed and configured.
Want to turn your inventory database into a more traditional e-commerce experience? Then you need the Reserve Cart add-on. This tool allows your users to fill up a virtual shopping cart as they browse through your inventory, and then reserve everything all at once. You can either utilize the instructions below, or follow along with this video tutorial:
Install the add-on through your WordPress dashboard by navigating to the “Plugins” tab.
After browsing and uploading the ZIP file, activate the plugin.
Enter your license key on the settings page.
Adding Items to Cart
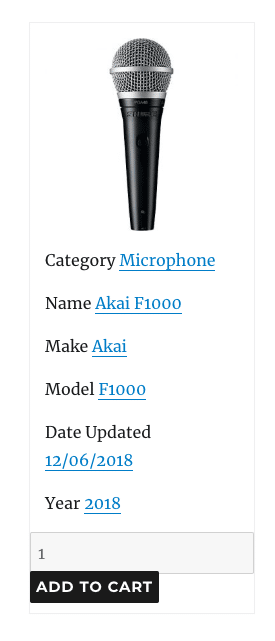
As soon as your add-on is activated, users will be able to add inventory items to their cart on the front-end. This can be done anywhere the inventory is displayed: inventory listings using the display shortcode, search results, or individual product detail pages. Each product will now have a quantity field and an “Add to Cart” button appended to their listing. The exact location these buttons are displayed can be managed in the settings, detailed in the Reserve Cart Settings section below.
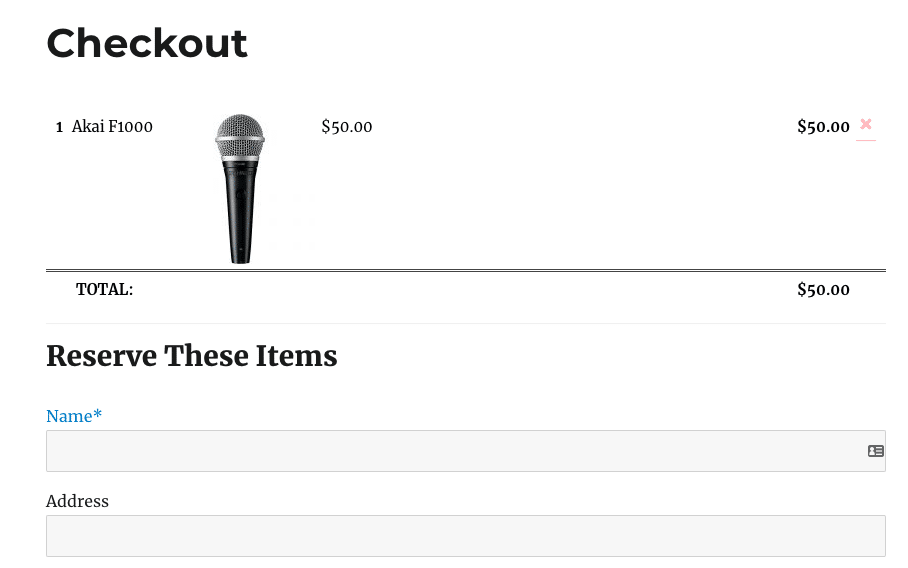
The Checkout Process
There are a few settings and elements necessary to prepare the checkout process:
Set your cart-specific Display settings. This is done the same way as detailed in the Quick Start Guide.
Create a page in WordPress you want to use for checkout, and include the checkout shortcode on that page: [wpinventory_checkout]
Specify the Checkout URL in the Reservation Cart settings under the Reserve tab in your WP Inventory settings.
Once you’ve finished these three steps, the checkout will be available on the same page created in step 2. The cart will be above the typical reservation form used for single items, but when submitted reservation requests will be submitted for all items in the cart.
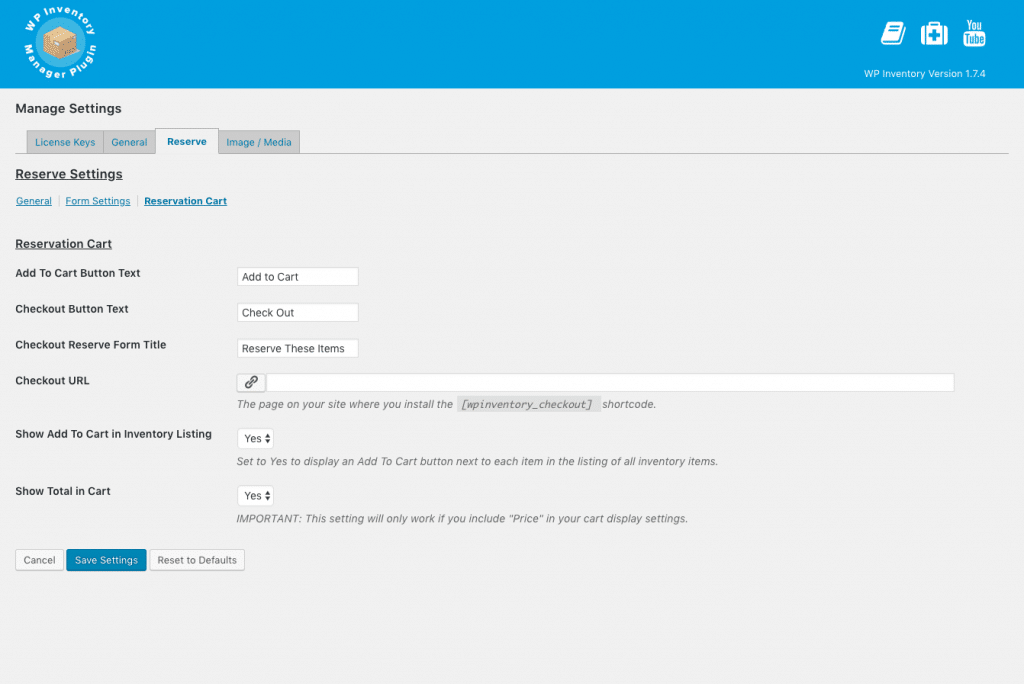
Reservation Cart Settings
There are several settings you can use to configure and customize the reservation cart, found in the Reservation Cart section under the Reserve tab on the WP Inventory settings page.
Add to Cart Button Text – Allows you to customize the text of the “Add to Cart” button
Checkout Button Text – Allows you to customize the text of the “Checkout” button
Checkout Reserve Form Title – Allows you to customize the title of the reservation checkout form
Checkout URL – The page where the [wpinventory_checkout] display shortcode is installed, where your checkout will be available to users.
Show Add to Cart in Inventory Listing – If enabled, this setting will allow users to add inventory items to cart from the inventory listing page and search results.
Show Total in Cart – If enabled, this setting will show the total sum of all inventory items in a user’s cart. Please note, this will only work if the “Price” field is included in your cart-specific display settings.
Manage accounting tasks, generate invoices, and more!
Want to have more oversight on your inventory count and reservation process? The Ledger add-on keeps a detailed record of increases and decreases in your inventory quantity, and can even allow you to generate invoices for customers. The add-on gives you a much deeper insight, and a greater level of control over the entire reservation process. You can either utilize the instructions below, or follow along with this video tutorial:
Install the add-on through the WordPress dashboard by navigating to the “Plugins” tab.
After browsing and uploading the ZIP file, activate the plugin.
After entering the license key, there will be a new link under the WP Inventory tab in the dashboard called “Ledger.”
Ledger Entry Creation
There are two ways for entries to be made in the ledger found after clicking the “Ledger” menu item in the WordPress dashboard menu:
Whenever a user submits the item reservation form (dependant on settings)
Manual entries on the inventory item editing page
You can find more information regarding controlling the entries created from the item reservation form farther down the page, in the Ledger Add-on Settings section.
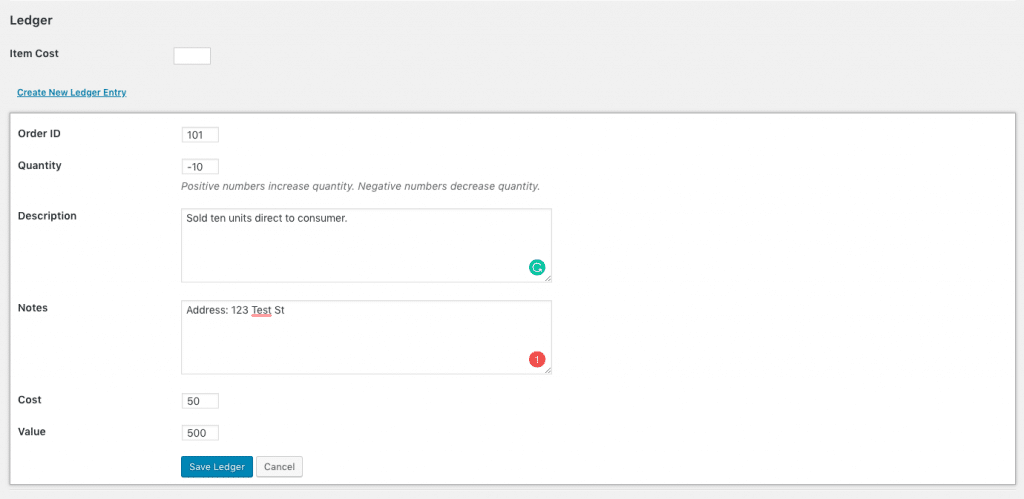
If you scroll down to the bottom of the inventory item editing page, you’ll find a section titled “Ledger.” Here you can set the hard cost of the item (different from the price you offer to your customers) as well as click the “Crew New Ledger Entry” button to open the following form:
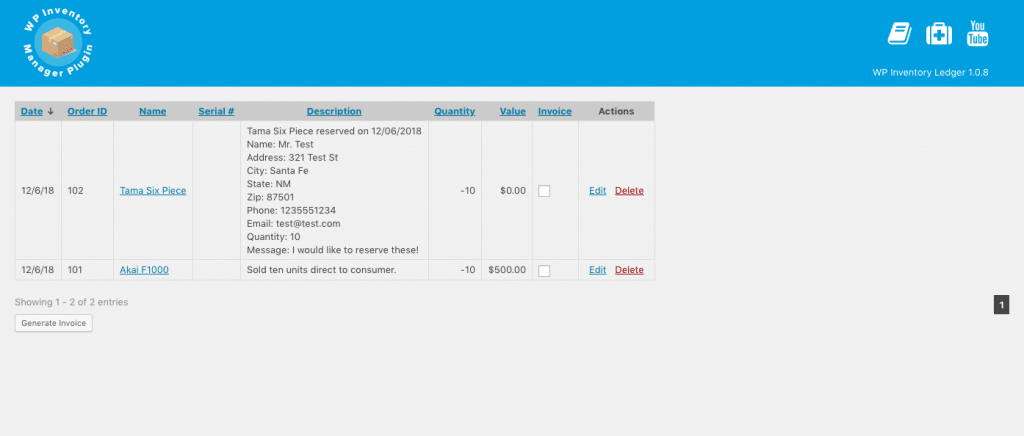
Viewing the Ledger
In each item editing page, at the very bottom, there’s a dropdown to view/hide ledger entries only regarding the pertinent product. You can find a complete ledger regarding all items by clicking the “Ledger” menu item in your WordPress dashboard menu. Every entry is able to be edited or deleted as well.
Invoice Generation
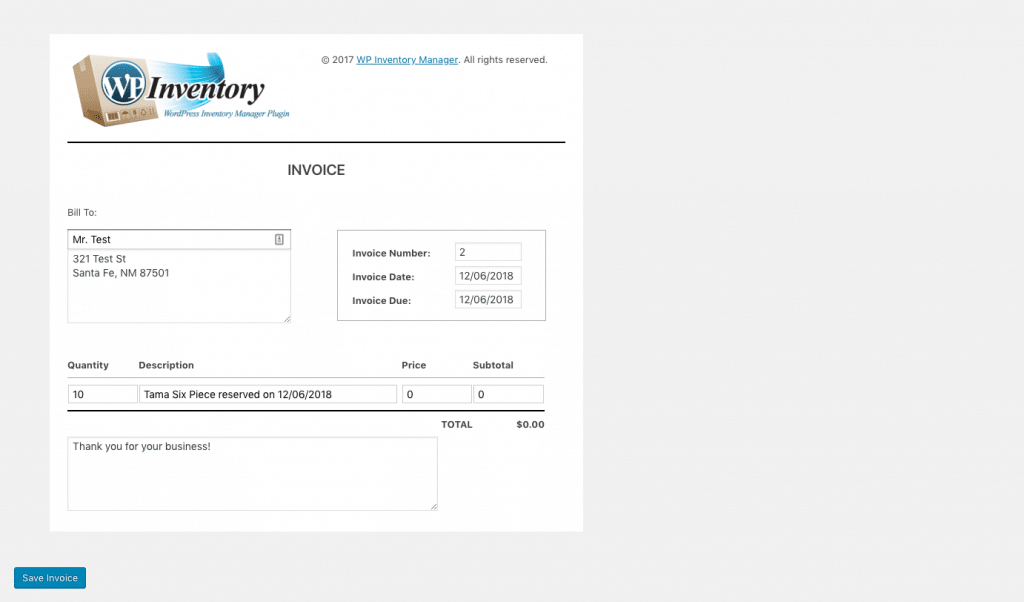
Wherever you view ledger entries, there is a column titled “Invoice.” If you tick the box, then click the “Generate Invoice” button below the entries, you’ll be taken to a page where an invoice is automatically generated based on the entry information and your Ledger Invoice settings.
You can modify final details here if necessary. Once you click the “Save Invoice” button, the checkbox in the “Invoice” column of the ledger entry will be replaced by three options: 1) Edit the Invoice 2) Save and Download the Invoice as a PDF 3) Delete the Invoice.
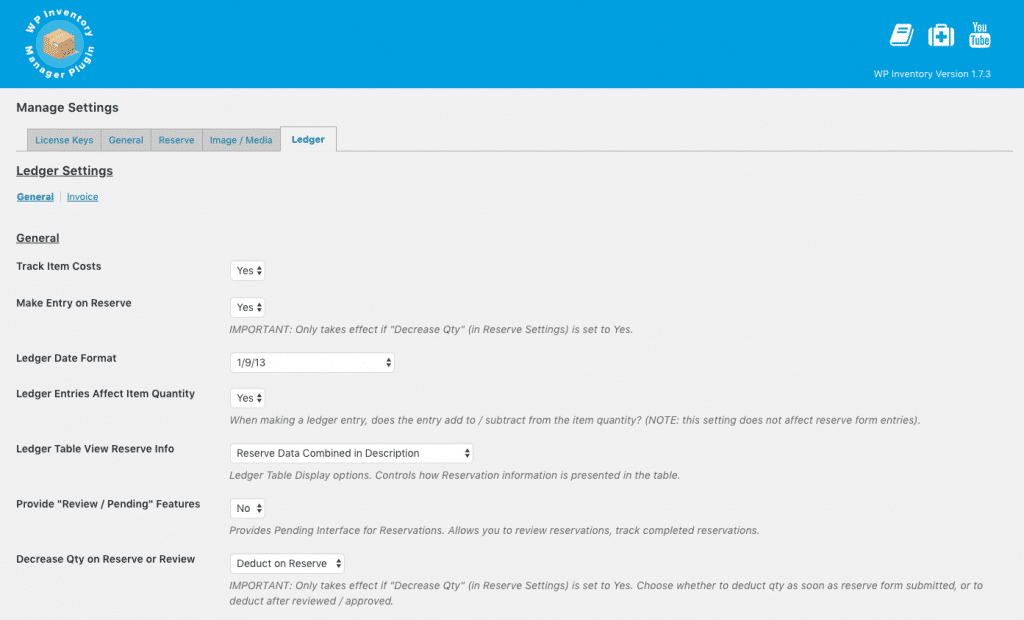
Ledger Add-on Settings
There are several settings which are specific to the Ledger add-on. There are both general settings, and settings regarding the customization of generated invoices.
General:
Track Item Costs – Enables the ability to track hard costs of items, distinct from the price shown to customers.
Make Entry on Reserve – When enabled, this setting will create a ledger entry when a user submits the item reservation form. Please note that this only takes effect if the “Decrease Qty” setting in Reserve Settings is enabled.
Ledger Date Format – Allows you to set the format of dates in the ledger.
Ledger Entries Affect Item Quantity – When enabled, this setting makes manual ledger entries affect the quantity of the specified item. Please note, this setting only affects manual entries (there is another setting regarding the same functionality of the item reservation form).
Ledger Table View Reserve Info – This setting determines how the information from the item reservation form is displayed in ledger entries.
Reserve Data Combined in Description – All of the field information will be combined into the description field.
Distinct Columns for Reserve Data – This will create different columns for each field in the item reservation form.
Description Column and Reserve Data Columns – This combines the previous two settings, combining all of the information in the description while also creating distinct columns.
Provide “Review / Pending” Features – When enabled, this will enable the “pending” interface for reservations, which allows you to review reservations before they are confirmed.
Decrease Qty on Reserve or Review – The same as “Ledger Entries Affect Item Quantity” regarding the item reservation form.
Invoice:
On this tab, you’re able to customize the layout of the generated invoices. You can set the content of the header, on both the left and right side. You can also customize the labels of each field. Finally, you can change the default text in the invoice footer.
Save time on maintenance with Bulk Item Management
Update any fields on any range of items
The Bulk Item Management add-on is ideal for users who need to update a large number of inventory items in a short amount of time. The plugin is smart, able to filter items based on any field with a wide variety of qualifiers and data criteria. Then once they’re selected, any of the chosen items’ fields can be updated, not just the ones selected. Find out how you can save time now with the following instructions, or follow along with this video tutorial:
Install the add-on through the WordPress dashboard by navigating to the “Plugins” tab.
After browsing and uploading the ZIP file, activate the plugin.
After entering the license key, there will be a new link under the WP Inventory tab in the dashboard called “Bulk Item Management.”
Updating Inventory in Bulk
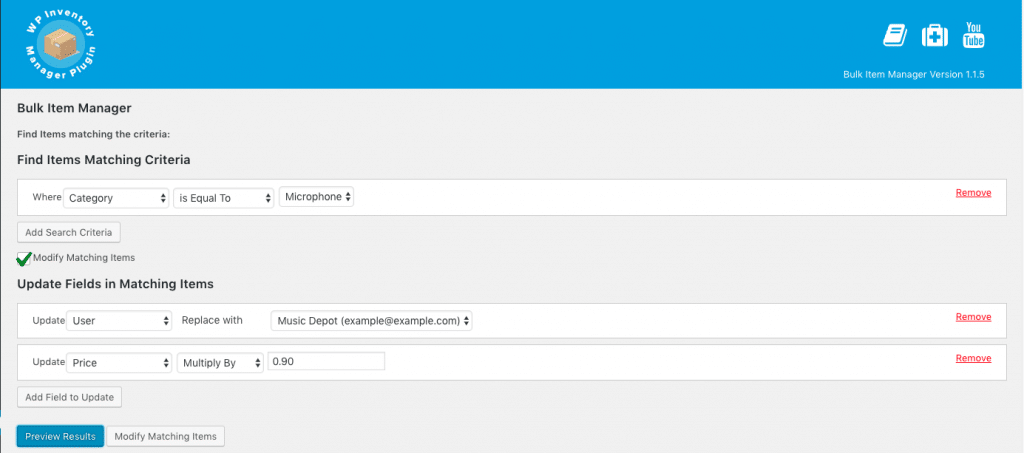
Find Items Matching Criteria
Following “Where,” select the field you’d like to target. This can be any of the default fields, as well as any custom fields created with Advanced Inventory Manager.
Select the qualifier from the following options: is Equal To, Starts With, Ends With, Contains, Does Not Contain, Greater Than, Less Than. Some options may not be available depending on the chosen field.
Enter your specific criteria based on the preceding two options.
If necessary, click the “Add Search Criteria” button and repeat steps 1.1 – 1.3 to create more than one filter statement.
Modify Matching Items
Tick the “Modify Matching Items” checkbox.
Following “Update,” select the field you’d like to update. This can be any of the default fields, as well as any custom fields created with Advanced Inventory Manager.
Select the instruction from the following options: Replace with, Append with, Prepend with, Multiply By, Divide By, Add To, Subtract From. Some options may not be available depending on the chosen field.
Enter your specific update value based on the preceding two options.
If necessary, click the “Add Field to Update” button and repeat steps 2.2 – 2.4 to create more than one update statement.
Finalize the Update
Click the “Preview Results” button to see how the statements defined in steps 1 and 2 will affect your inventory items.
If there are no changes needed, click the “Modify Matching Items” button to finalize the update.
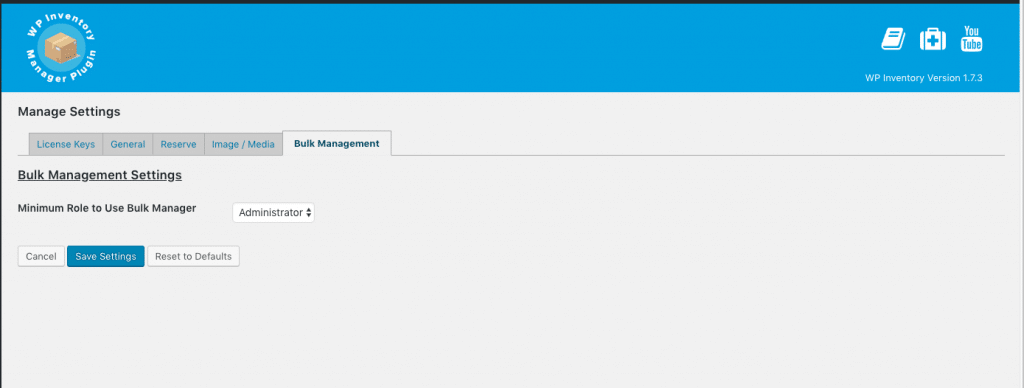
Bulk Item Manager Settings
There is one setting to the Bulk Item Management add-on available in the “Bulk Management” tab of the Settings page.
Minimum Role to Use Advanced Item Manager – This sets the role that a user must have to utilize the Bulk Item Management form.
Categorize your inventory to create an expansive database
If you have many different Types and categories of inventory items, you the Advanced Inventory Manager (AIM) add-on. This tool allows you to create different “Types” of inventory, with completely customized fields. For instance, you wouldn’t give the same attributes to a hammer as you would to a refrigerator. With AIM, you can eliminate confusion and expand the capabilities of your inventory database. You can utilize the instructions below, or follow along with this tutorial video:
Installation
Purchase and Download the Advanced Inventory Manager add-on.
Install the add-on through the WordPress dashboard by navigating to the “Plugins” tab.
After browsing and uploading the ZIP file, activate the plugin.
After entering the license key, there will be a new link under the WP Inventory tab in the dashboard called “Advanced Management.”
Adding New Inventory Types
Navigate to the “Advanced Management” page of WP Inventory Manager.
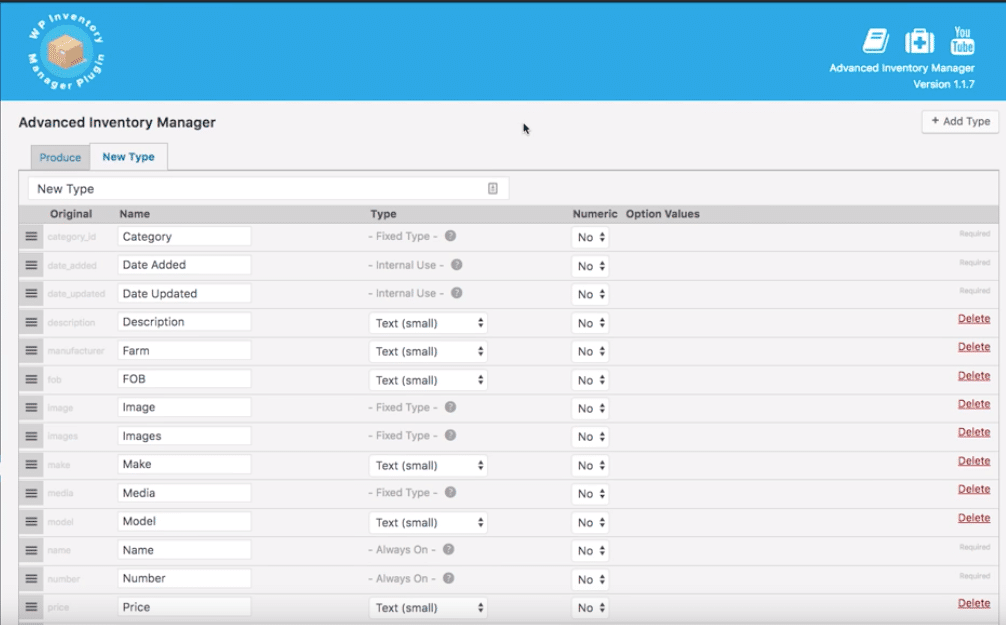
Click the “Add Type” button at the top right of the page
Once clicked, the button will bring up a form with a set of fields corresponding to the default inventory item attributes. The Type can be named at the top of this form, and the attributes of the Type are customizable below. New attributes can also be added using the “Add Field” button at the bottom right of the page.
Original – The default name of the field. This cannot be changed. New fields will have the word “custom” in this column.
Name – The name of the field that will display in all places on both the backend and frontend of the website. This can be used to rename default fields or give a name to new, custom fields.
Type – A dropdown choice between a small Textbox, a large Textarea, a Number, a Dropdown / Select, or a Radio select. The option values are set in the Option Values column.
Numeric – A Yes/No selection as to whether the attribute is exclusively numeric.
Option Values – The defined choices available in the item creation form when the Type of attribute is either a Dropdown or Radio selection.
Delete – Aside from a few foundational attributes, most attributes can be deleted if they are unnecessary by clicking the button in this column.
Finally, be sure to set the Display settings for the new Type. This can be done either by clicking the “Manage Display Settings” button at the bottom of the page or navigating to “Display” in the WP Inventory Manager menu. This is done in the same way as detailed in the Quick Start Guide.
Categorizing Inventory Items
Once Types have been created, when trying to create inventory items, the first option provided (before anything else is available) is setting the Type of the item.
Once a Type is assigned, the rest of the fields will become available. The fields available, as well as their names, are determined by the attribute settings defined in the Adding New Inventory Types process.
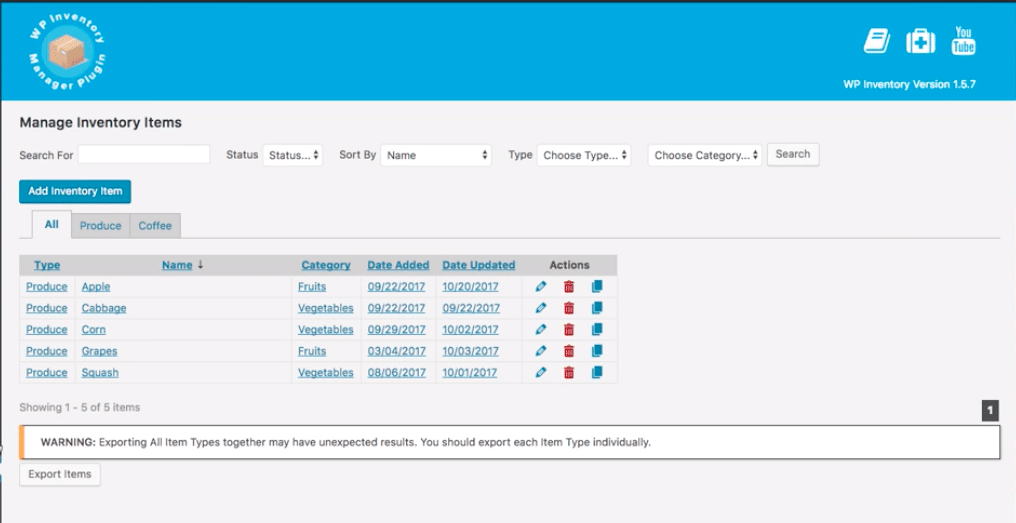
Filtering Inventory Items by Type
On the Manage Inventory Items page, there are now several tabs above the list of inventory items. The All tab displays all items in the database, but each new Type added will create a new tab here that only lists items in the corresponding Type.
Similarly, on any page where the display shortcode is used, the user can now search and filter the inventory listings by any available Types.
Advanced Inventory Manager Settings
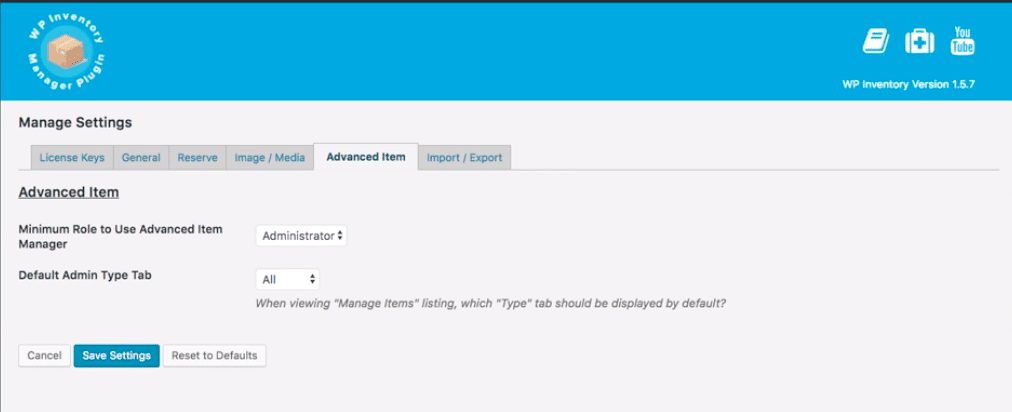
There are a few options specific to the Advanced Inventory Manager add-on available in the “Advanced Item” tab of the Settings page.
Minimum Role to Use Advanced Item Manager – This sets the role that a user must have to create new Types and manage Type settings.
Default Admin Type Tab – When viewing the “Manage Items” listing, this setting determines which “Type” tab is displayed by default. The default value is All inventory items, but it can be set to only show a specific Type of default.
Add new customization and functionality with these options
WP Inventory Manager may be a powerful tool, but sometimes you need specific functionality to make it best fit your needs. We’re constantly working to improve WPIM through our add-ons, affordable plugins that greatly expand your abilities while managing your inventory. You can find a list of add-on documentation below:
Divide your inventory by location for enhanced management
Have multiple stores or warehouses? The Locations Manager add-on is the ideal tool for you. This powerful extension allows you to manage your inventory items and their quantities based on different set locations, and see activity reports for each individual location. You can even include the location in the reserve form confirmation email for seamless communication with your customers. You can either utilize the following instructions, or follow along with this tutorial video:
Install the add-on through your WordPress dashboard by navigating to the “Plugins” tab.
After browsing and uploading the ZIP file, activate the plugin.
After you enter your license key, there will be two new links under your WP Inventory tab in the dashboard called “Locations” and “Location Activity.”
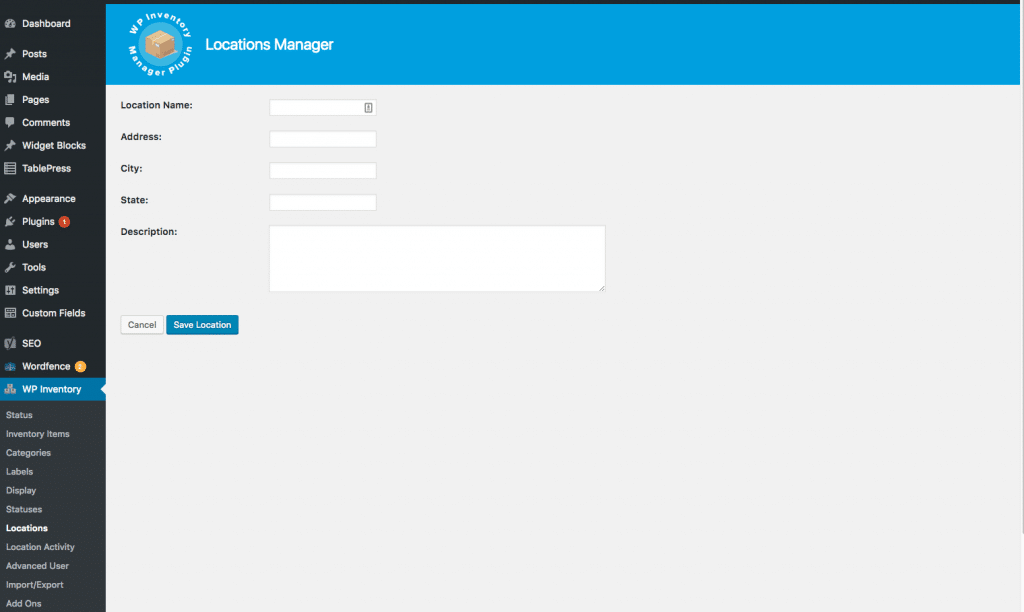
Adding and Setting Locations
Navigate to the “Locations” page of WP Inventory Manager.
Click the “Add New Location” button
Fill out the following form of basic location information, and click “Save Location” when finished
Now when you create any new inventory items or edit inventory items already present, there will be a new field in the creation form called “Assign to Locations.” Here, you can choose the locations where the item is available, and set the specific quantity available at said locations. Please note that the sum of the quantities set for the Locations must equal the quantity entered in the default field.
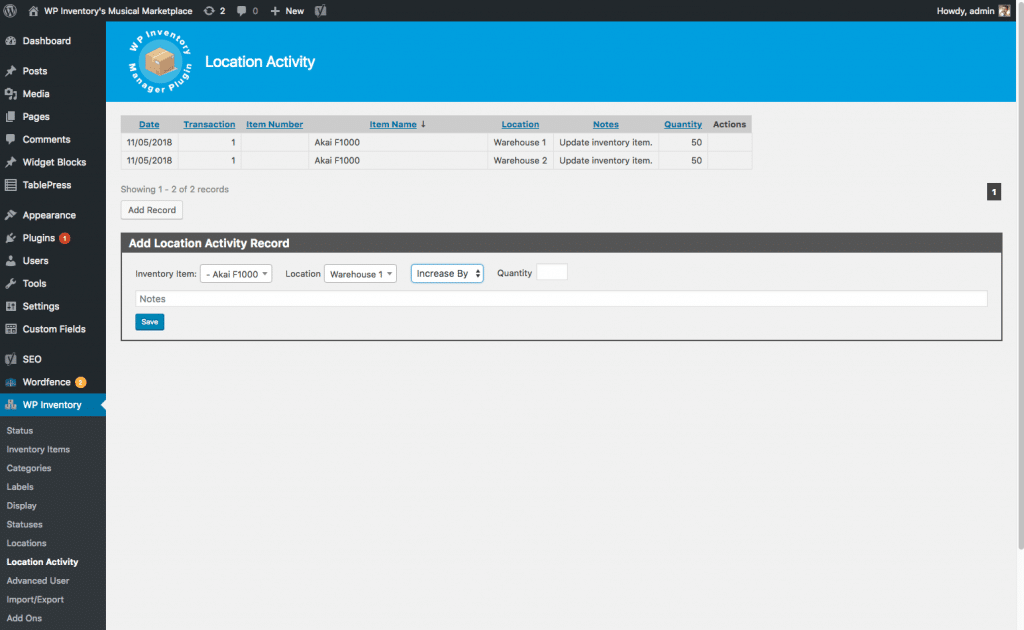
Managing the Activity Log
By clicking the “Location Activity” menu item, you’ll be able to see the activity log. This is a log of changes to quantity based on inventory items and locations. Whenever a quantity is set or changed in the inventory item creation process or editing process, the system creates an entry in the activity log. These activity log entries cannot be edited or deleted.
However, it is possible to create manual entries in the activity log for changes not handled through the system (returns, last minute changes, etc.) or for bookkeeping and other ad-hoc adjustments.
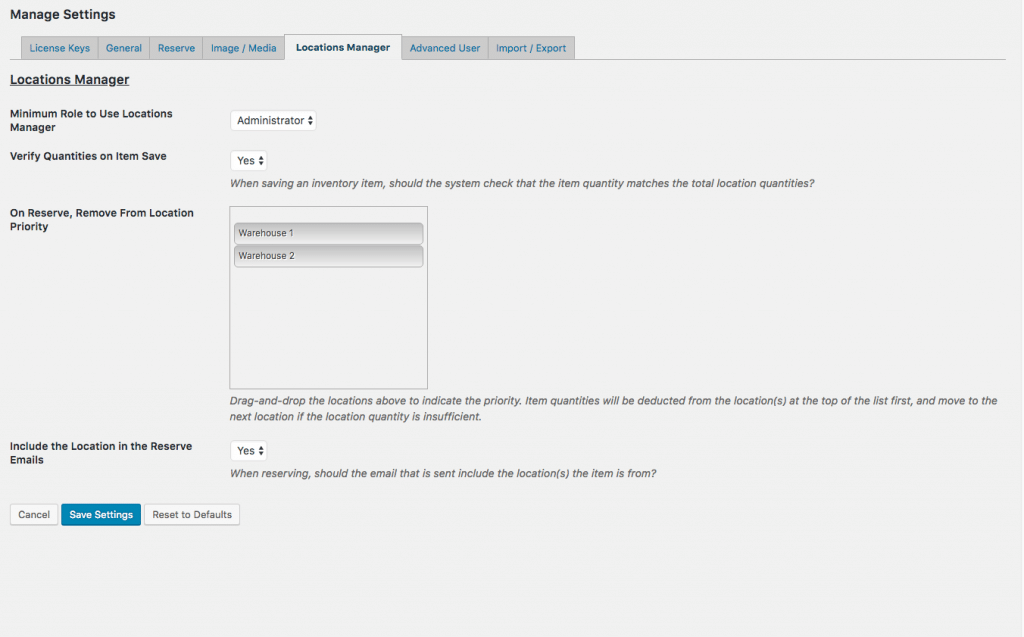
Locations Manager Settings
Along with the “Locations” and “Location Activity” menu items, you’ll also find a new tab on the settings page for settings specific to Locations Manager.
Minimum Role to Use Locations Manager – This sets the role that a user must have to create locations and create entries in the activity log.
Verify Quantities on Item Save – When enabled, the system will run a check whenever an inventory item is created or edited to ensure that the sum of the quantities allocated to different locations matches the total quantity available of the item (which is set separately). An error will be returned if the values don’t match.
On Reserve, Remove from Location Priority – This list determines the order of which location will have its quantity reduced when a user reserves an item. If the top of the list has a quantity of 0, the next location will be updated, and so on. At this time, this is only the way to choose which Location an inventory item deducts from on reserve.
Include the Location in the Reserve Emails – When enabled, the user’s reserve order confirmation email will include the location that the item has been reserved from.
Great plugin! I love the ability to manage the display settings for the listing and the detail page.
Useful and Free, But a Paid License Gives You So Much More!
Typically ‘free’ plugins come in a few flavors useful or enough to get you to pay for what you really need. This plugin offers a unique solutions to a number of Inventory uses and displays for free, no fuss or muss about it.
However paying for a license opens up support for one year and allows addition of the addons if desired. Let me just say for the meager cost of $15 for a year of support the team is everything you would want from a development group and customer service team rolled into one.
Look forward to using this plugin for a long time to come.
Great Product – Fantastic Support!
What a great plugin, works very well and the support is fantastic.
Thank you for a good product, looking forward to anything else you guys may have up your sleeve.
Keep up the good work.
Excellent, Clean, Simple Inventory Management
The administrator features make this an excellent plugin for managing a list of items based on a variety of factors. The database and code are well structured, so you could easily modify it to your liking or use it right away as is. Many aspects of the plugin are also customizable as part of the plugin’s settings.
Excellent All Around!
The software and service is excellent. Can not thank them enough. Sometimes it is hard to find such dedication and professionalism. Highly recommend WP Inventory and the add-ons.
Great Product, Even Better Support!
Having used the application / plugin for more than 6 months, I cannot express enough my appreciation for WP Inventory. Easy to implement, intuitive for users, the application allows us to indicate our current and forthcoming inventory positions easily. We have chosen to show our inventory not by using numbers, but by using literals like “In stock” and “Arriving soon”.
A new application using WP inventory is being implemented for another part of our business and it will display actual units of inventory. It is nice to have one application that can handle two different styles of implementation.
What is most impressive is the reliability and the timeliness of support for this application. It is not hyperbole when I say that the support for this plug-in is the best of any WordPress plugin that we have used.
Great Product! Great support!
Great Plugin – Great Support!
This plugin is just the ticket for a small business (up to 5000 items) needing a comprehensive inventory system. I found it quite easy to install and just as easy to use. I ran into one problem, contacted their support center and had my problem rectified in a couple of hours. I’ve never been a fan of email support, but these guys are great! I couldn’t be happier with everything about my purchase!
Great Program and Customer Support!
This program is just what we needed to list our inventory with photos to our customers and the public – Very flexible as to what information you can show-and easy to use
Great Plugin!
After installing and configuring everything, I still needed some help with some issues in the way I was trying to use IM. The support team was very clear in their explanation, and everything was solved quite fast.
Great Product and Support!
I was looking for a product to display collection items on my site when someone suggest WP Inventory. It was exactly what I was looking for. The support is unmatched. They have helped me several times along the way. You will not be disappointed with WP Inventory.
Fantastic Plugin and Support!
I was recently looking for a solution to manage inventory for a client on their WordPress site. I searched and found the WP Inventory Manager plugin and after reading some reviews, decided to install it. The interface was well considered, and offered a tremendous amount of capability for the free version. Everything worked as stated in the promo, and I was very happy with the results. I wanted to expand the capabilities of the program, so I purchased the Import/Export add on. What a time saver!
I am new to developing, so had a few issues with some custom code, due to my inexperience. When I sent my questions and emails for assistance with the problem, I had an answer within the day that remedied my problem and also gave me a little more insight into some of the code in this great plugin.
I have since purchased the Advanced Inventory Manager and plan to add the Bulk Item Manager very soon.
Considering the price of these Add Ons and the fact that the initial WP Inventory Manager is free, it’s an incredible value, and has served my clients very well. I may have been able to develop a system in php with Dreamweaver, but it would have involved a tremendous amount of time and effort.. making WP Inventory Manager and its Add Ons, with its excellent support, one of the best purchases I have made in recent years!
Great Plugin with Superb Support!
Whilst the free version is great, it’s well worth the small amount it costs to purchase a licence. Support is superb and the plugin works just perfectly. The only choice if you are looking for pro inventory solution.
Excellent Tech Support!
Not only does this plugin work as advertised, but they also have excellent tech support. They answer emails quickly and were able to ask/solve my problems in a timely manner.
Highly recommended.
Great Plugin, Top Notch Support!
Can’t say enough good things about this plugin and its support. I had an issue that was quite unique to my situation and the support staff went above and beyond to make the plugin work for me. I would highly recommend this plugin if you are doing any sort of inventory management.
Excellent Inventory Plugin for WordPress
I used this plugin and eventually used the developers to do all my WordPress programming. They are responsive, competent and write clean code. I would recommend this plugin and the developers to anyone looking for WordPress work.
Good Support!
Very willing and helpful support.
Excellent Support!
The guys at wpinventory go out of their way to help solve any issues that might exist! One of the best supports I have had the pleasure to work with.
Simply Awesome!
The database functions are really worth seeing. You can see that there were experts here who understand their craft! Logical structure of the database, useful functions and an incredibly detailed guide with numerous videos, what more could you ask for? But the best part is the support! Responds to requests in the shortest possible time, has solutions and no standard texts ready and is on top of that friendly! Conclusion – best recommendation!
Amazing!
I cant believe how good this plug-in is! It was great when I first downloaded it and began using it. I ran into some small bumps down the road and the support team they have is beyond exceptional. Always a working answer to a problem, and always in a quick a timely manner. I would Give them more then 5 stars if I could! Keep up the great work guys!