A warehouse runs on one question: what do we have and where is it? Most teams answer that with a spreadsheet that is out of date by lunch, or with an enterprise system that costs more than the stock it tracks. If your business already runs on WordPress, there is a lighter way to manage warehouse inventory that does not involve WooCommerce or a five-figure platform.
This guide shows how to run real warehouse inventory inside WordPress with WP Inventory Manager: stock across multiple locations, reorder points, fast search and controlled access for your team.
Why a warehouse does not need WooCommerce
Most inventory advice points you to WooCommerce. For a warehouse, that is the wrong tool. WooCommerce is built to sell products online: carts, checkout, payment gateways and shipping. A warehouse is about what sits on the shelf, not what is in a shopping cart.
You need to know quantities, locations, reorder points and who moved what. None of that requires a storefront. WP Inventory Manager runs on any WordPress site as a standalone system, so you get warehouse tracking without the weight of an ecommerce platform you will never use.
What warehouse management actually requires
Before adding any tool, it helps to be clear on what a working warehouse system has to do.
- Accurate stock counts. A live quantity for every item that staff can update as goods move in and out.
- Location awareness. Stock split across warehouses, zones or shelves, with a count for each.
- Reorder points. Minimum levels that warn you before an item runs out, not after.
- Fast search. The ability to find any SKU in seconds across a large catalog.
- Controlled access. Each team member sees and edits only what they should.
WP Inventory Manager covers all five through its free core plus a few targeted add-ons.
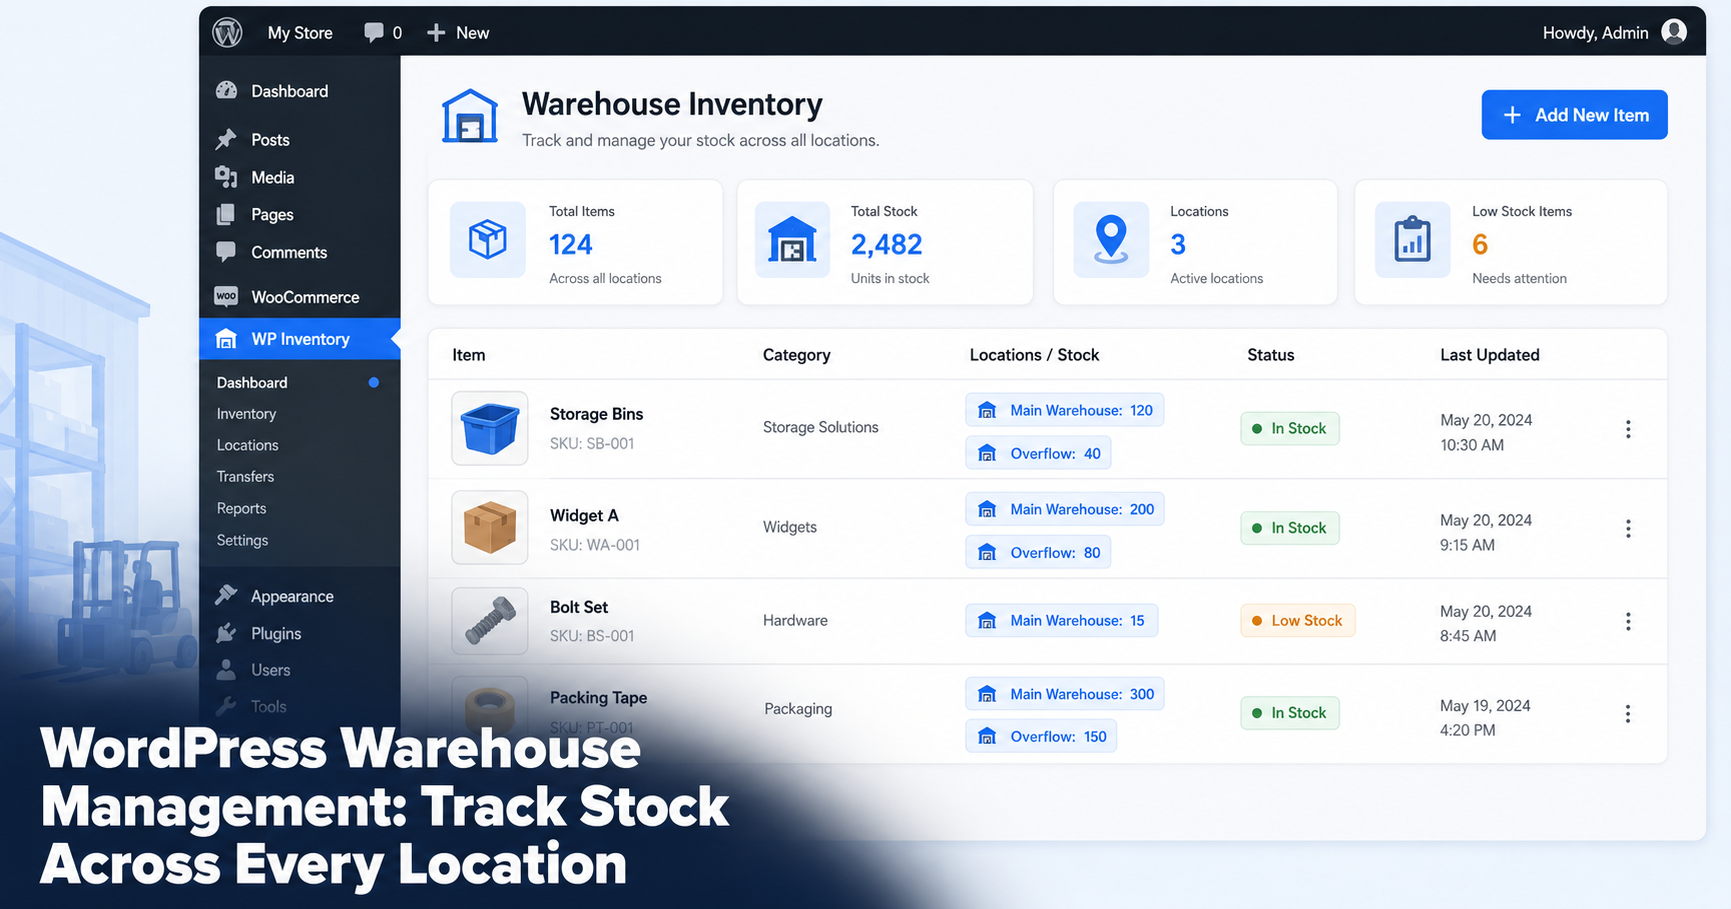
Track stock across multiple warehouses
The Locations Manager add-on is the heart of a multi-site warehouse setup. Each item carries a separate quantity for every location you define, so you always know where stock actually sits.
With Locations Manager you can:
- See total stock company-wide or drill into a single warehouse.
- Set up as many locations as you need, from two depots to dozens of zones.
- Transfer items between locations and keep both counts correct.
Example: A parts distributor stores fast-moving items in a main warehouse and overflow in a second unit across town. The dispatcher opens the item, sees 120 units in the main warehouse and 40 in overflow, then ships from the right one without a phone call.
Set reorder points and get low-stock alerts
Running out of a core item is what costs a warehouse money. WP Inventory Pro adds the fields that prevent it: minimum and maximum quantity per item, plus low-quantity email alerts.
Set a reorder point on each SKU and the system emails you when stock drops to that level. Pro also records quantity history, so you can see who adjusted a count and when, which matters when numbers do not add up.
Example: A reorder point of 25 is set on shipping boxes. When the count hits 25, an email lands in the manager’s inbox and the item is flagged in the admin, so the next order goes out before the shelf is empty.
Find any item in seconds
A warehouse catalog grows fast. Once you pass a few hundred SKUs, scrolling stops working. The Advanced Search add-on turns your inventory into a filterable database, so staff narrow results by category, location, custom field or keyword without paging through the whole list.
That speed matters most at the moment someone is on the floor trying to confirm whether an item is in stock.
Control who can edit each warehouse
Not everyone should be able to change every count. The Advanced User Control add-on sets, per person, whether each user can edit all items, only the ones they added, or none, with the same control over viewing. A bulk user screen applies the rules to a whole team at once.
The result is a system the warehouse manager trusts: floor staff update what is theirs while the master count stays protected.
Bulk updates and stock counts
Warehouses live by the periodic count. The Import / Export add-on makes it a quick round trip rather than a week of manual edits. Export your current inventory to CSV, update the counts in a spreadsheet during the count, then import the file back to apply every change at once. New stock can be added the same way instead of one screen at a time.
What you need and what it costs
You can start free. The core plugin handles item records, categories and a front-end display, which is enough for a single small stockroom.
For a working warehouse, two paid tiers cover the rest. WP Inventory Pro at $79 a year adds reorder points, low-stock alerts and quantity history. The All Access Pass at $199 a year bundles Pro with Locations Manager, Advanced Search, Advanced User Control and the Reserve Cart and Import / Export tools. For a business tracking stock across more than one location, All Access pays for itself the first time it prevents a stockout.
Get started: Browse the tools that fit your operation at wpinventory.com/add-ons, or download the free plugin and set up your first location today.


