Add-On: QR code

Print a WordPress inventory QR code label for any item, stick it on the shelf, the case or the item itself, and a scan with any phone opens that item’s record: no searching, no typing, no walking back to a computer. The QR Codes add-on is built for the moment a customer asks about something while your team is standing next to the stock, and for the stock count where every item gets scanned rather than looked up.
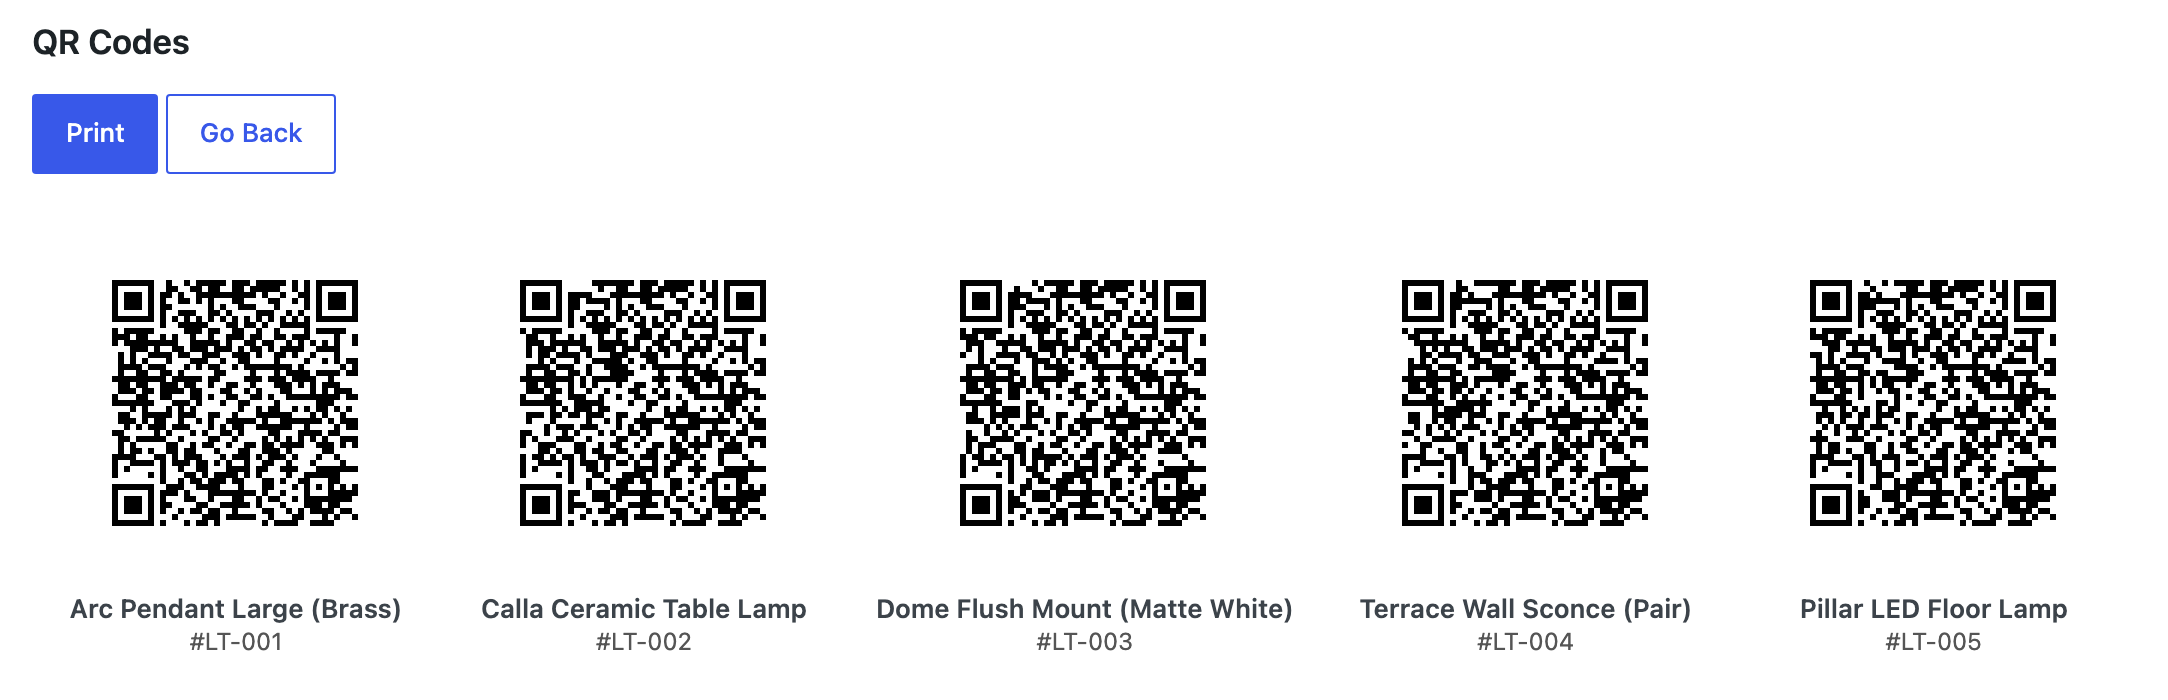
A sheet of five WordPress inventory QR code labels, each with the item name and number underneath, ready to print

WordPress inventory QR code labels in three steps

Go to QR Codes under the WP Inventory menu and choose how you want to print: a single item, a list of item IDs, or a whole range of IDs at once. Set how many copies you want of each label, the width of the code in pixels and the white margin around it, and click Print; your browser’s print dialog does the rest. Any ID in a range that has no item is skipped, so a batch never produces a tag that leads nowhere. Every label shows the item’s name and number under the code, so your team can tell tags apart at a glance without scanning them, and the codes are vector, so they stay sharp at any size, including the small tags you stick on cables and tools.
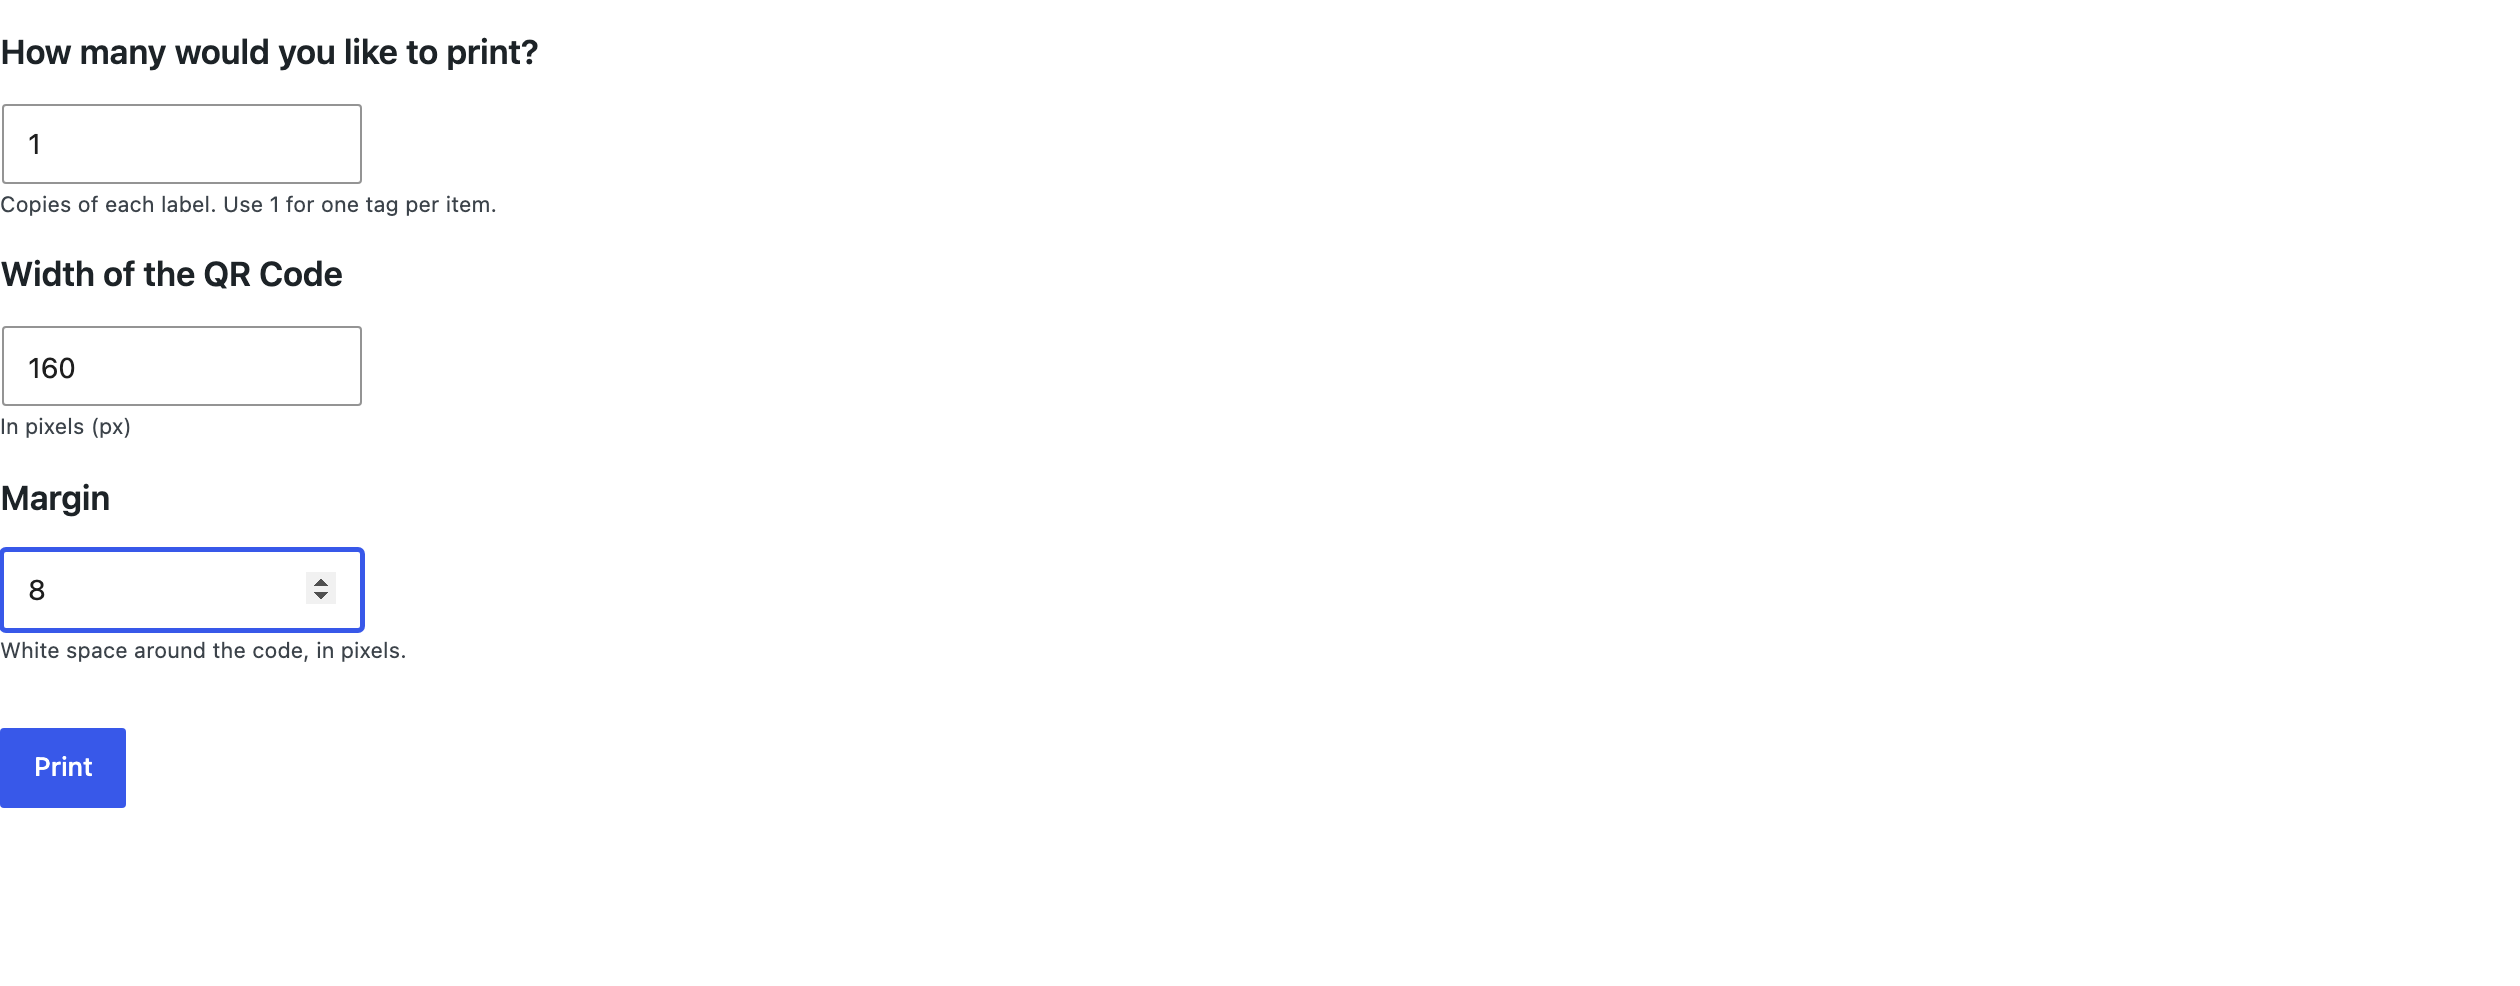
The QR Codes print options: copies of each label, width of the code in pixels and margin

You can also print from the item itself: every inventory item’s edit page has a QR Code section with the code and a Print Code link, handy when a single new arrival needs a tag. Scanning a tag opens the item in the WordPress admin, where staff can check details and make changes on the spot. Because it opens the admin, the phone needs to be signed in to your site; WordPress asks once, then takes the scanner straight to the item, and one sign-in per device is usually enough. A single setting, Minimum Role to Use QR Codes, decides who may generate and print codes; it defaults to Administrator.

The QR Code section on an inventory item's edit page, with the code and a Print Code link

The QR Codes add-on requires WP Inventory Manager Pro with an active license and PHP 8.1 or higher. It pairs well with the Locations Manager for stock spread across rooms or sites, and with the Ledger when a scan is the first step of recording a movement. The documentation covers installation, printing tips and troubleshooting.

(Note: This add-on requires a licensed copy of the WP Inventory Manager)
Add-On: Analytics

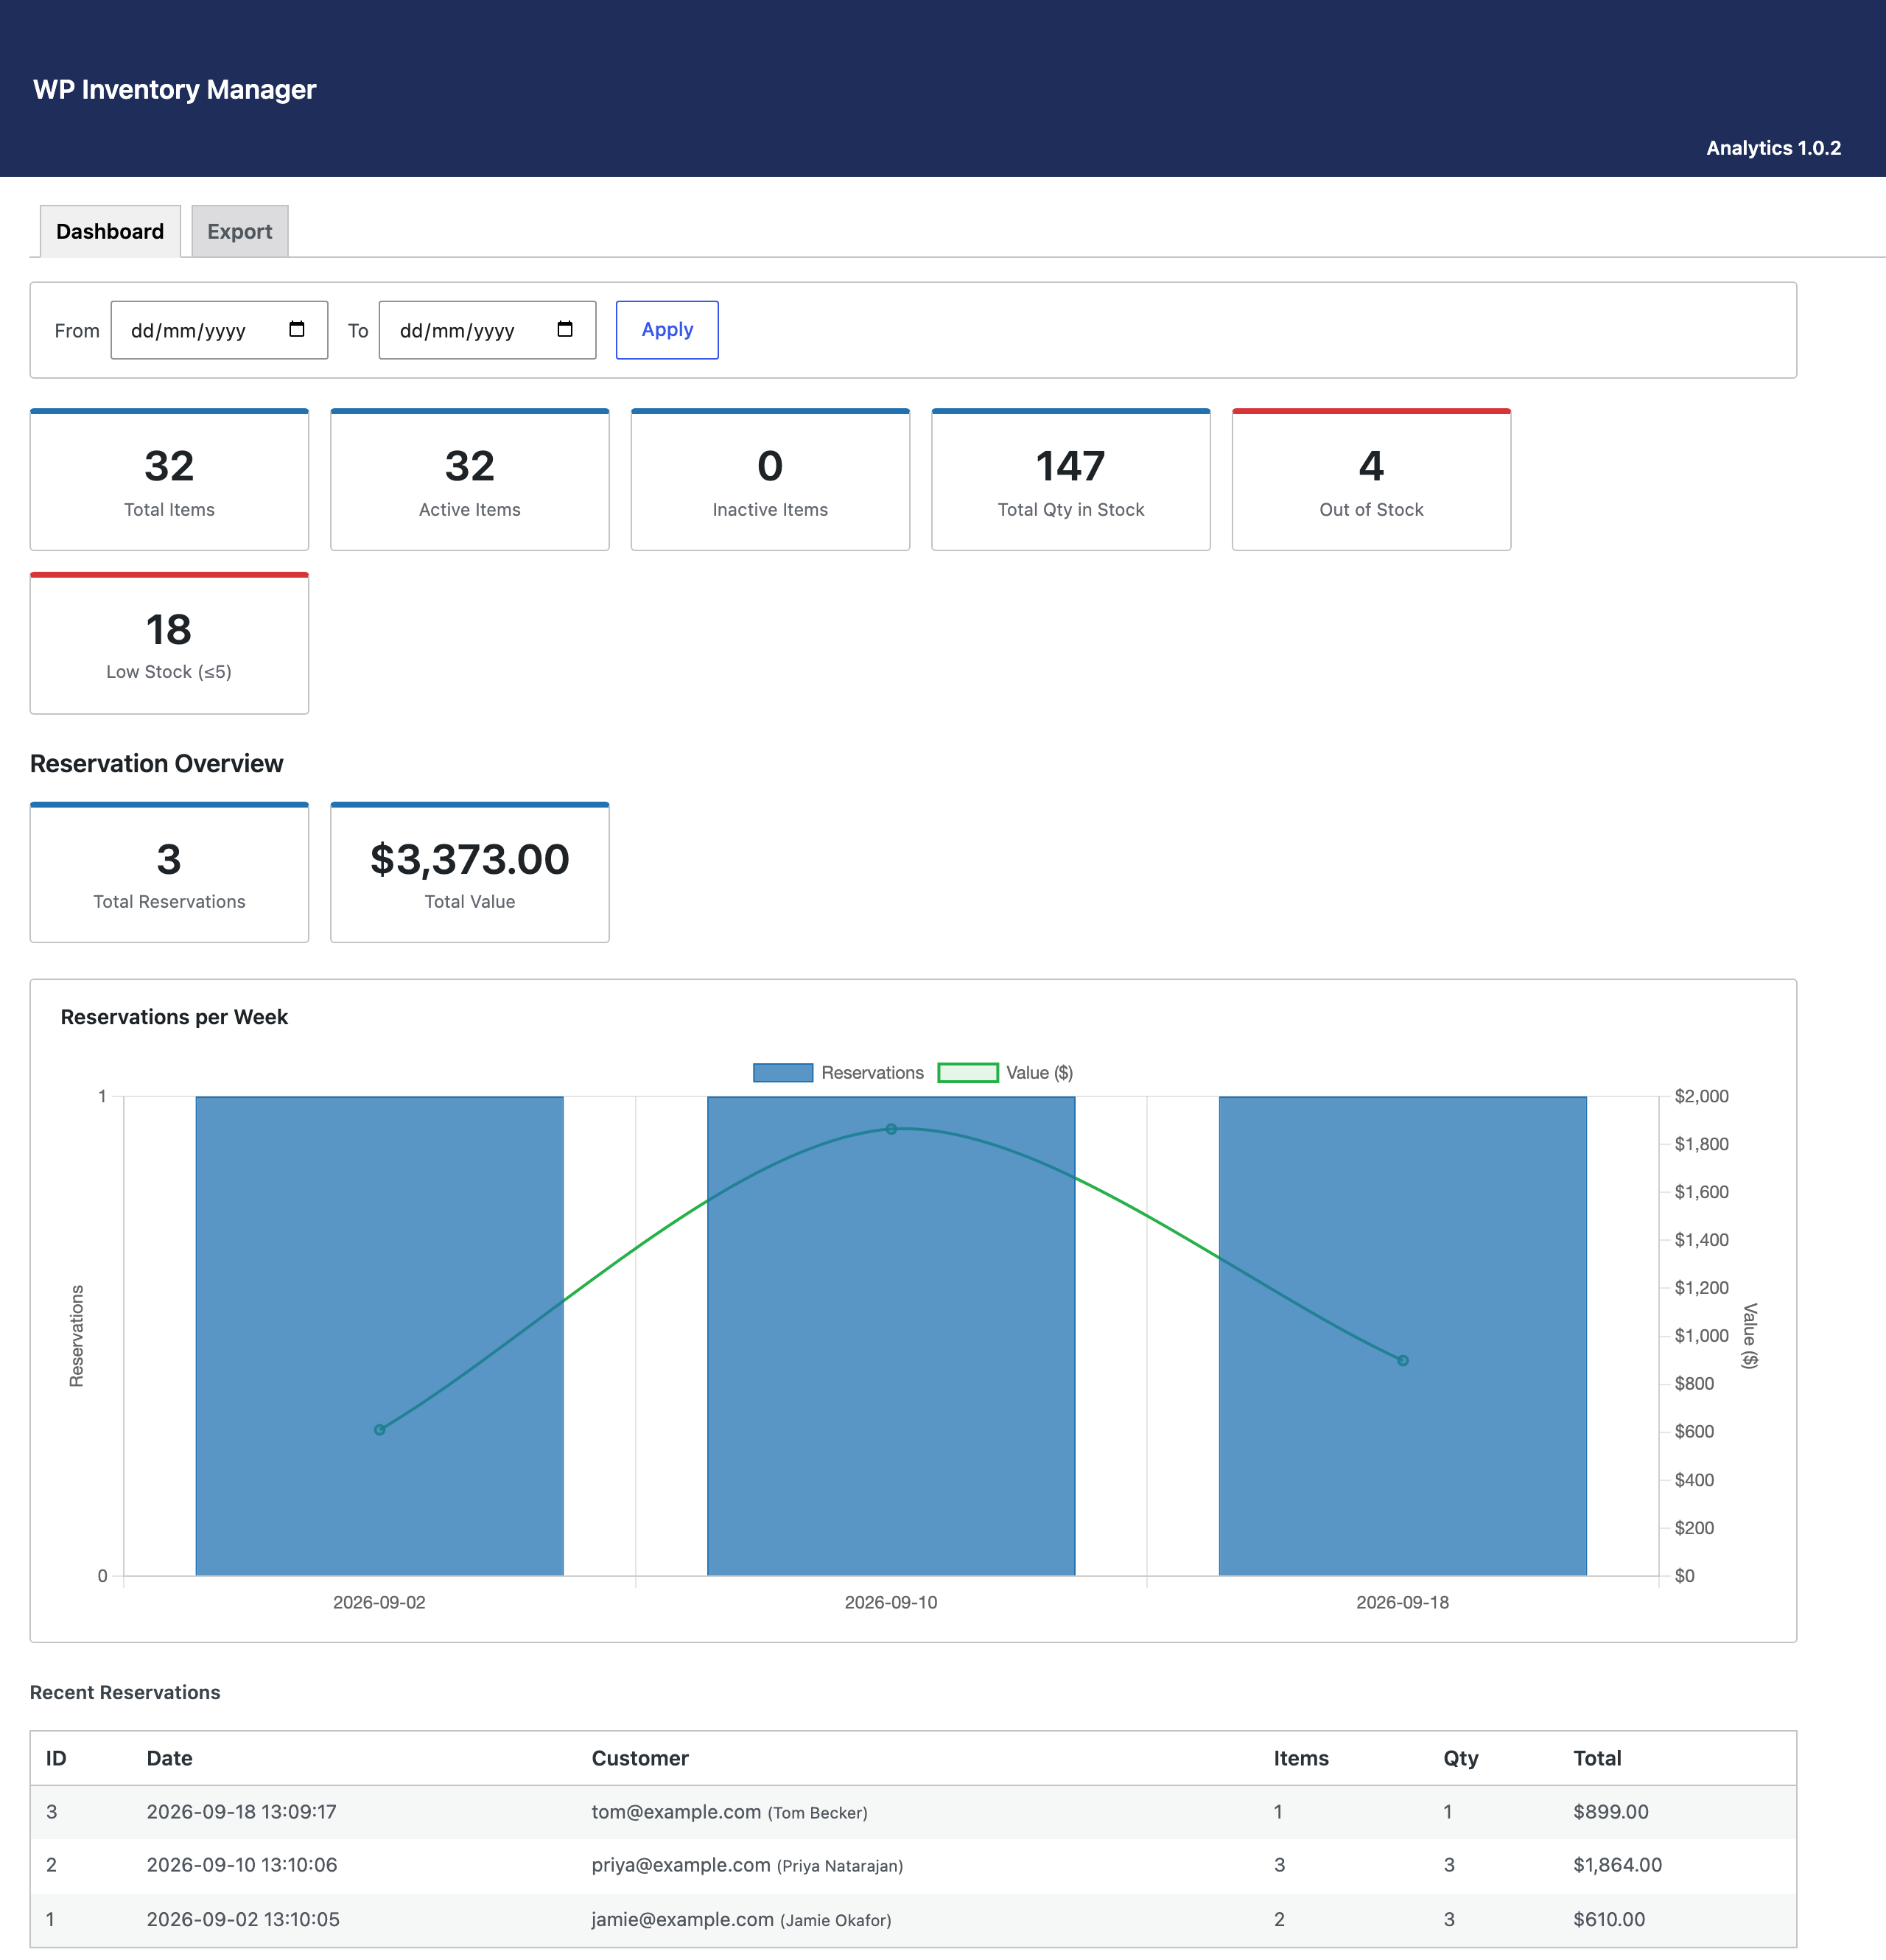
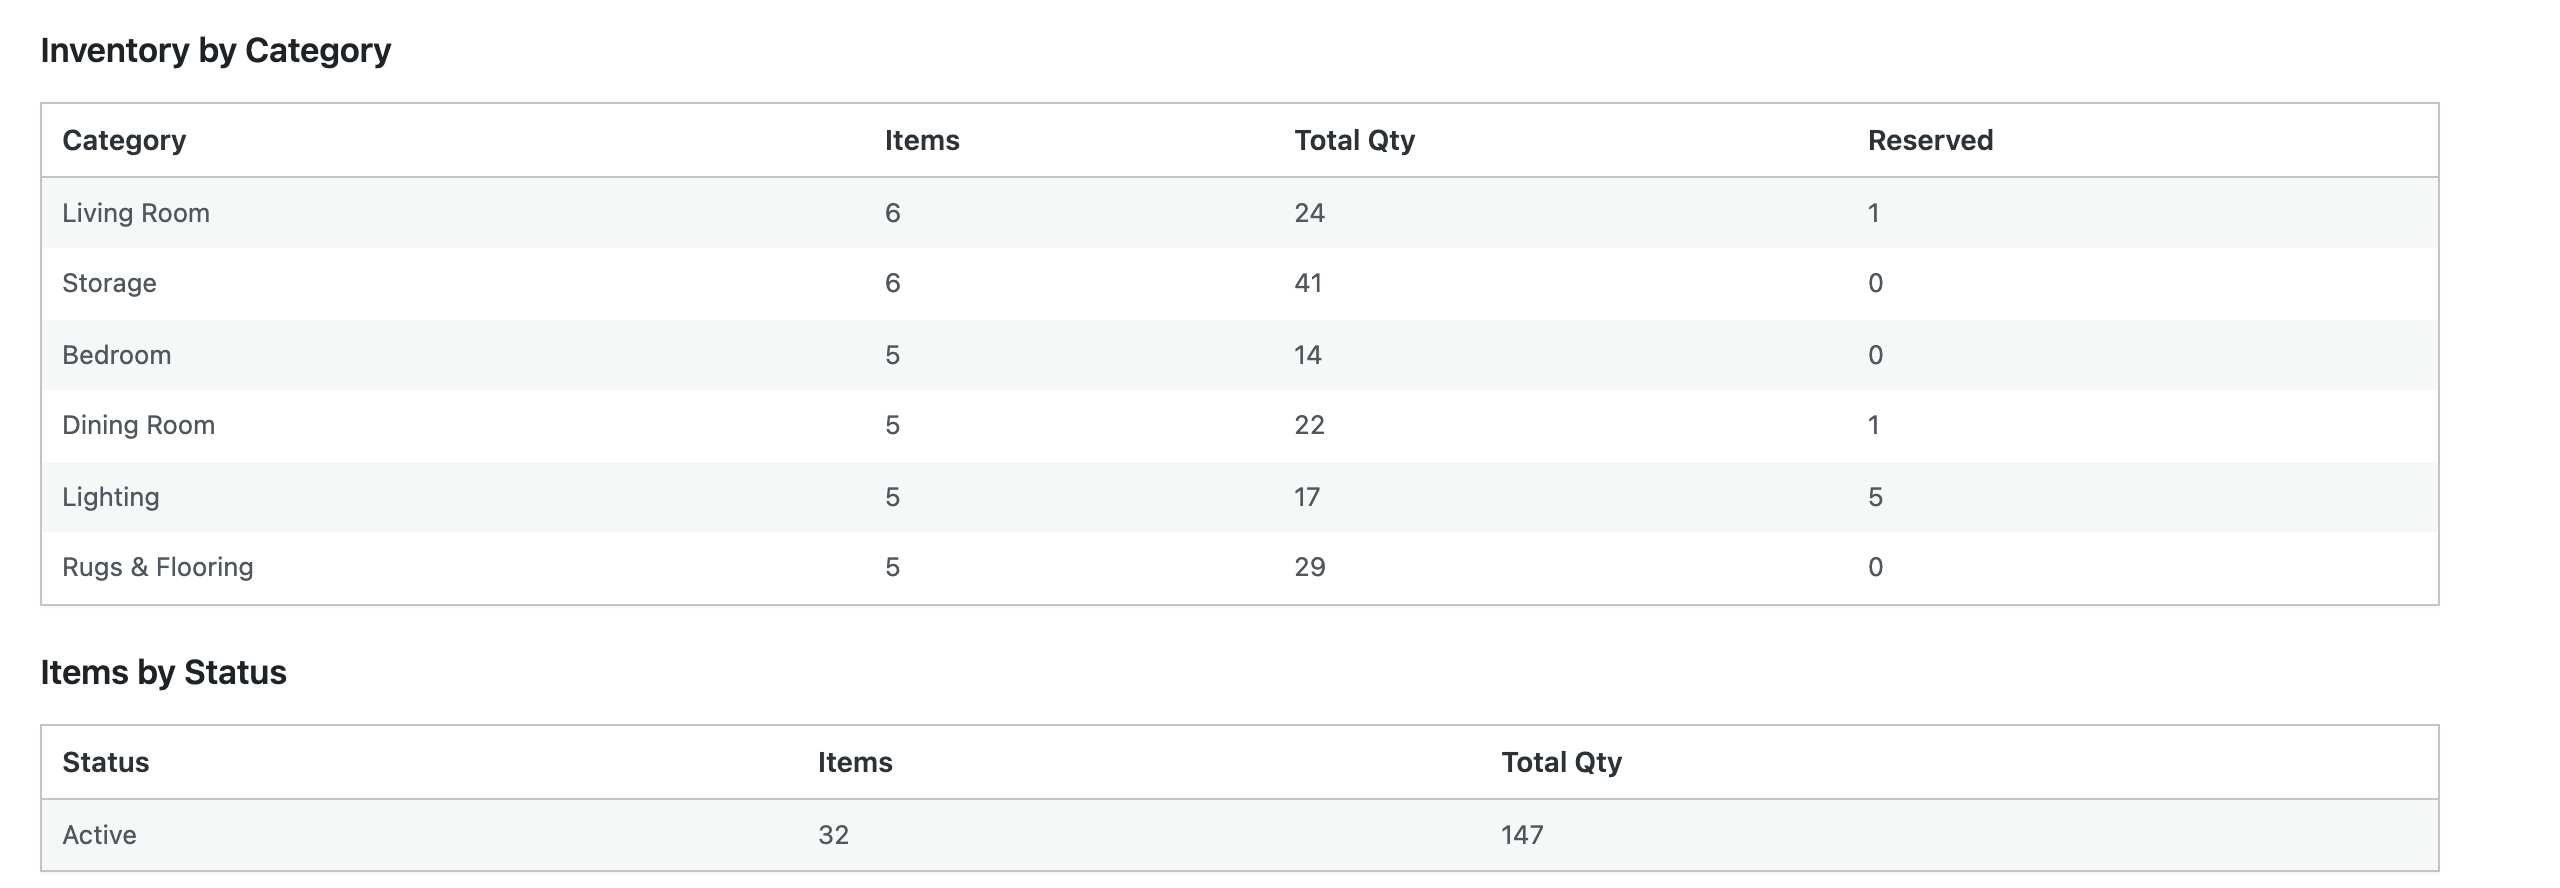
The Analytics add-on gives WP Inventory Manager a WordPress inventory analytics dashboard: one screen under the WP Inventory menu that answers the questions you otherwise assemble by hand. How many items do we carry, how many are active, how much stock is on hand, what is out of stock, and what is about to run out? Summary cards at the top give the numbers; the tables below break them down by category and by status, list what changed in the last 30 days, and flag every item at five units or fewer.

The WordPress inventory analytics dashboard: summary cards, the Reservation Overview with total value, the reservations-per-week chart and recent reservations

WordPress inventory analytics that grow with your add-ons

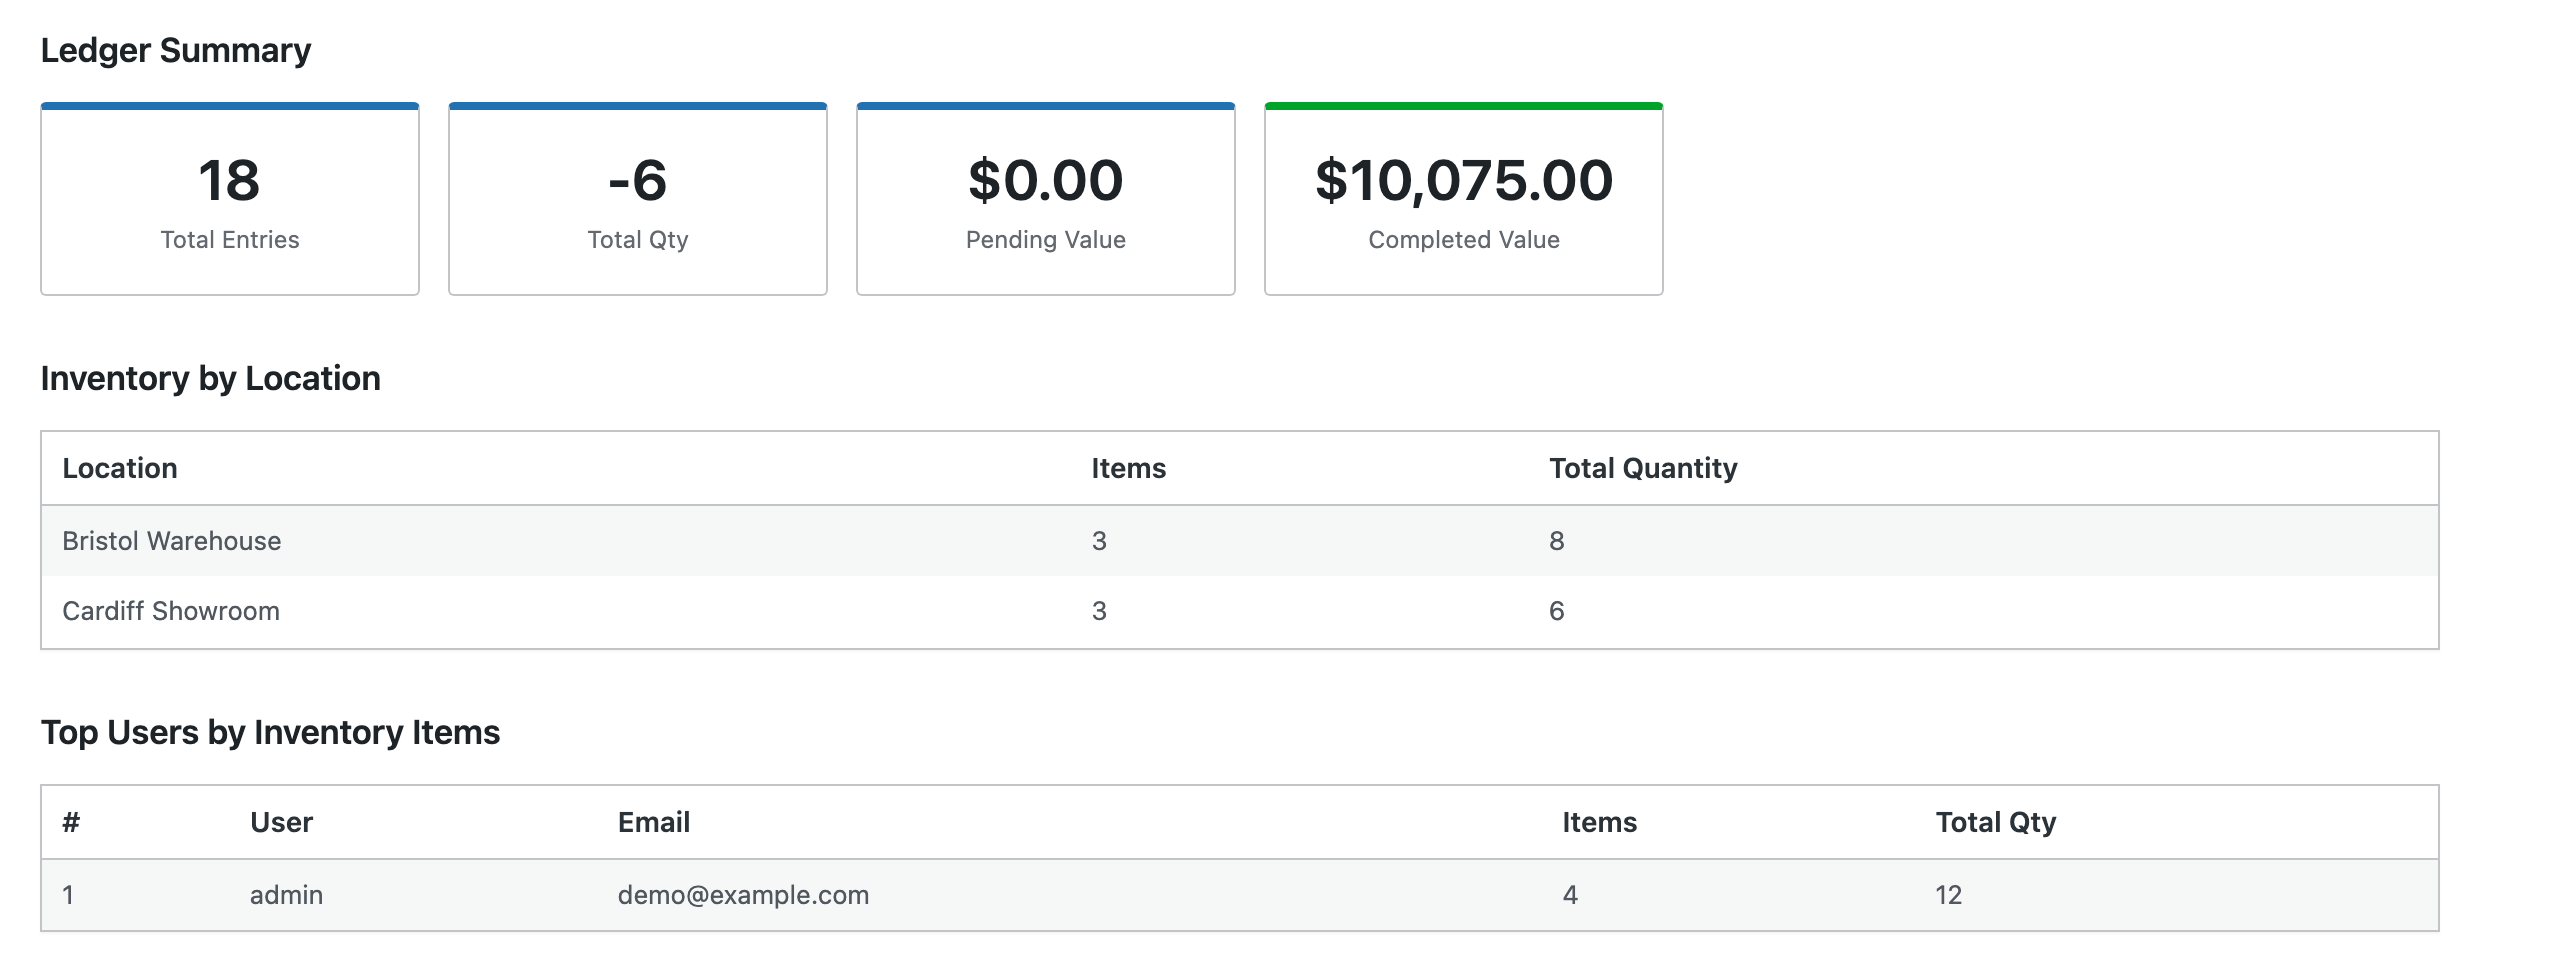
The dashboard reads whatever else you have installed. With the Reserve Cart it adds a Reservation Overview: total reservations and their value, a reservations-per-week chart with the value line on a second axis, the most recent orders, the most reserved items, and a CSV export of every reservation with the checkout form fields flattened into columns, ready for a spreadsheet. With the Ledger it adds a Ledger Summary of entries, pending value and completed value. With the Locations Manager it breaks inventory down by location, and with Advanced User Control it lists the users who own the most items. Sections for add-ons you do not have simply do not appear.

Analytics sections fed by other add-ons: Ledger Summary, Inventory by Location and Top Users by Inventory Items

A date filter at the top of the page applies to the reservation and ledger figures, so you can compare this month with last, or pull one quarter’s reservations into the export. The inventory tables always show the current state of your stock and are not date-filtered. The dashboard is read-only: it reports on your inventory and never changes an item.

Inventory by Category and Items by Status tables on the Analytics dashboard

Analytics requires WP Inventory Manager Pro with an active license; on the free plugin it shows an upgrade prompt instead of the dashboard. If your license lapses, the dashboard keeps working and renewal is only needed for updates and support. The documentation covers installation and each section of the dashboard.

(Note: This add-on requires a licensed copy of the WP Inventory Manager)
WP Inventory Manager

WP Inventory Manager is a free WordPress inventory plugin: the core inventory management plugin costs nothing and needs no license key. Create unlimited inventory items, configure the settings and fields to meet your needs, display the information you choose with a convenient shortcode, and let your visitors reserve items from your inventory. We’re proud of our 4.6-star rating on WordPress.org, with more than 1,000 active installations, and believe it speaks to the value of this inventory management plugin.

DOWNLOAD NOW


However, without a license for the Pro version, you’re missing out on two things:

  • Add-Ons – WP Inventory Manager comes with a robust set of features, and we’ve expanded its capabilities with a range of add-ons: custom inventory types, search filters, a reservation cart, multiple locations, a ledger, bulk editing and more. All add-ons require a licensed version of WP Inventory Manager in order to function.
  • Premium Support – Free users have the documentation and the WordPress.org support forum. A license adds direct, personalized support, including help troubleshooting issues on your own site.

If you’re interested in a license, you can learn more on our Licensing page.

Add-On: Disable Detail Page

This add on will remove the detail page and all settings related to the front end detail page. Effectively making it so that a detail page is inaccessible and leaving only the listing view in place. Over the years we have had numerous questions and/or requests to hide the detail page. User’s simply don’t need it because their listing page tells the whole story and therefore going to the detail page would only be redundant and bad user experience. We heard you. Just download and install and your detail page will be gone.

Add-On: Notifications

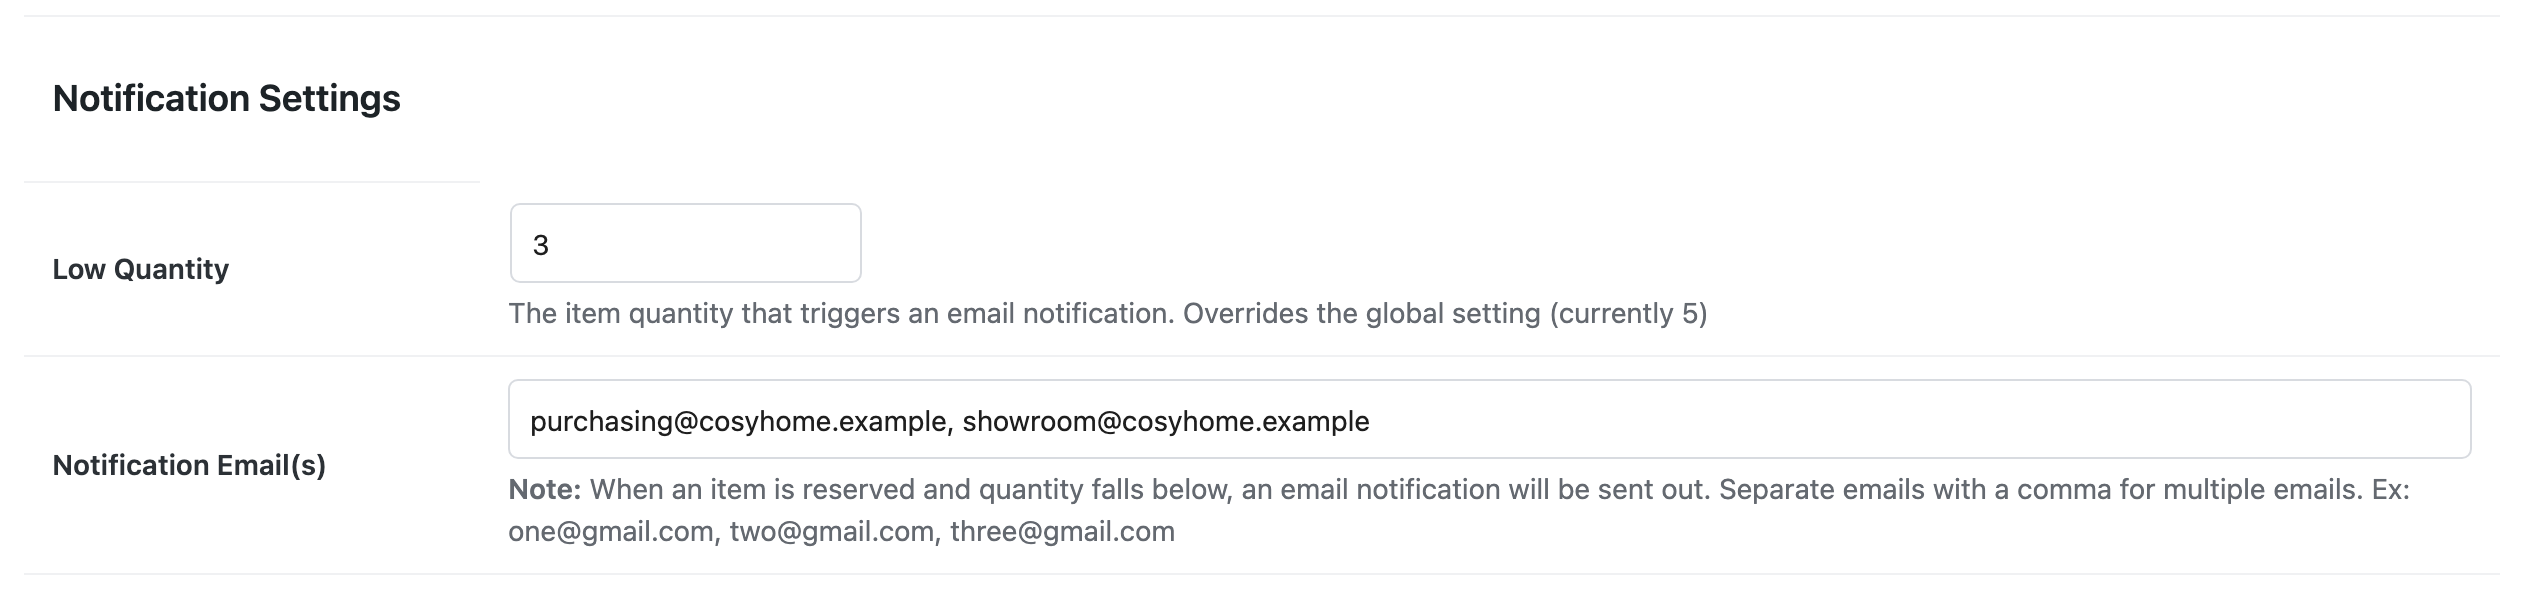
WP Inventory Manager can already email you when stock runs low, but it uses one threshold and one address for every item. The Notifications add-on adds per-item low stock alerts: each item gets its own trigger quantity and its own list of recipients, so the person who reorders lamps hears about lamps, the showroom hears about the display stock, and a fast-moving line can warn you at twenty units while a slow one waits until two.

Per-item low stock alerts on the item edit page: a low quantity of 3 and two notification email addresses

How per-item low stock alerts work

Once the add-on is active, every item’s edit page gains a Notification Settings section with two fields: the quantity that triggers the alert, and the email address or addresses to send it to, separated by commas. Leave either blank and the item falls back to the global setting, so you only configure the items that need special treatment. When a reservation brings the item’s quantity down to the threshold or below, the alert goes out to that item’s recipients.

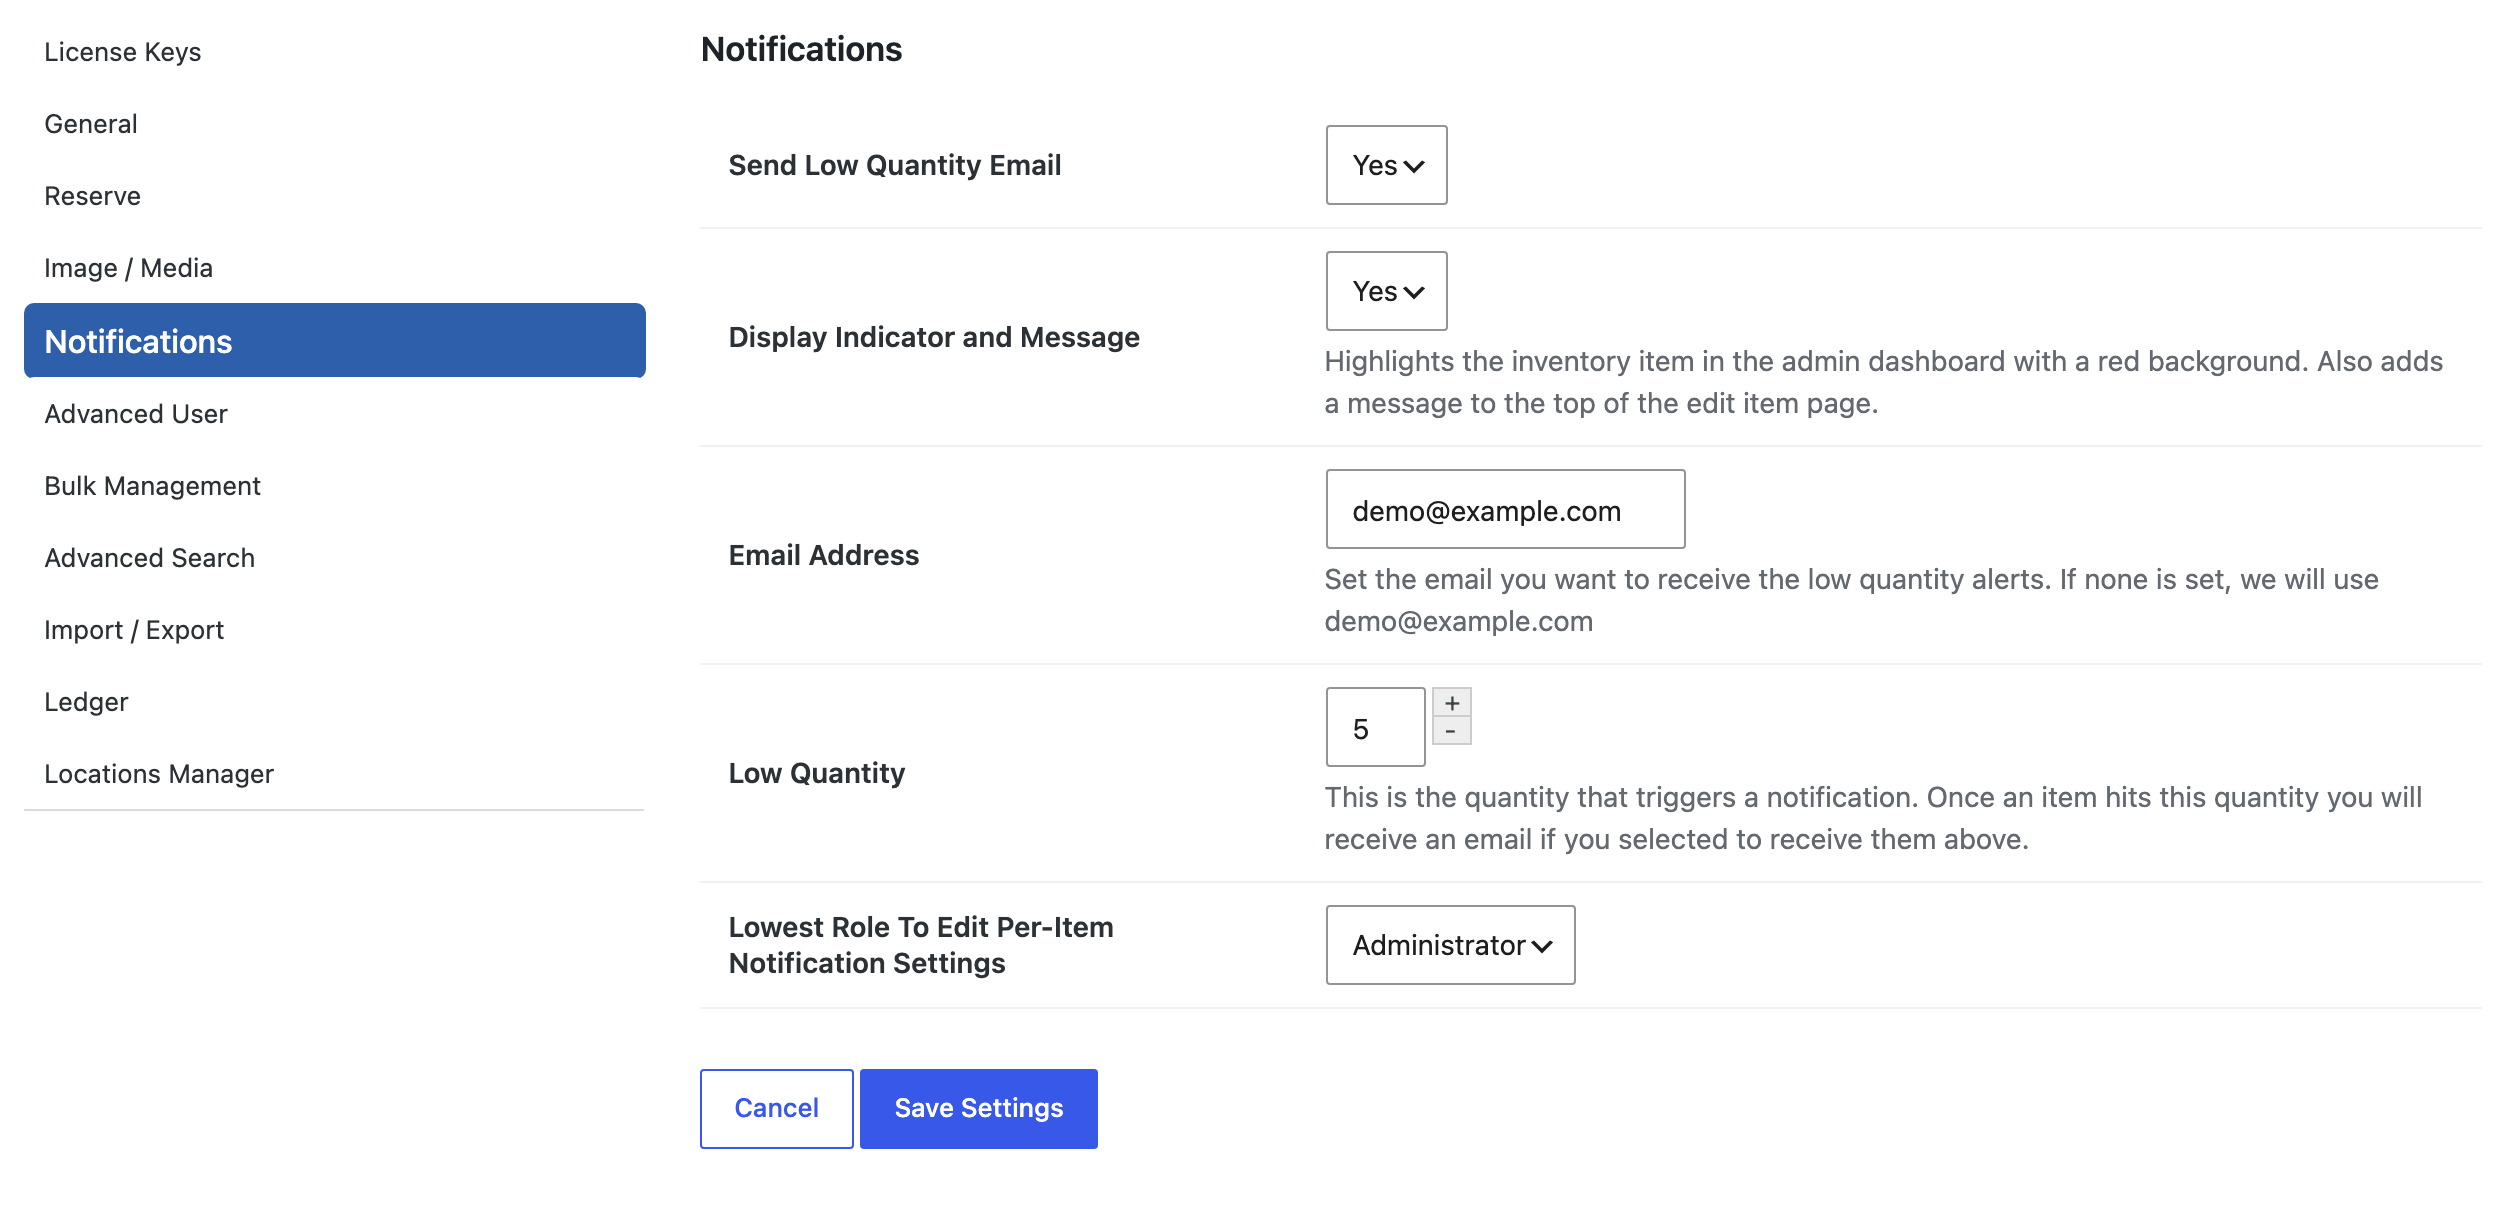
The Notifications tab in WP Inventory Settings, with the global low quantity email options and the lowest role allowed to edit per-item notification settings

Two settings matter on the Notifications tab in WP Inventory Settings. “Send Low Quantity Email” must be set to Yes, because the per-item section only appears when low quantity emails are enabled at all. And “Lowest Role To Edit Per-Item Notification Settings” decides who on your team may change an item’s threshold and recipients, so a shop assistant can update stock without being able to reroute the alerts. The global “Display Indicator and Message” option still highlights low items in red in your dashboard.

One thing to know: the alerts fire when a reservation reduces the quantity. They do not fire when an administrator edits the quantity by hand or when a Ledger entry changes it, so the add-on is built for inventories where stock leaves through your website: rental gear, event equipment, samples, anything customers reserve. It pairs naturally with the Reserve Cart, where one checkout can take several items below their thresholds at once. The documentation covers the settings in detail.

(Note: This add-on requires a licensed copy of the WP Inventory Manager)
Add-On: Stripe

With this add on, you are able to sell your inventory.  There are a couple of caveats, however:

  1. You must have an SSL certificate.  Most good hosting providers issue SSL certificates and can install them for you.
  2. You must have a Stripe.com account.

Add-On: Advanced Search

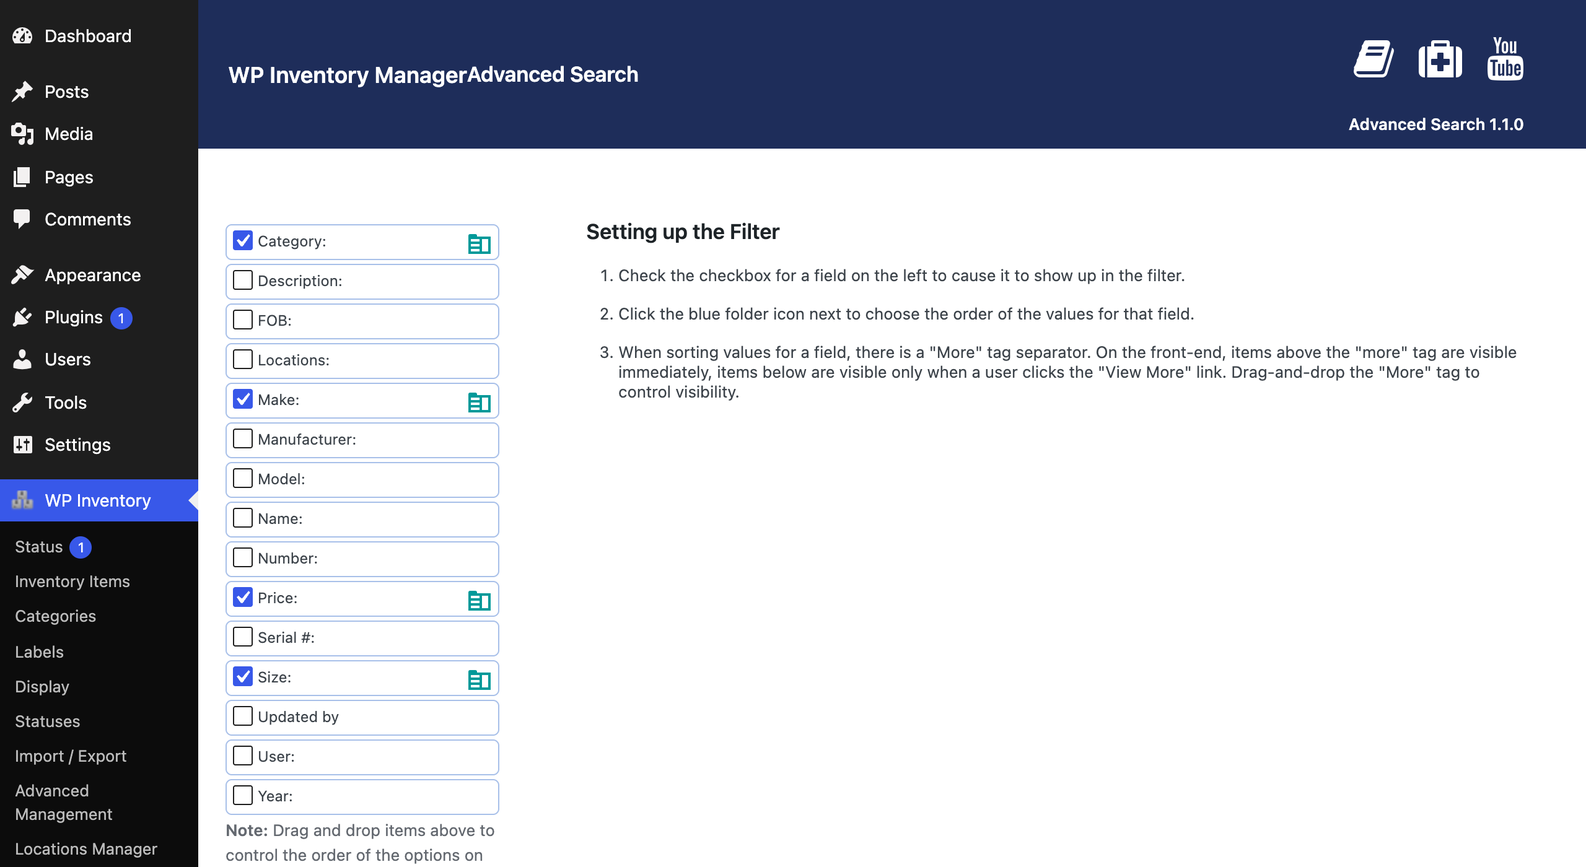
The Advanced Search add-on adds front-end inventory search filters, Amazon style, to WP Inventory Manager. Choose which fields your visitors can filter by, the order of those fields, and how many values to show before a “See More” link. All of this is done with a drag-and-drop interface in your WordPress dashboard, with instructions right on the page.

Choosing which inventory fields become front-end search filters on the Advanced Search admin screen

Inventory search filters where your visitors are

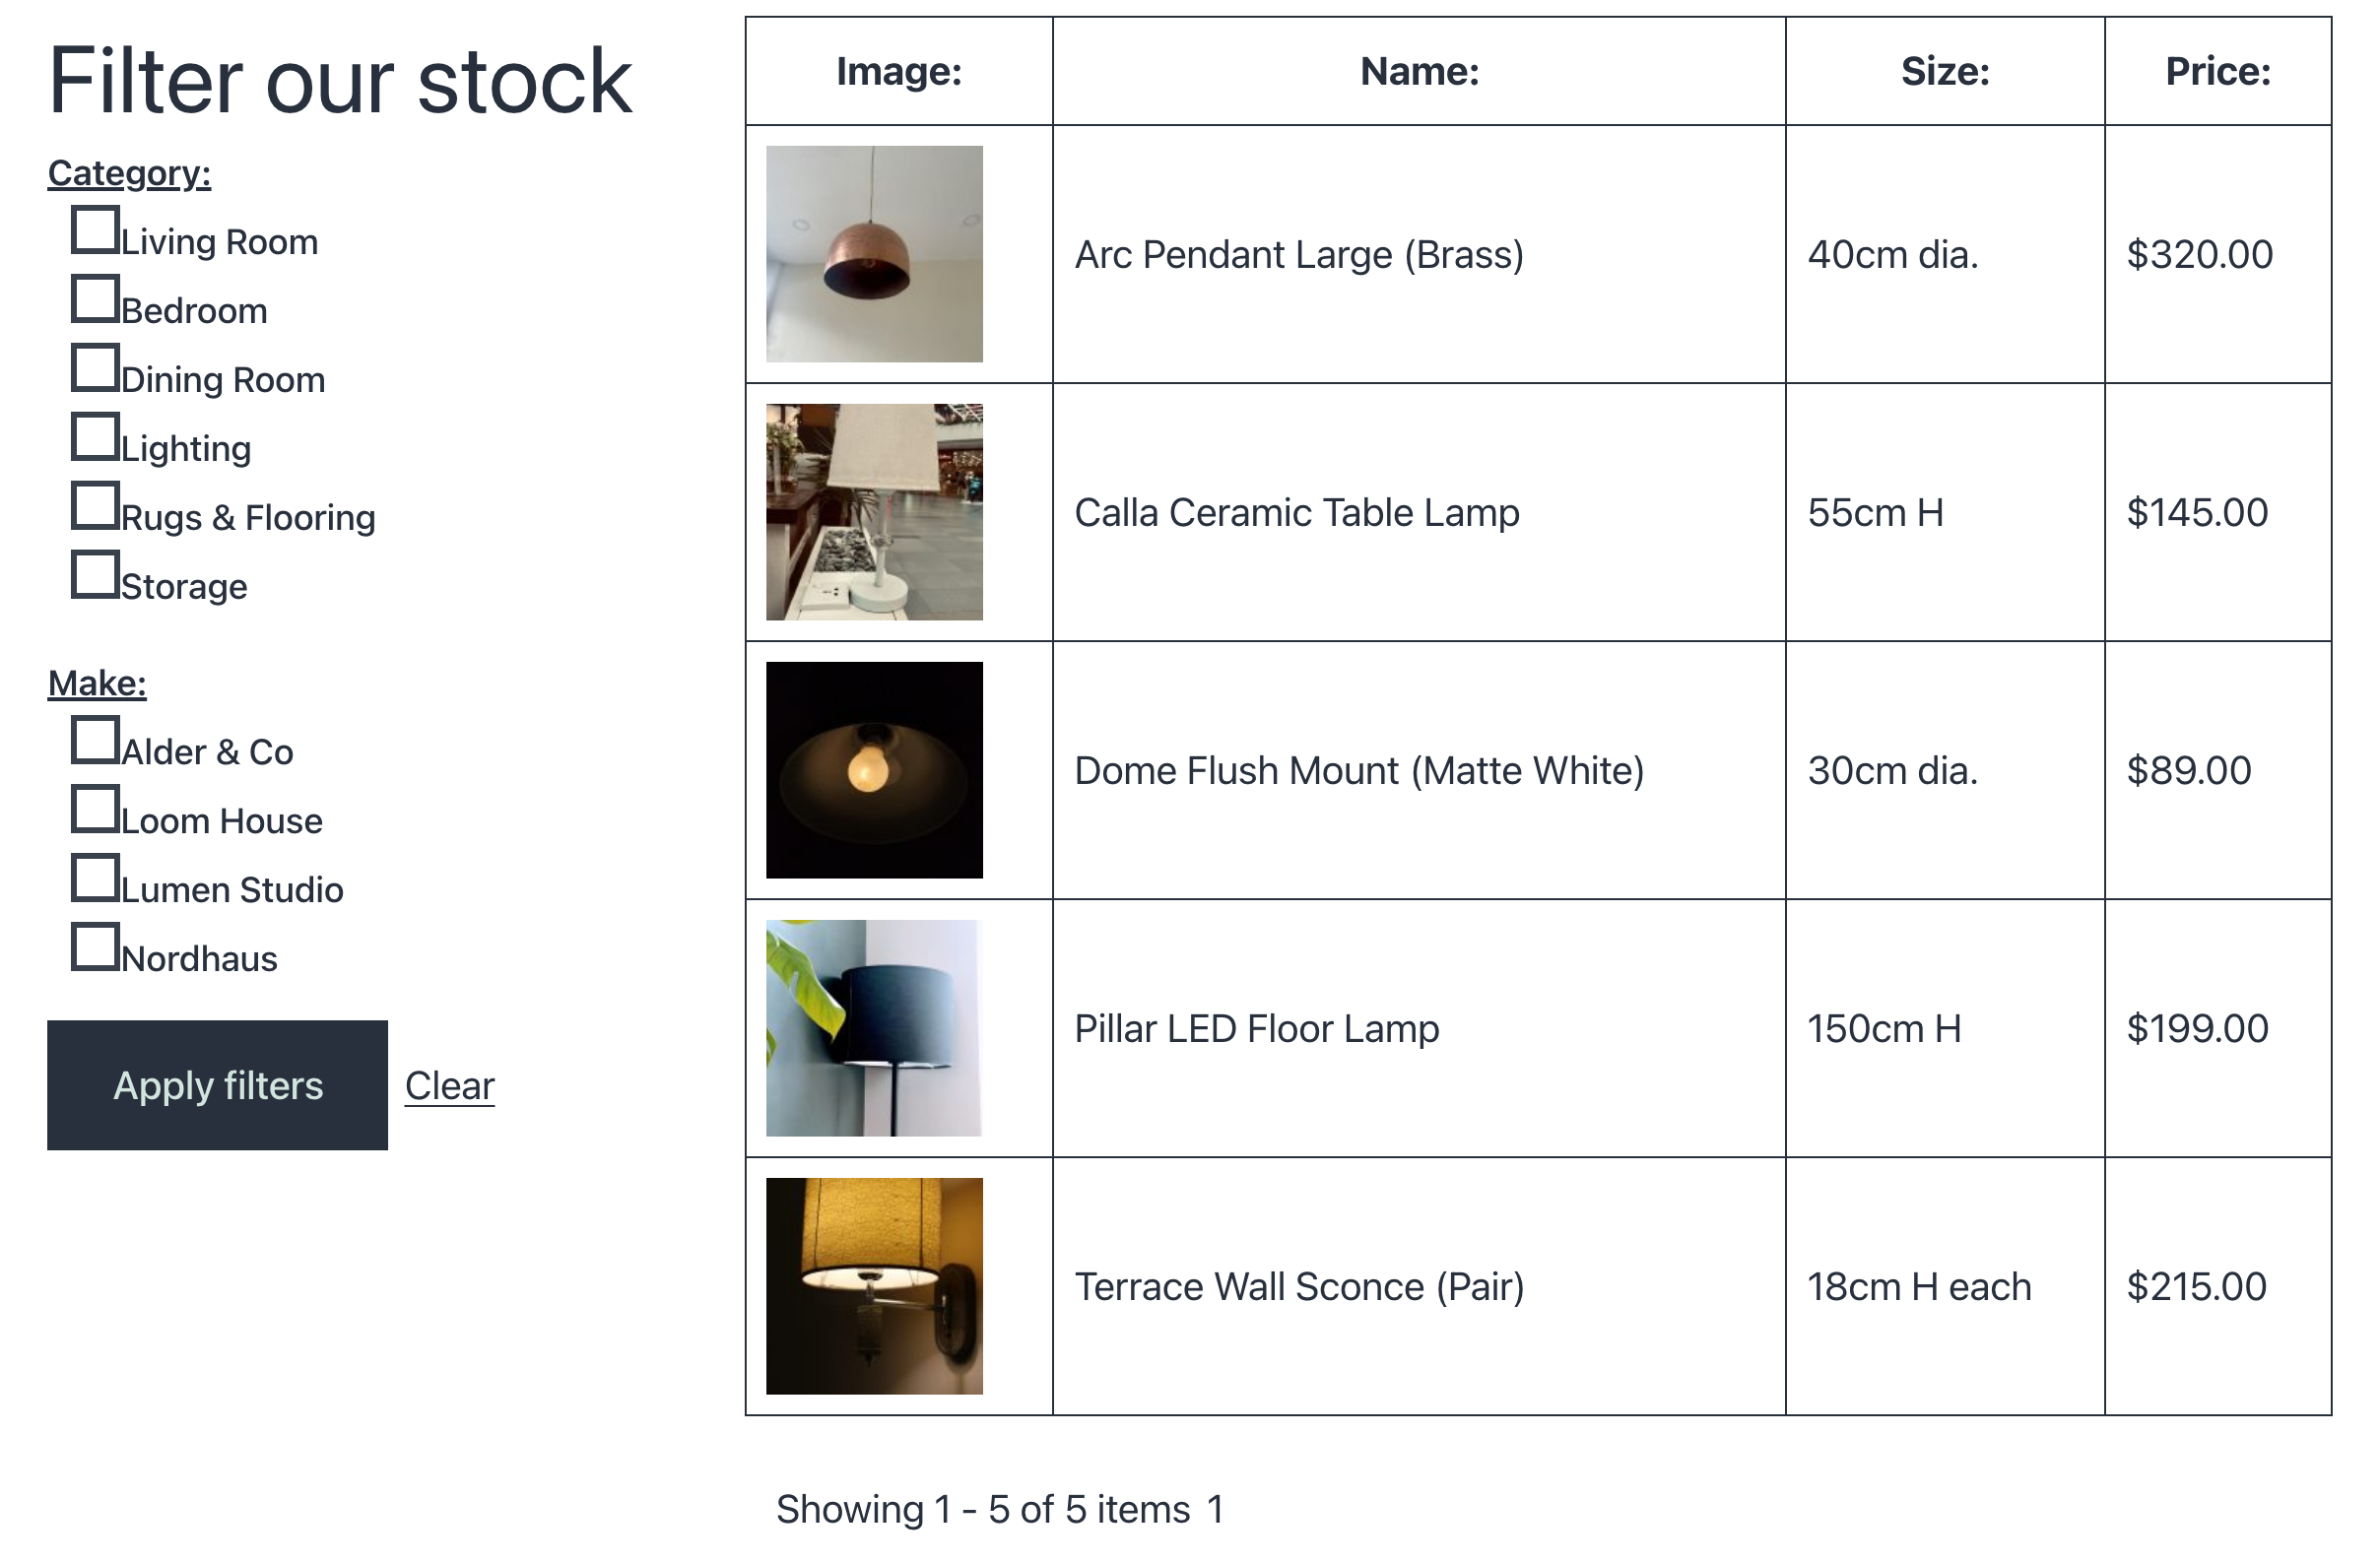
Put the inventory search filters on the front end either through a widget in any sidebar, or anywhere on a page through a shortcode with plenty of parameters to make it fit. Visitors can combine as many filters as you offer, and the available values update as they choose, so they never end up with an empty result. For example, if a visitor ticks the Lighting category and no lamps come from a particular make, that make drops out of the list. Only fields that actually hold values appear as filters, so an unused field never shows up empty.

Inventory search filters for Category and Make beside the inventory listing on the front end

Advanced Search works with the standard inventory fields and, if you use the Advanced Inventory Manager, with the custom fields you define per inventory type: the number of strings on a guitar, the seating of a sofa, the wattage of a lamp. A store with hundreds of items, a rental fleet, a library of props, or a school equipment catalog all get the same quick narrowing that visitors expect from any large shop. Nothing changes in how you manage stock: the filters read the fields and values you already maintain, and a field you stop using disappears from the filter on its own. Setup takes a few minutes; the documentation covers the widget, the shortcode and every option, and there is a short video walkthrough on YouTube.

(Note: This add-on requires a licensed copy of the WP Inventory Manager)
Add-On: Locations Manager

Have more than one store, warehouse, van or storeroom? The Locations Manager is the multi-location inventory add-on for WP Inventory Manager. Create any number of locations, each with its own name and address, and split every item’s quantity across them: eight in the showroom, twelve in the warehouse, two out on the delivery van. The item’s total stays the single number your visitors see, while you keep track of where each unit actually is.

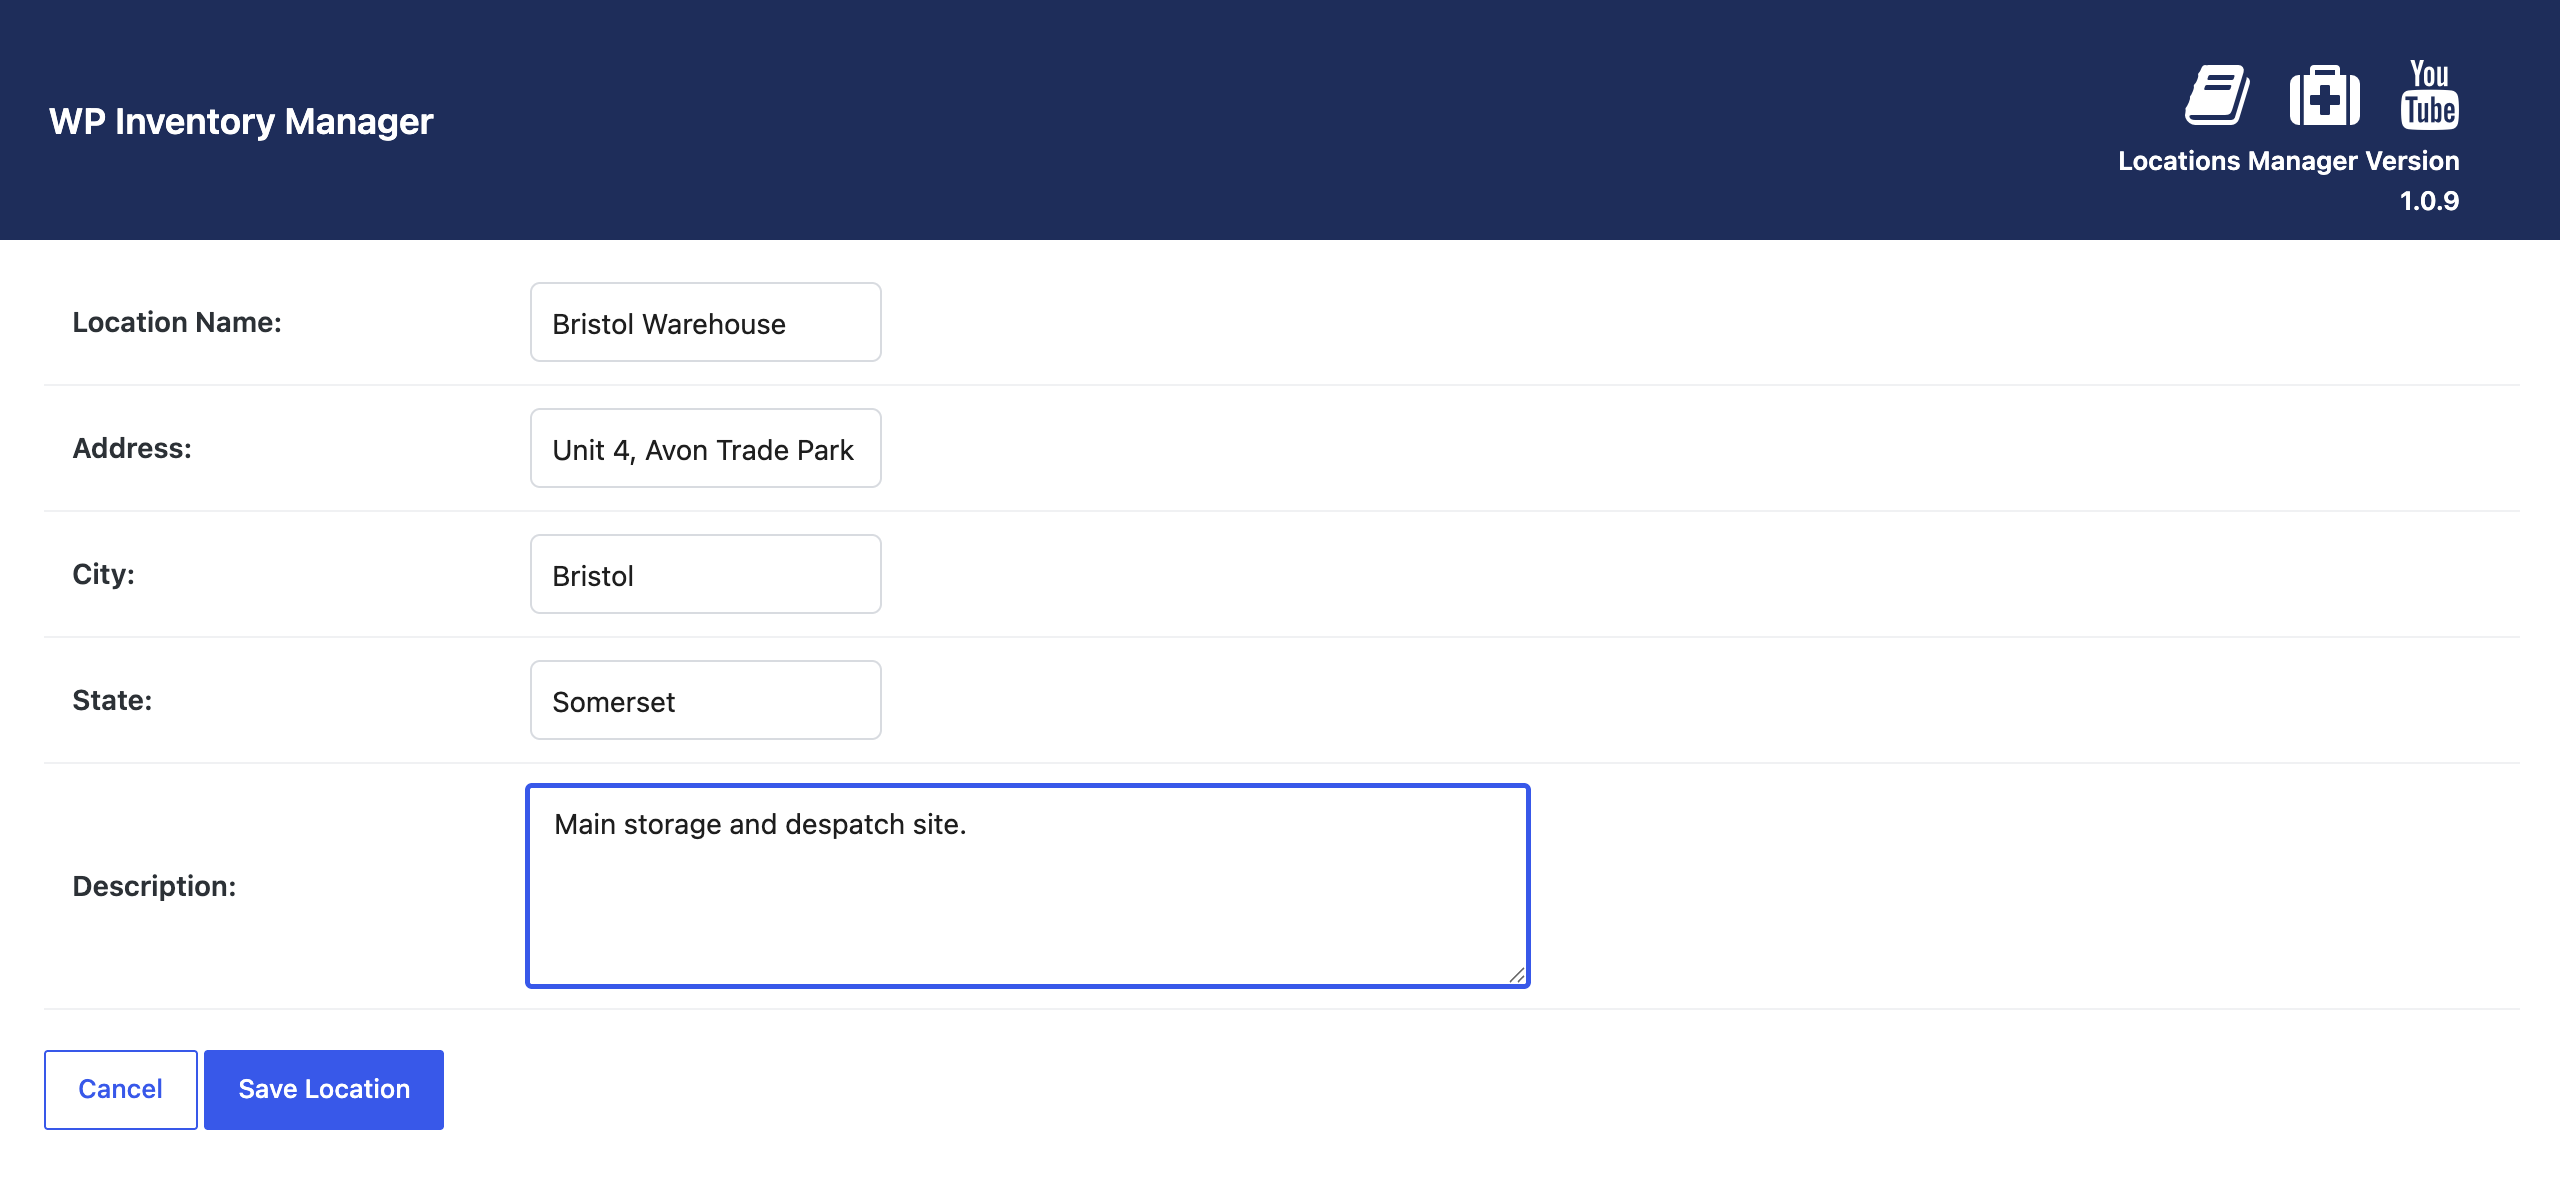
The Add New Location form in the multi-location inventory add-on, with name, address, city, state and description

How the multi-location inventory add-on works

Once your locations exist, every item’s edit form gains an “Assign to Locations” field where you enter the quantity held at each one. Moving stock between locations is a matter of changing two numbers, and an optional check on save confirms that the location quantities add up to the item total, so a typo cannot quietly lose a unit.

The Assign to Locations field on an inventory item, splitting the quantity between two locations

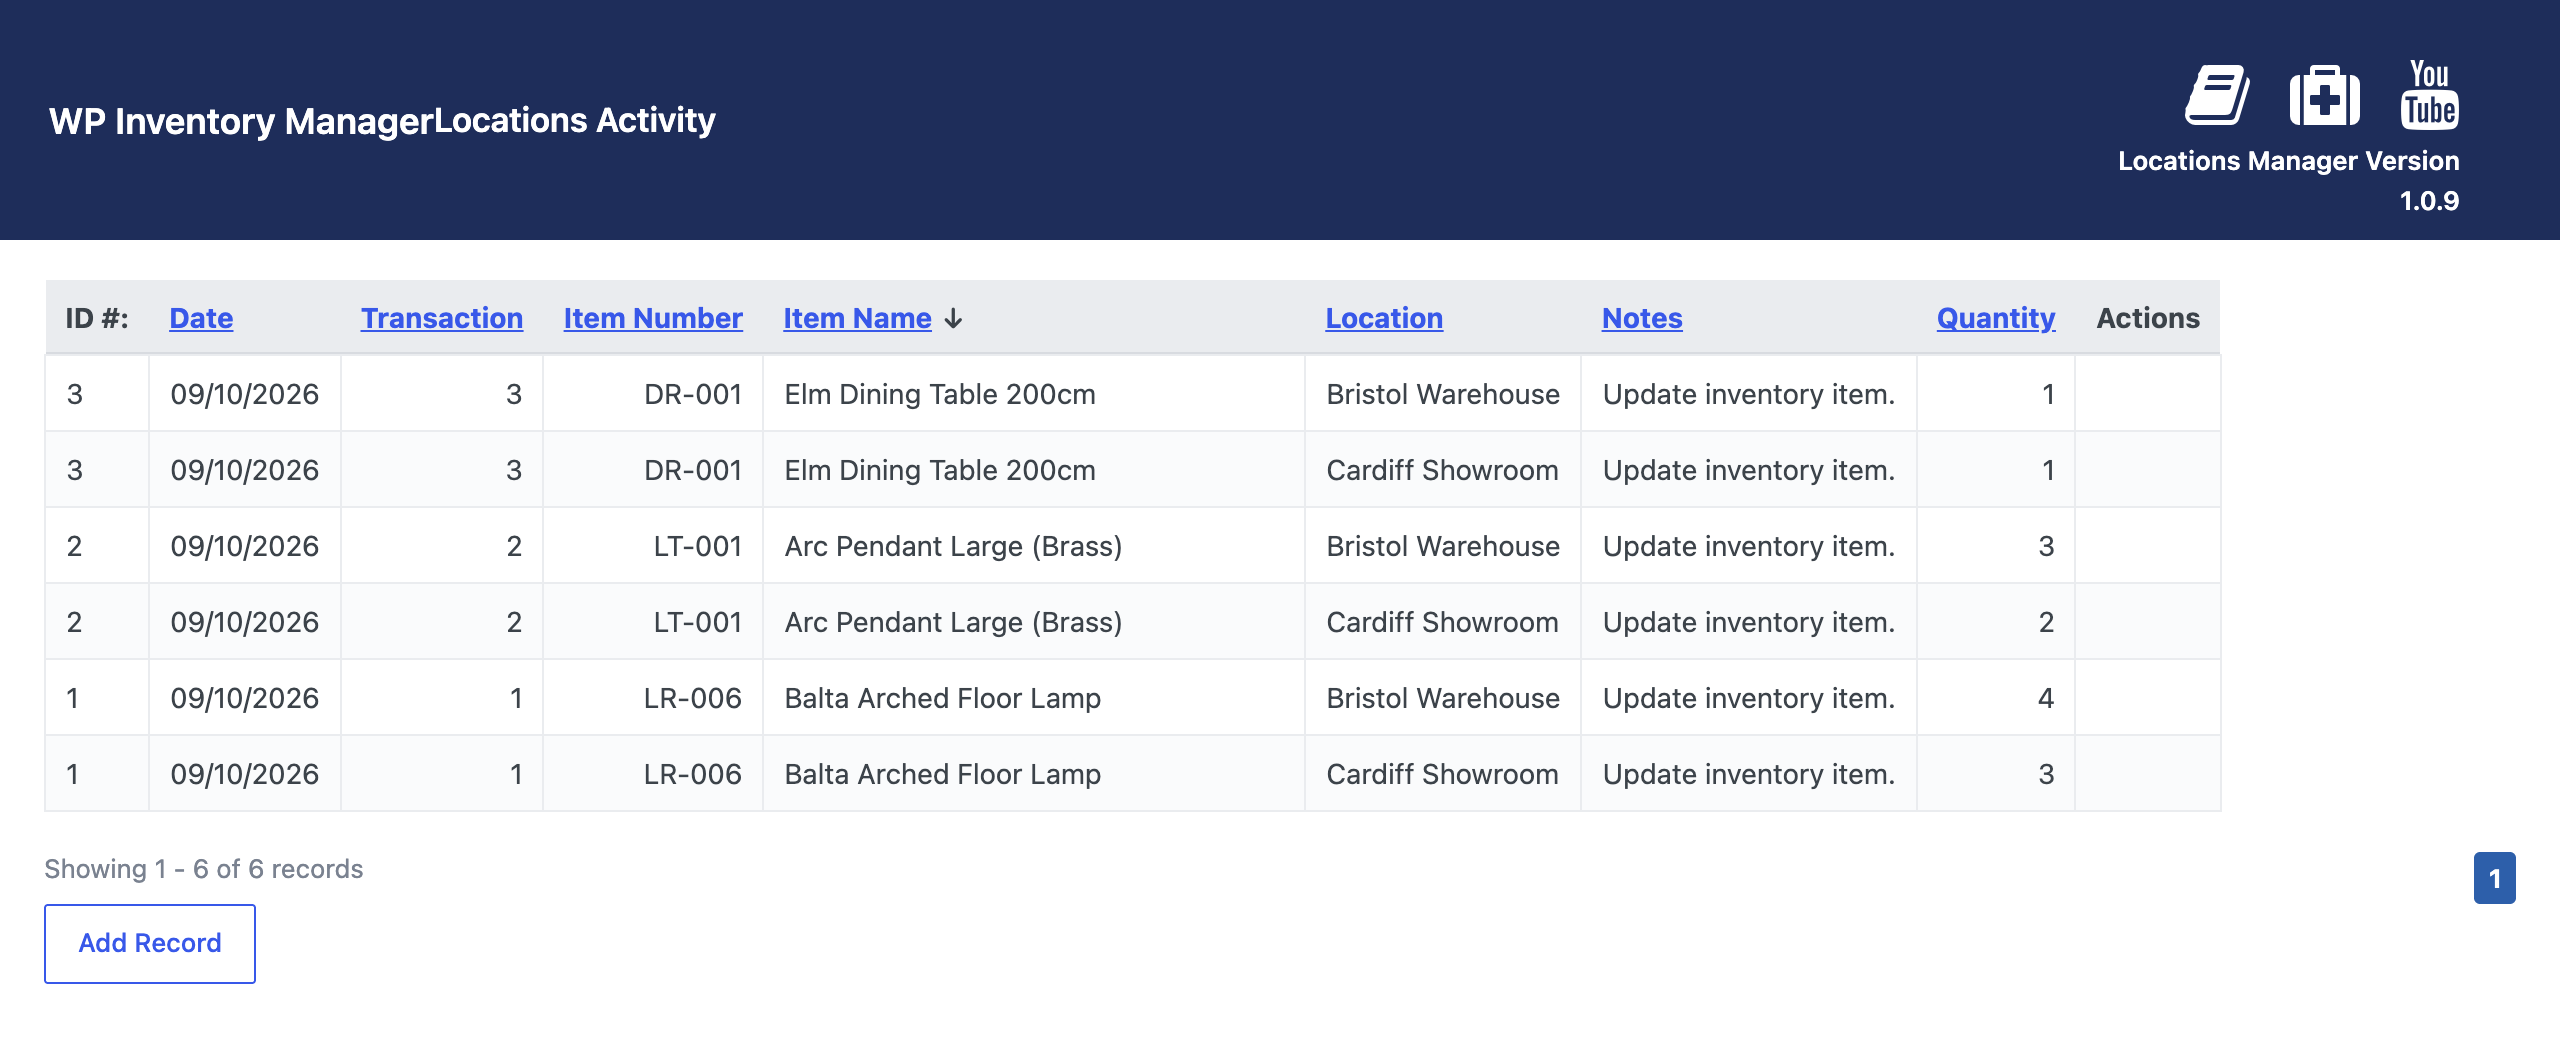
Every change is written to the Location Activity log: which item, which location, how many, when, and by whom. You can add manual entries too, for returns, breakages or a stock count, so the log doubles as a per-location audit trail. When a visitor reserves an item, the add-on takes the quantity from your locations in the priority order you set, moves to the next location when the first is empty, and can name the location in the confirmation email so the customer knows where to collect.

The Location Activity log, listing each quantity change by item, location and date

Locations Manager suits any inventory that lives in more than one place: a retailer with two shops and a stockroom, a rental company with depots, a school with equipment spread across buildings, a charity with several warehouses. It works with the Ledger add-on, so each ledger entry can record the location the stock moved from. For the wider picture, read our guide to multi-location inventory management in WordPress; the documentation covers every setting, and there is a short demo on YouTube.

(Note: This add-on requires a licensed copy of the WP Inventory Manager)
Add-On: Reserve Cart

The Reserve Cart add-on turns WP Inventory Manager’s one-item reservation form into a multi-item reservation cart. Out of the box, a visitor can reserve a single item at a time; with Reserve Cart they add as many items as they like from your listing, adjust quantities, and send one request for all of them. You get a single reservation email listing every item, and your visitor gets a single confirmation.

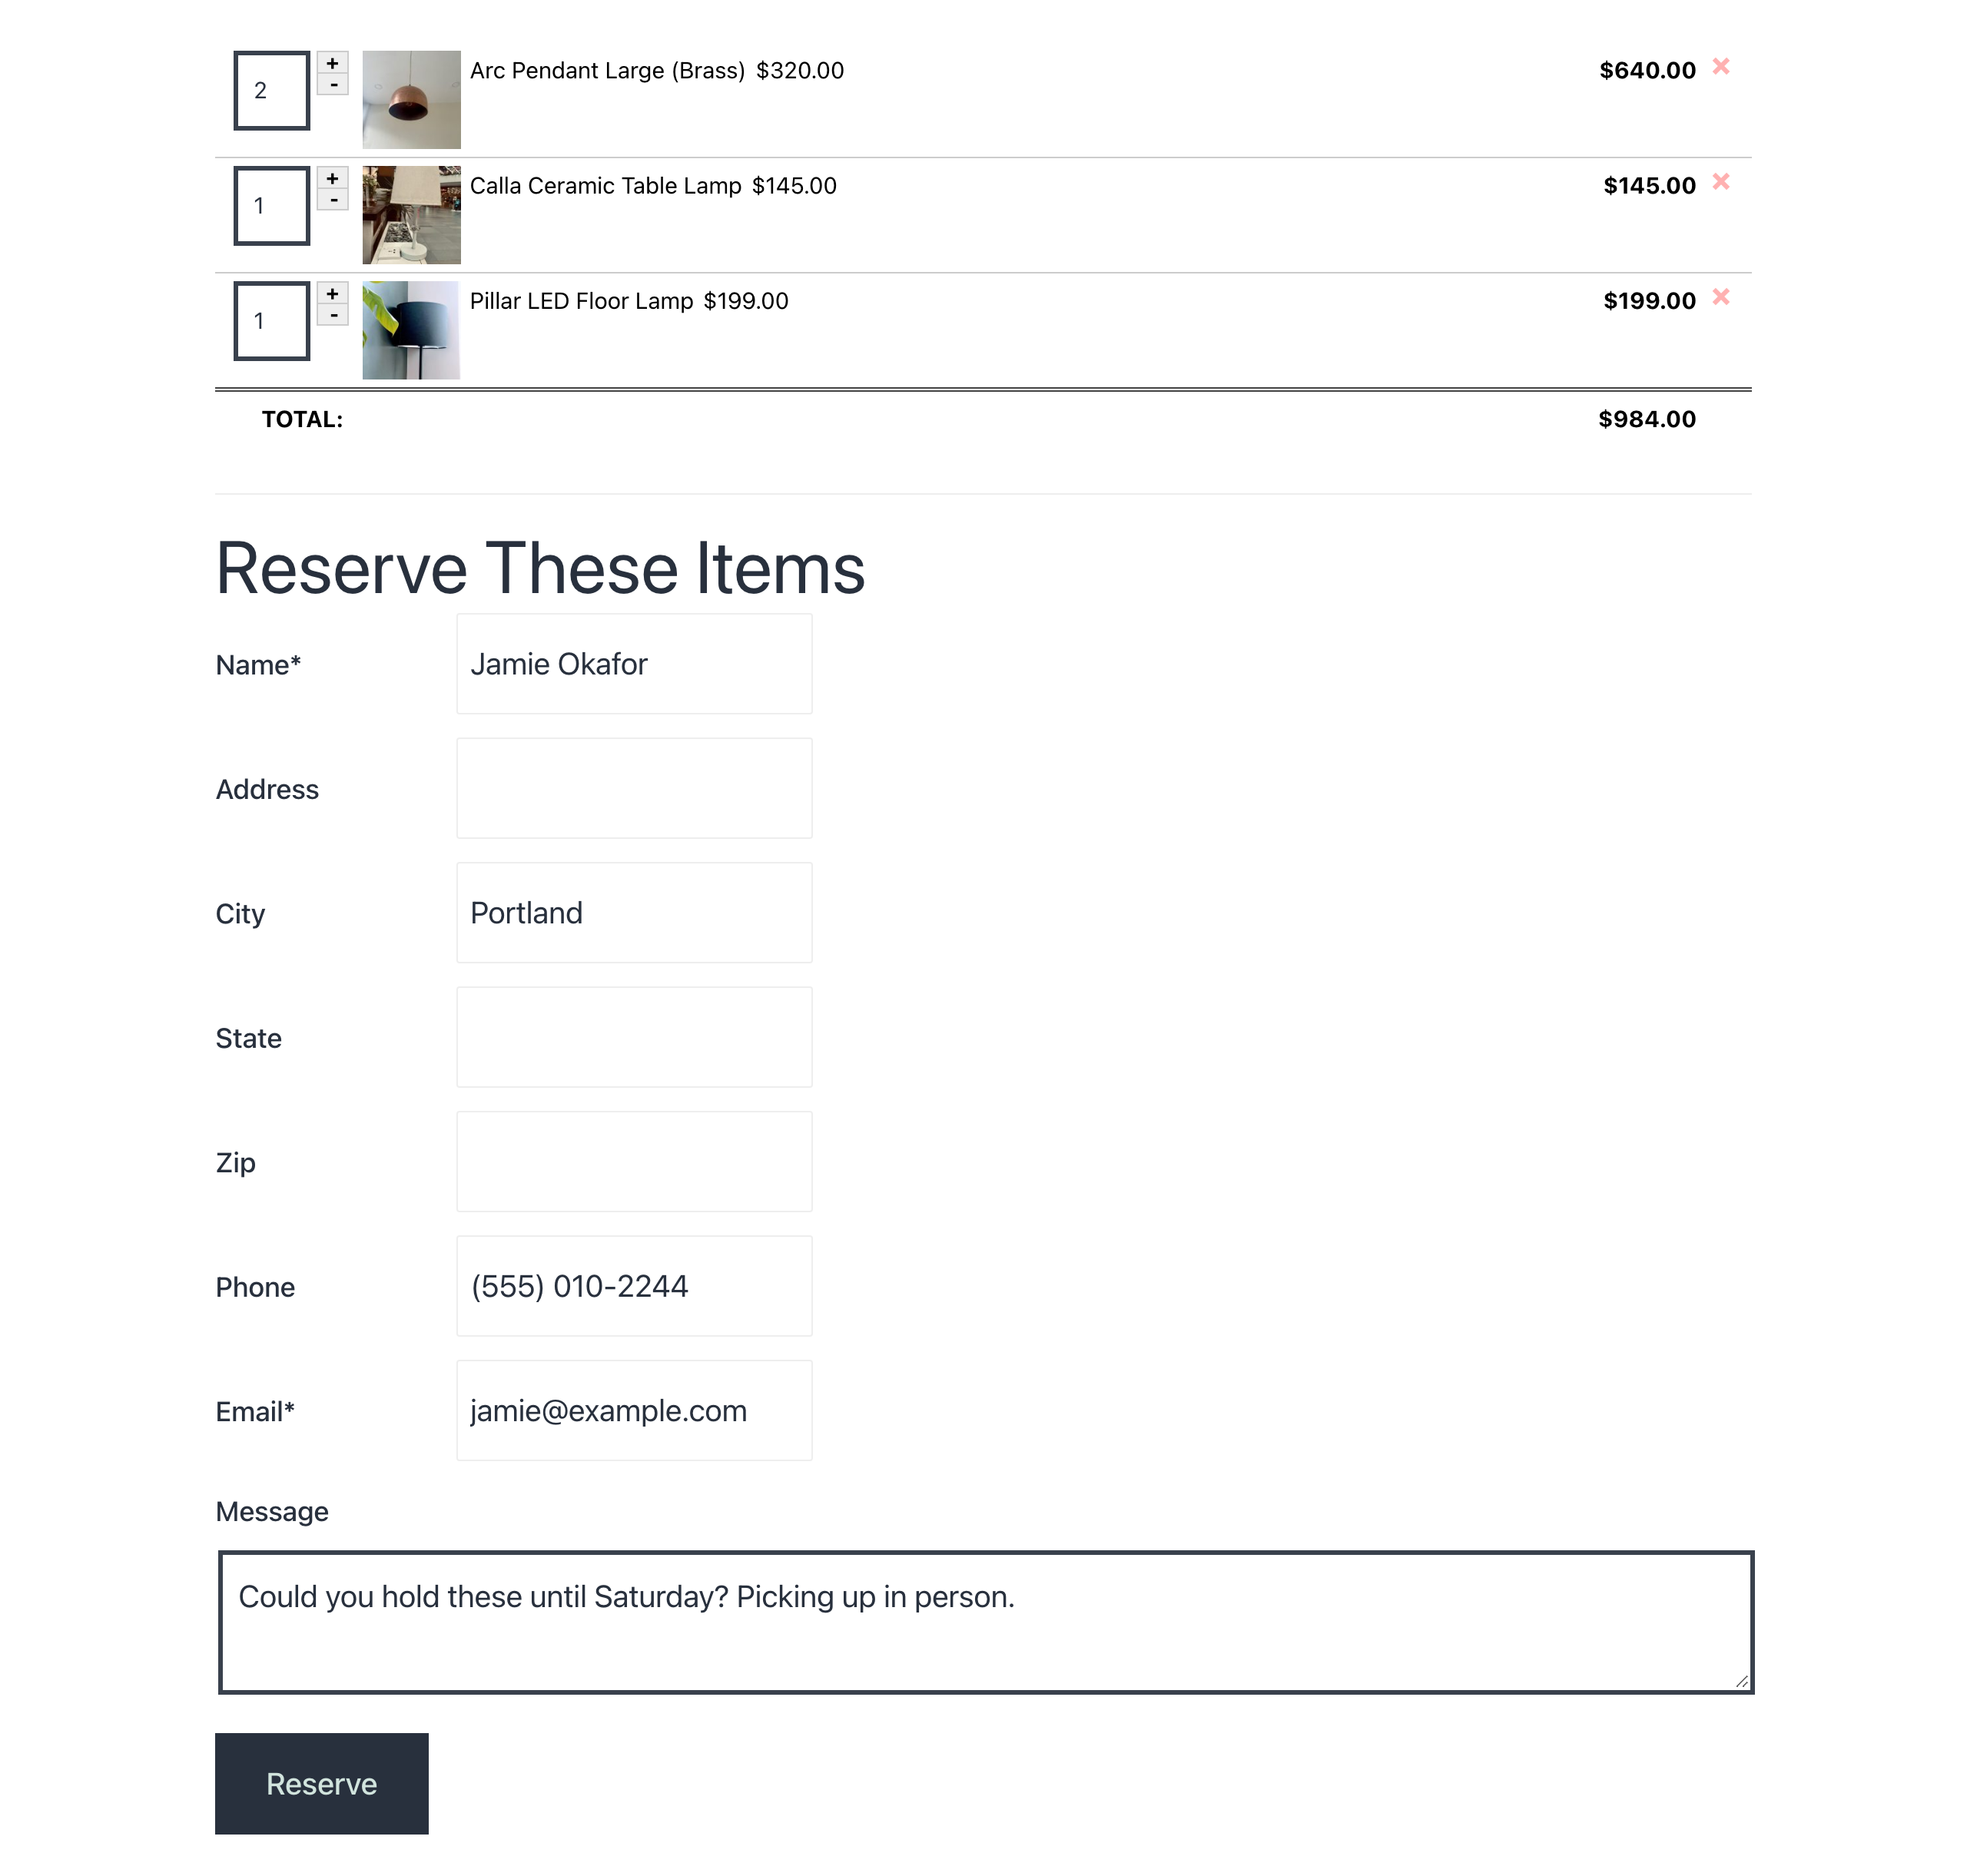
The multi-item reservation cart checkout page, with three items, quantities, a running total and the reservation form

How the multi-item reservation cart works

An “Add to Cart” button appears next to every item in your listing and on each detail page. Two shortcodes do the rest: [wpinventory_cart] shows the current cart anywhere on your site, and [wpinventory_checkout] builds the checkout page, with the cart contents, an optional running total, and the same reservation form you already use, so name, email, phone and message settings carry over. A cart widget is included for sidebars, and the add-to-cart and checkout templates can be overridden in your theme like any other WP Inventory Manager template.

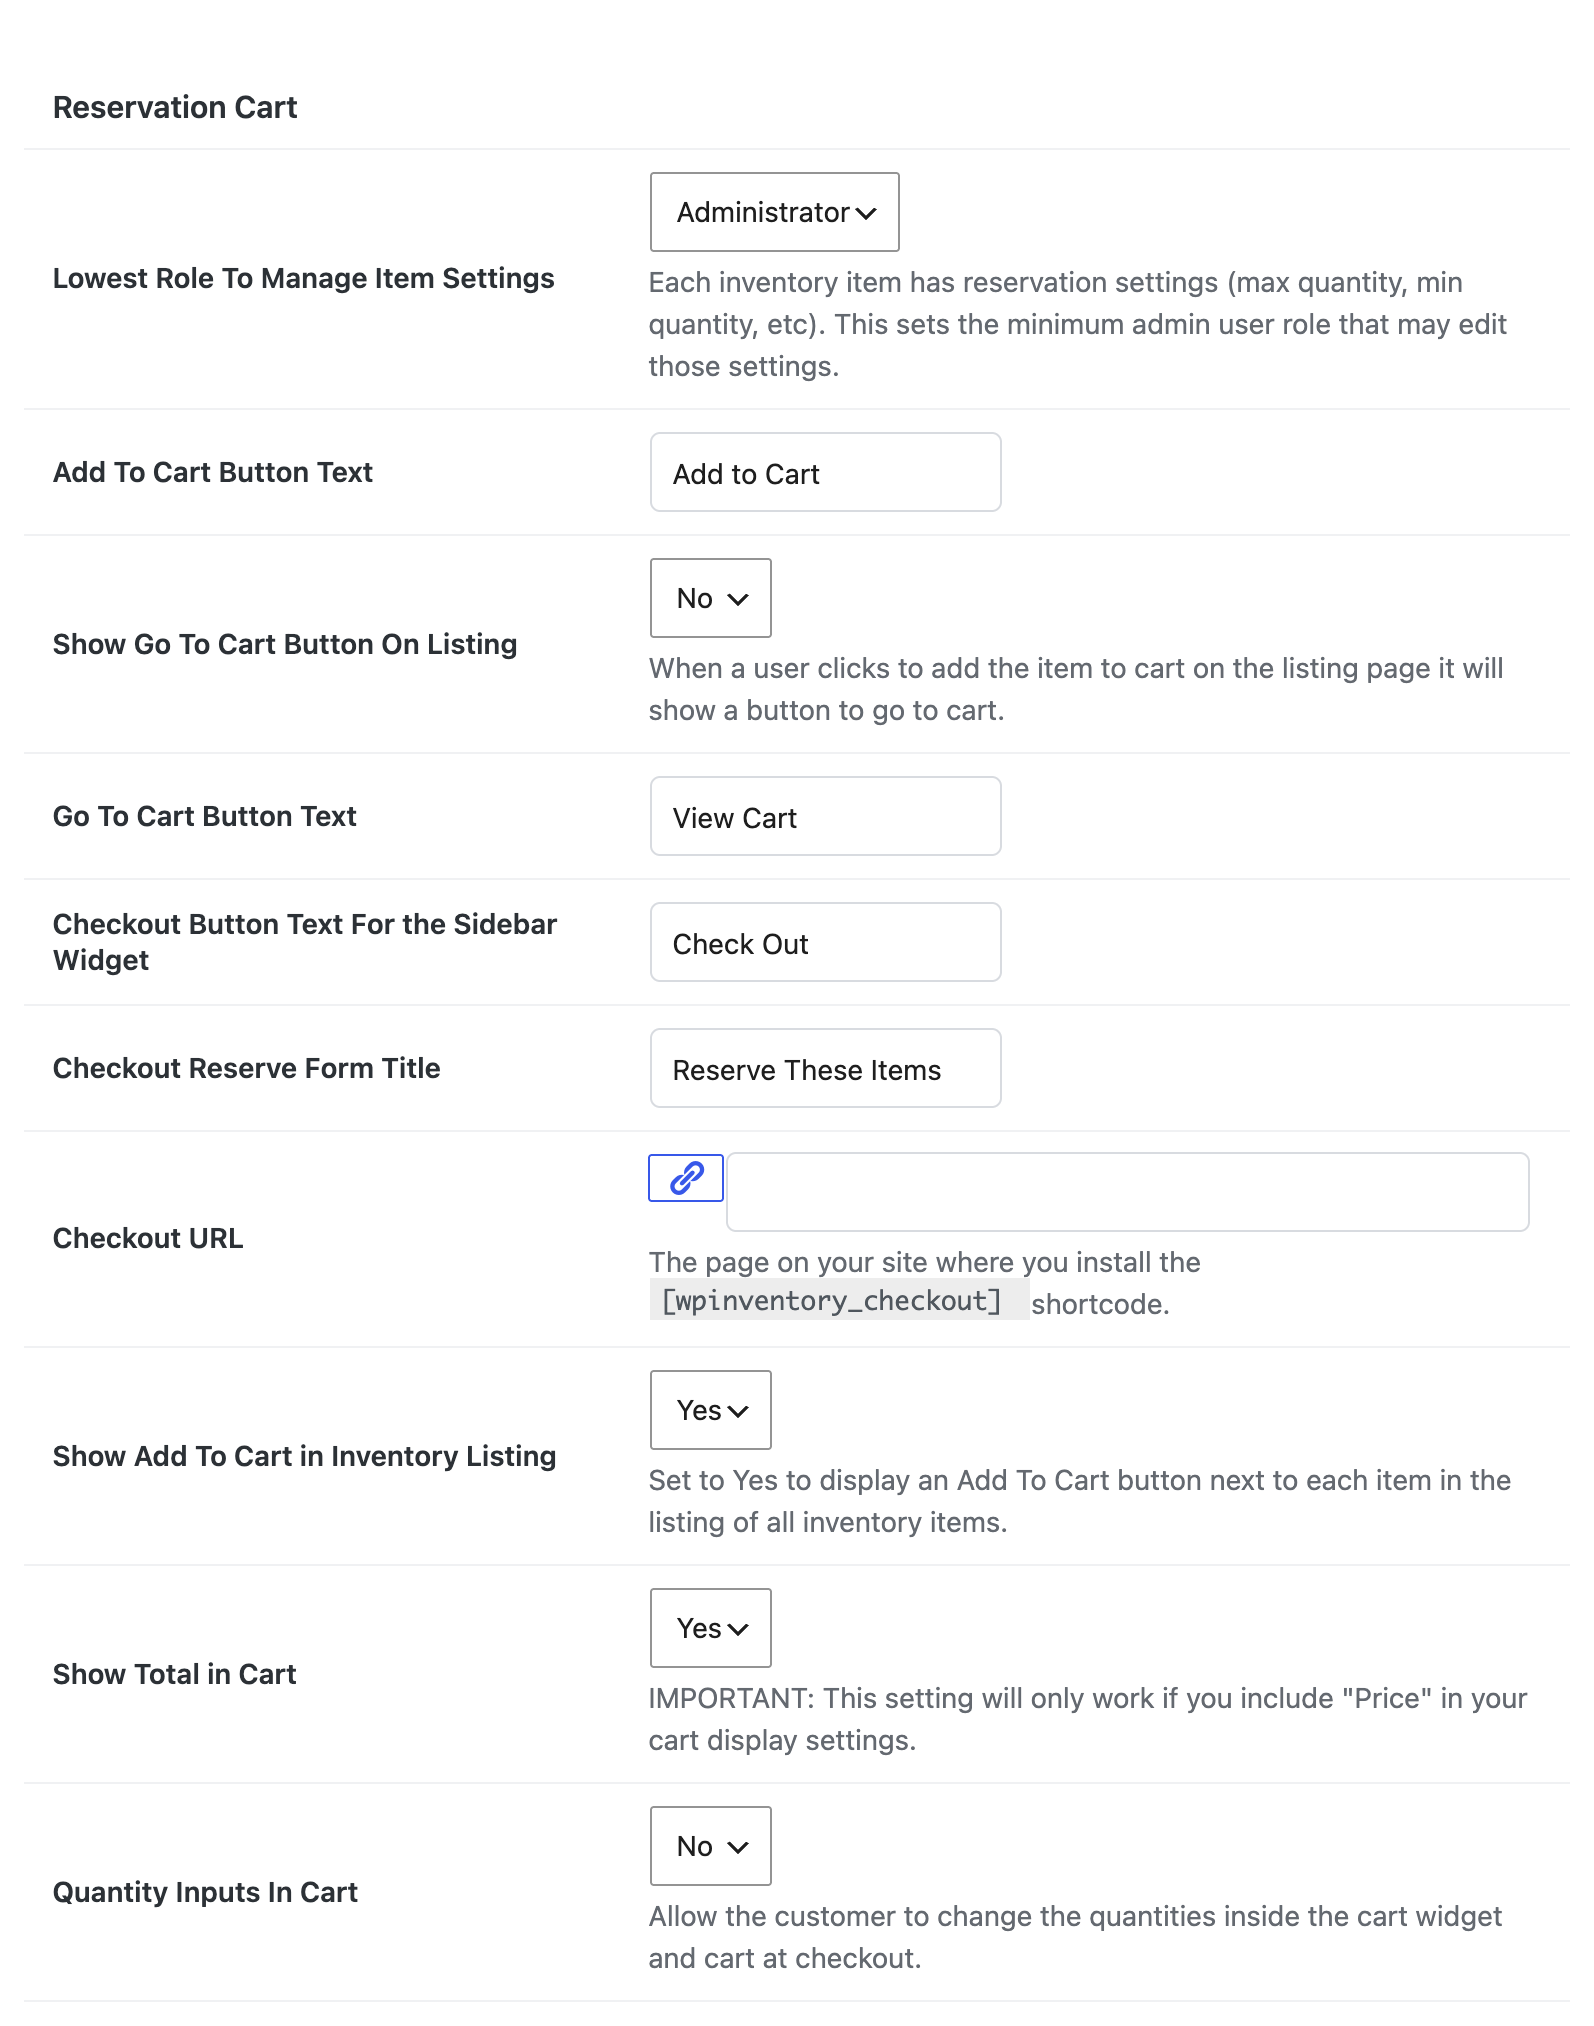
The Reservation Cart settings under the Reserve tab: button labels, checkout page, running total and quantity options

Everything is configured from the Reserve tab in your WP Inventory settings: the button and checkout labels, which page holds the checkout form, whether to show a total, whether visitors can change quantities, and per-item minimum and maximum quantities for stock you need to ration. Reserve Cart is a natural fit for equipment rental, prop and costume libraries, school and church resource rooms, and any catalog where people usually want several things at once. Stock can be reduced automatically when a reservation comes in, exactly as with the standard form, and with the Ledger add-on each reservation is recorded as a ledger entry against every item in the cart. Reservations arrive by email and appear in your dashboard the same way single-item reservations always have, so nothing changes in how you process them. The documentation covers every setting, and there is a short demo on YouTube.

(Note: This add-on requires a licensed copy of the WP Inventory Manager)
Add-On: Advanced Inventory Manager

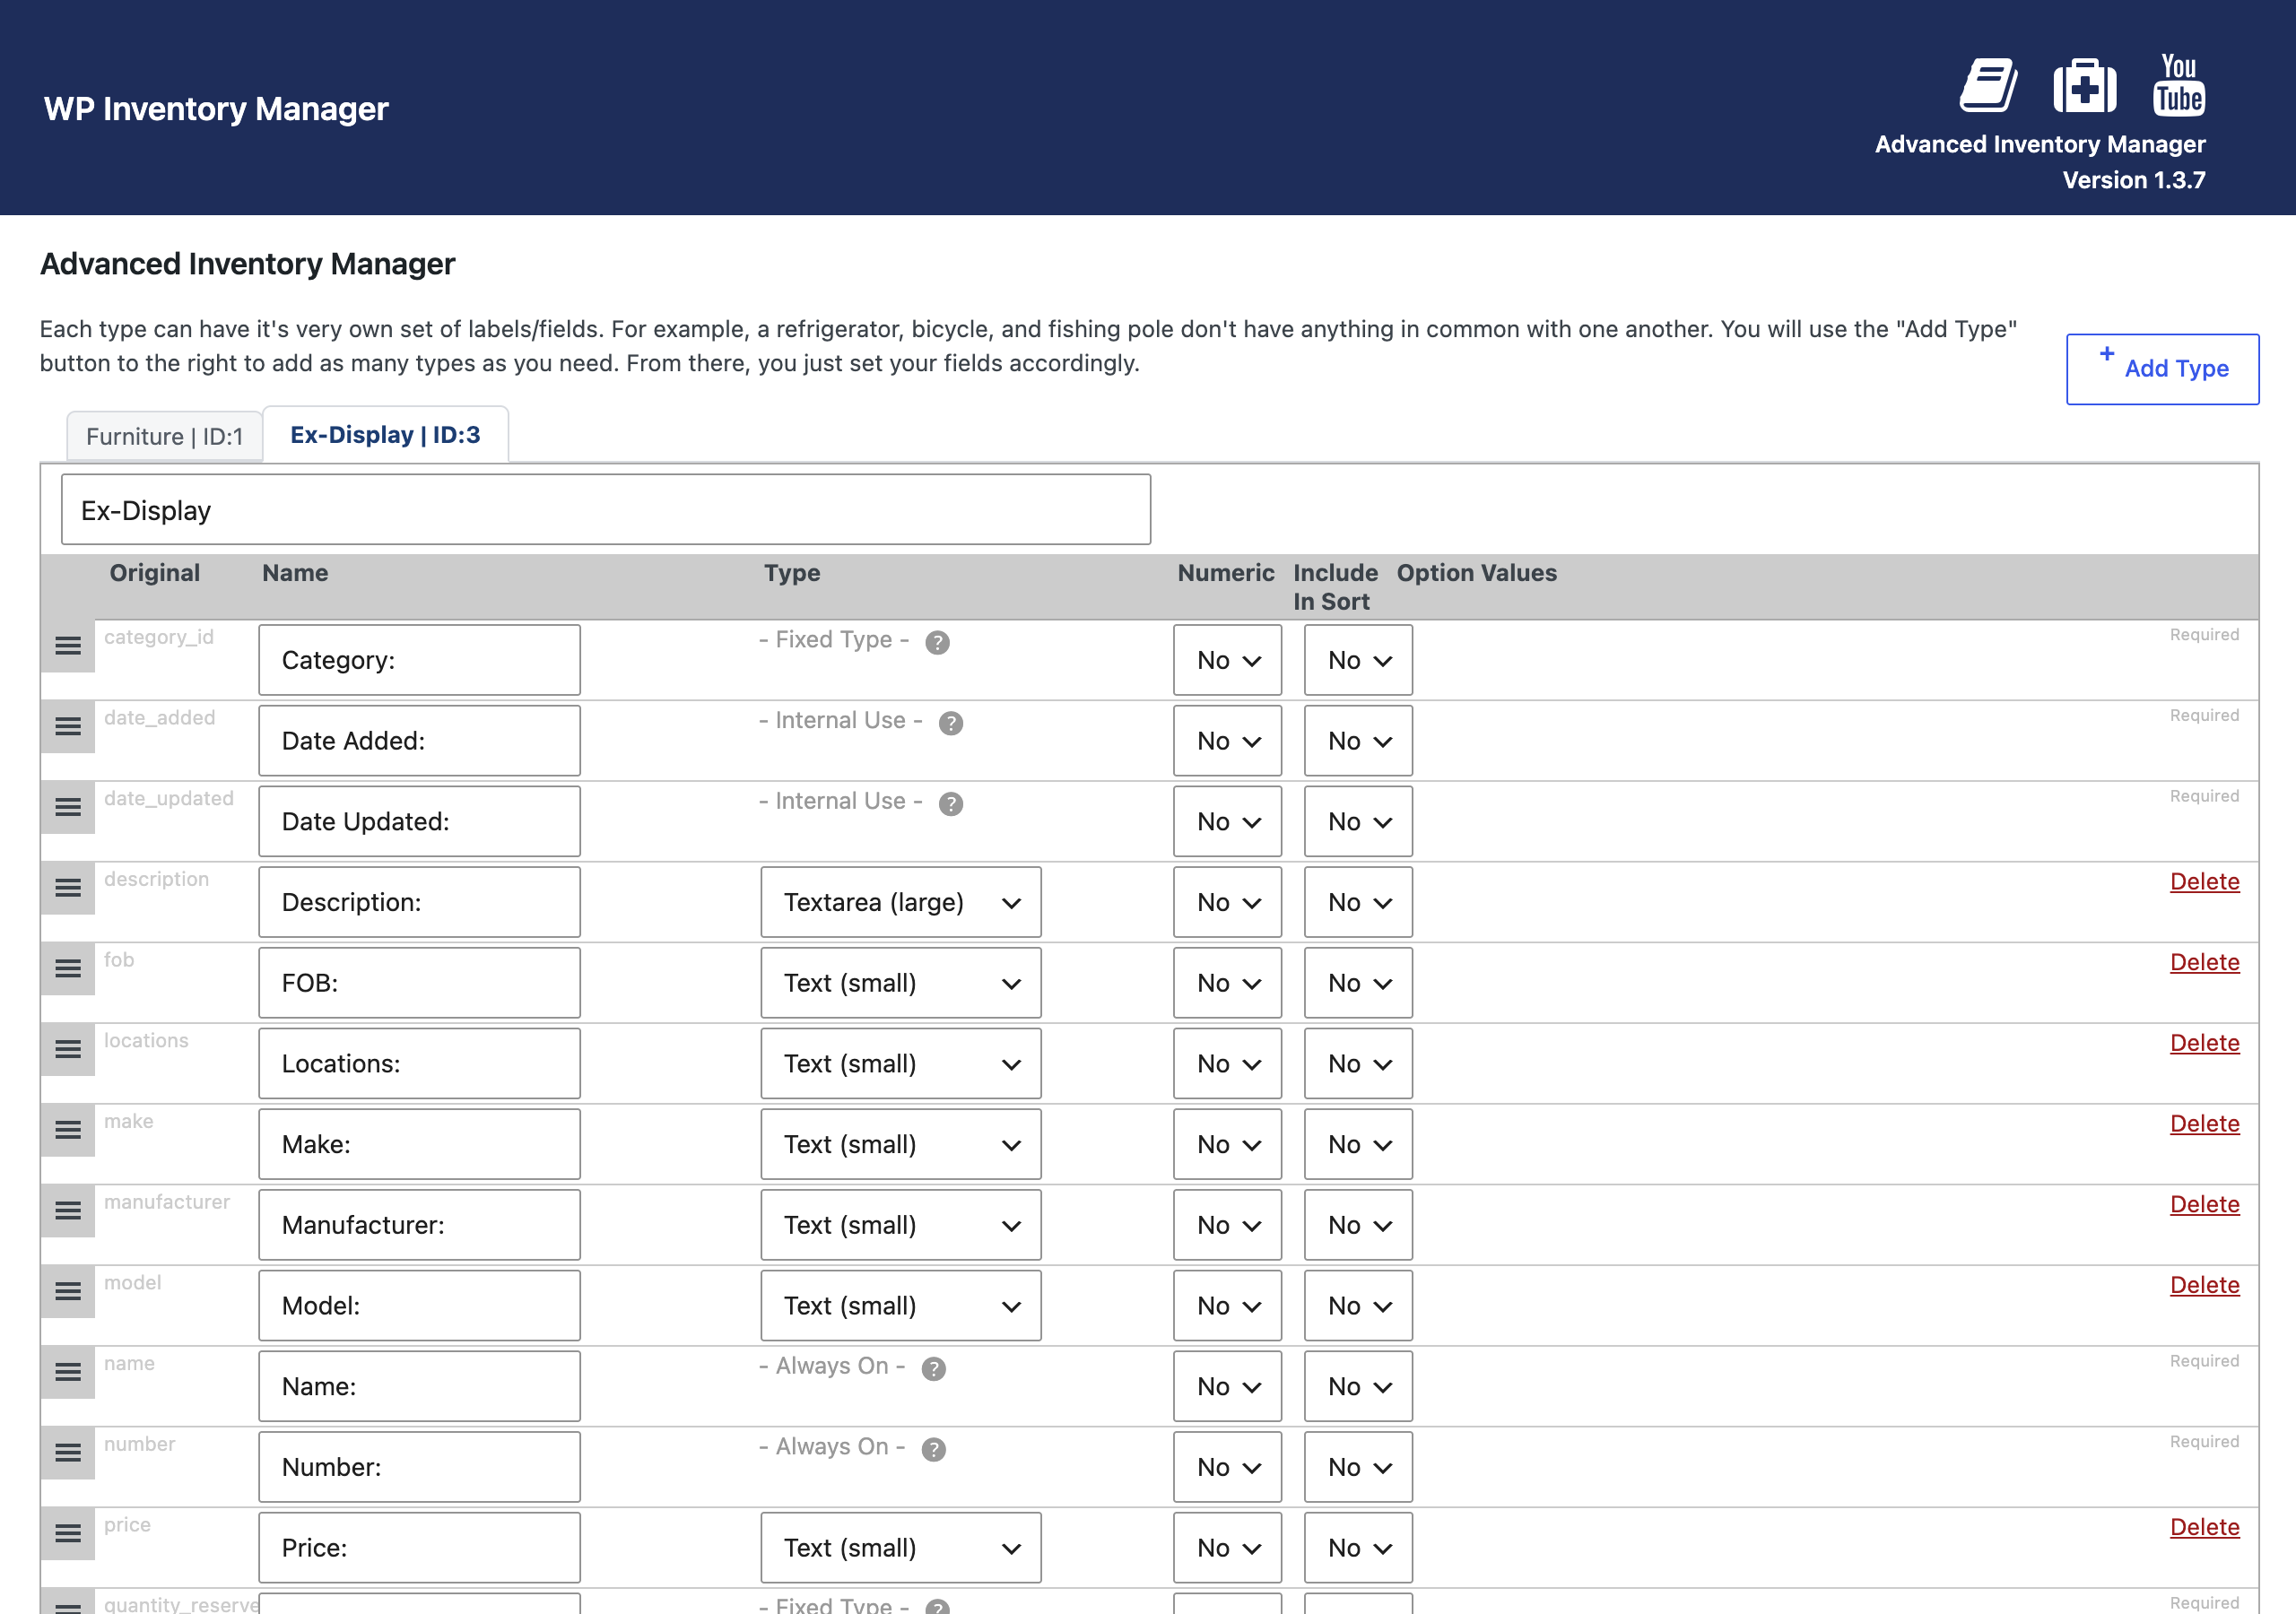
Advanced Inventory Manager adds custom inventory fields to WP Inventory Manager, so each kind of item can carry the information that actually describes it. A dishwasher is much different than a couch: the dishwasher may have fields such as height, width, and various control options, while a couch may have material, designer, and so on. Create as many inventory types as you need, give each one unlimited custom fields, and control the format of those fields (text, dropdown, radio buttons, and more). You can even go a step further and customize which fields display on the front end for each type.

Custom inventory fields for each inventory type in the Advanced Inventory Manager type editor

Custom inventory fields at item creation

Defining a custom inventory type adds a step to the item creation process to ensure you’re entering the correct information. When you add new inventory, you’ll be prompted to select the type for the item before anything else. Then, all of the custom inventory fields you set for that type appear for you to enter, and nothing else. The Manage Inventory Items screen also gains a tab for each type, so a shop with guitars, amplifiers, and accessories can work on one kind of stock at a time.

The Inventory Type selector at the top of the add-item form, shown before any other field

Any inventory with a variety of item types can benefit from the Advanced Inventory Manager add-on: a rental fleet where vehicles and trailers need different details, a school tracking laptops alongside lab equipment, a church with both sound gear and furniture, or a store that sells instruments and lessons. Fields you add through the add-on work with the rest of the plugin, so they can be shown on the front end and, with the Advanced Search add-on, offered to visitors as filters. The documentation walks through creating your first type, or you can watch the demo on YouTube. Upgrade to total control over your inventory today!

(Note: This add-on requires a licensed copy of the WP Inventory Manager)
Watch the Demo:


30-day money-back guarantee

Reviews on WordPress.org

Trusted by 134,000+ businesses since 2013

★★★★★

"Created an online museum for my club. Really impressive plugin. Support was responsive and helpful."

@hackrepair

★★★★★

"Excellent, clean, simple inventory management. Well structured code — use it right away or customize it to your liking."

@techlocally

★★★★★

"We purchased the entire suite. Installation was easy, small issues were fixed immediately, and the guidance during setup was invaluable."

@design4dotcom

★★★★★

"Plugin support was helpful and rapid. Highest mark."

@drgar

★★★★★

"Great support. Very thorough when looking for a solution, and upfront with exactly how to fix it or institute a workaround."

@shoidahl

★★★★★

"I used this plugin and eventually hired the developers for all my WordPress work. Responsive, competent, and clean code. Would recommend to anyone."

@justenhong